Showing posts with label Birthday Card. Show all posts

Wednesday, January 22, 2014

Let's Party - Creating an Easy Banner on a Birthday Card


Okay this card was created using some old Nikki Sivils paper and stickers.  I used the patterned paper also as embellishments here with the help of some baker's twine and a couple trusty circle punches.  I thought the party hats were perfect for making a fun banner - I just needed to add glitter.  All I needed to add texture and bling was Stickles and I was DONE!

Before you dive in and purchase all those fun embellishment stickers, stop and think - could you use some of that lovely patterned paper to create eye-catching focal points to your projects?

And now it's January.  If your hand made card stash is running a little low, it's time to start making more to build it back up!  Stay tuned for more fun cards!  If you haven't already, subscribe to my YouTube channel (Mo K) or to my blog's feed.


I'm currently working on my next class at The Art Studio at Scrapbook News and Review.  If you haven't caught it already, check out my newest classes:


Peace and Love!


Thursday, November 7, 2013

Create a Flower with Ribbon or Other Trim

flower birthday card

I love fluffy texture rich flowers like the one created for the card above.  The fun part is that I created that flower with string and yarn!  Yep!  And here's a fun tutorial to show you guys how I created the flower above!  In this tutorial, I used Glubers but all you really need is a piece of cardstock cut into a circle as the base for your flower.  Just add some high tack glue like craft glue, Tombow Mono Multi glue or similar glue to the circle so that you can slowly wind and press your trim into a spiral starting at the center of the flower.  For details, see my tutorial!  Enjoy!


Supplies
Scissors
Glubers or Large Adhesive Dot
Ribbon
Tulle
Yarn


Step One:  Cut about a 2 foot length of tulle, ribbon and yarn.  You can use the yarn to tie together the ends of the braid.  Note: Experiment with different kinds of fabric, twine, and string.


 Step Two:  Braid until you have about an 18 inch length of trim.  Again, use the yarn to tie off the end and snip off the excess trim.  This will be the piece you will wind into a flower.  Note: You may need varying lengths of trim depending on the width and thickness of each trim.  18 inches was just the amount I needed to create this flower.


 Step Three:  Take off the top layer of film from the Gluber and press one end of the braided trim into the center of the glue dot.  Slowly wind the trim into a spiral, using your thumb and fingertips to help flatten the trim as you continue to wind.  Wind until the flower is the size you like or until you’ve reached the edges of the glue dot.

Step Four:  Tuck the end piece under so that it does not show.  Trim away any excess adhesive from the bottom of the flower (if there is any).  Keep your flower on the glue dot until you are ready to use it on a project.


Braided Trim Flower by Maureen Esquillo-Kao Supplies Yarn: EK Success; Adhesive Dot/Gluber: Cosmo Cricket; Other: Ribbon, tulle

If you want more fun and fabulous out-of-the-box ideas, you really need to take my Creating with String Class:  Embellishments available soon.

Until then, you can check out my Creating with String class that focuses on creating backgrounds!


Yes, you read that right. A String of Ideas: Creating with String focuses on using string in your crafty play. You’ll also employ other stash busting items such as baker’s and hemp twine, embroidery thread, yarn and even ribbon as a tool in your artwork and to partner them with different mediums such as ink pads, reinkers, acrylic ink, mists and watercolor for a variety of looks. Spritz, splash, dribble, drizzle, roll and stamp until your heart’s content. 

Get ready to get your hands good and inky with this inspiring class. I’ll show you how to stamp, masks and make impressions with string. I’ll even go over fun ways to store them either very cheap or even free! You’ll learn how to create beautiful backgrounds to incorporate onto your cards, pages, tags, ATCs and even altered items. You can also apply the techniques learned in this class to mixed media projects and art journal pages. 

Everything you’ll learn in A String of Ideas: Creating with String is applicable to multiple disciplines of fun and you’ll see artwork in action as I share and discuss scrapbook pages, cards and tags created specifically for this class.   


The class is presented in video format and accompanied by helpful PDFs to illustrate the ideas and techniques you’ll use over and over again. There are 6 finished projects in this class as well as 27 backgrounds. You'll never look at a piece of string the same way again!


Thursday, July 4, 2013

Lucky Me...When "I" Became "We"

Lucky Me

Hello Fellows!  My goodness, it's been almost a month!  I've been working on my Creating with String class as well as purging all the years of junk from my home.  I'm in the process of organizing everything and that's been such a challenging but rewarding job!

I've also been hard at work painting my patio furniture and plastic planters!  I'll snap a photo and share it soon!

This morning I had some time to edit a video for you all and I'd love to share this very special card I made for my sister's birthday last year.  I remember the day she came home.  I was presented with my very first best friend that day and boy was it an unforgettable occasion in my life!


In the video,  I employ stamping and spray resist techniques using Versamark and Goosebumps spray from Tsukineko.  I also used my fabulous Versacolor cubes and watered them down for a watercolor effect.  This card was so much fun to make!


I hope you all have a wonderful Fourth of July!!!  I am off to some family BBQs!

xoxo,
Mo

Thursday, December 31, 2009

I missed you Sketchy Thursdays!!!!

So....Hubbs got me a BOX...kid you NOT....a WHOLE BOX....of scrappity stuff I had on my 2 Peas Wishlist!!!!  Ummmm....there were TONS of crackle paint, distressed stickles, liquid pearls, distressing ink in lots of colors, and like 5 huge wooden Hero Arts stamps!  Aaaahhhhhh.....I made my wishlist thinking...yeah right, my family won't get me this stuff cuz I've already got A ROOMFULL of scrappin crap!  But Hubbs came through!!!!  And as I usually complain about how much of a TYPICAL MAN he is....this time it WAS TO MY BENEFIT!  "HOW SO?"....you ask?   Well, being the typical guy...especially the guy who does NOT KNOW A THING about scrapping...he was like....holy H*LL...what do I get...as he looked at my mile-long wish list....so what does he do?????  He BOUGHT THE WHOLE DANG WISHLIST!  Ha ha!  I was cracking up!  I was like "oohhh you shouldn't have...it cost too much"...but BOY WAS I GLAD HE DID!

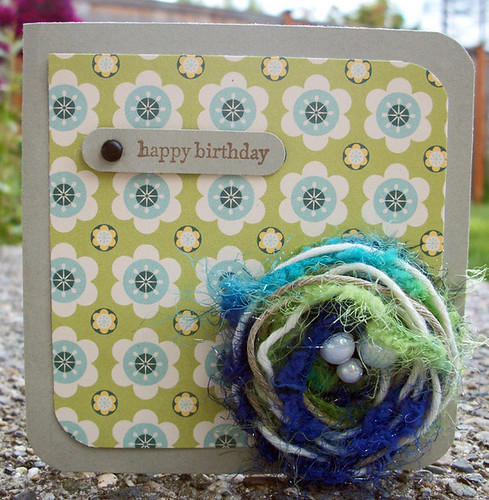
Anyway, on to my share.  I have SERIOUSLY neglected one of my favorite challenge blogs....Sketchy Thursdays because of...well....life...Holiday prepping, present making, house-cleaning...you know!  So....I realized I could still make the "second chance" challenge!!!!  So....I cranked out one of my most favoritest cards EVER!

I don't know WHO will get this...but if I ever part with it....it's going to be a super special person!  He he!


I got to play with LOTS of my new stuff!  Take a look!!!!!


Oh yes...almost forgot to mention...I went scrap digging to come up with the elements of the card!  The only thing I had planned was LOTS of stickles, liquid pearls and distressing ink! 


That there in the center...the backing of some Prima Flower packaging....uh huh....I'm sooooo happy I saved it!  It looks so prettiful!  I used my FAVE distressed stickles in Vintage Photo....LOVE IT!


I added tons of my OTHER favorite stickles....Diamond....it is SOOOOO freaking sparkly....I so WISH you could see the full effect!!!  Sigh.....

So, my escape to my craft room was well-enjoyed.....the kids barged in as I was adding finishing touches.

We are headed over to my Uncle's house to eat dinner and drink champagne and party with my cutey patootey baby cousins and my parents and hopefully my other aunt will be there too.

TOMORROW you will hear my news......I couldn't resist but have hinted at it here on the blog and unless you remember what it usually looks like...you might miss it....

HAPPY NEW YEAR to all!  Have a safe one!  I do hate watching the news New Year morning.....I just pray people are safe....

Hugs,
Mo

Saturday, June 27, 2009

Happy Birthday, Human.

I got my shipment of Stampin' Up! goodies in the mail the other day! Wow! As a Demonstrator, we get to order sets BEFORE THEY ARE ACTUALLY OUT! I also got a couple new hostess sets in the new catalog! The new catty comes out July 1st! Oh, it's sooooooo nummy! And the NEW In Colors are so lusciously bright!

Well, I've been meaning to head over to my friend, Samatha's NEW CHALLENGE BLOG: SP Color Combos! It's called SP Color Combos and every week she has a challenge where you will use certain colors in your projects. Anyway, I saw this weeks colors and...boy did I have a time thinkin' up a design! I don't usually use these colors together...definitely a challenge for me! But, it worked out and most importantly I had fun!

I got to use my NEW set Lots of Bots! This set is too cuteriffic! While I was creating, I kept on saying "Waaaaaaleeeeeee" the whole time! It's so catchy (from the movie Wall-E)! I do a lot of sound effects when I stamp....but that coulda been the Sangria talkin'!


I sooooo tried to make this a boy card, but alas....I love my flower clusters much too much so they snuck in there! I like mixing it up...rough distressed edges, nuts and bolts, flowers and bling! Ha ha! WHAT A COMBO! I think it worked because of the color combo...I mean purple (kinda girly) with brown and green (in very boy shades)!


Hope you likey....HUMANS!

Friday, May 8, 2009

A Mother's Day Card!

Sorry I've been MIA! Lots of stuff going on! Work has been hectic at the Walk-In-Clinic...does that say it all? Just got over some stomachy thing...yeah, fun times! I haven't grown a pig snout yet, so don't worry! Nuff said!

On with the show! Well, I managed to slam out a few projects, thanks to all the wonderful challenges by the Vintage Plum Girls! You guys are awesome! I was able to spend a block of time on sunday May 3rd croppin' the day away at the VP Crop for National Scrapbooking Day (well, day after technically). Anyway, I will be sharing my creations within the next couple of weeks!

For Mother's Day, I created a card to give my wonderful mother! Shhhh, don't tell! This was a fun one!

This challenge was for Beth's "Wild Kingdom" challenge where you use an animal in your creation. As you can see, my card wasn't that wild at all.....pretty peaceful if you ask me! But I love the way the card turned out! What's cool is that you could use it for different occasions! I just stamped a "Happy Mother's Day" greeting inside and ta-dah...a Mother's Day Card!

Make a bunch of these and keep it next to a greeting stamp set, envelopes and a black ink pad. Then, all you have to do is stamp your sentiment and there you are!

How cute is that?
I'm lovin' the ribbon "grass". This card is great for Spring and Summertime giving!

What did I use to make this, you ask????

Here's a list:

Stamps
Best Wishes and More (Item # 111602)

Ink
Basic Black Classic Stampin' Pad
Signo White Gel Pen

Paper/Card Stoc
Kraft
Ballet Blue
Baja Breeze

Accessories
Big Shot by Sizzix
Bigz Top Note
Birds & Blooms: Large Flower, Scallop Circles, and Bird
Old Olive Ribbon
Stampin' Dimensionals
Twine
Stapler
Yellow button brad by Making Memories

Below is a photo of the stamp set I used! This set is pretty handy! Look! It covers the seasons! You even have a heart! It's very versatile and a good buy! (I got it free when I attended the Stampin' Up! Regionals in Seattle!) I've used it LOTS since I got it!

Don't have it? Want it? I can help! You can purchase from me 24/7 from my Stampin' Up! website (maureenkao.stampinup.net)! And they can ship directly to YOU! If you already have a Demonstrator, though, please order from them :) Sorry, United States orders only!


*I did some faux stitching around the edges of the Top Note piece with my Signo Gel Pen (really, you gotta get one).

*I used the gathered ribbon technique to form "grass". Haven't tried this technique yet? It's fun! I learned it from Kristina Werner! Want to see it? I pasted it to an old post, so CLICK HERE and scroll down to find the video.

*I love this set because I don't have to worry about stamping the sentiment on straight!!! I didn't have that nervous feeling, cuz you know it's not meant to be straight!!! No pressure!

Just for fun, I thought I'd mention that the stamp set has a COORDINATING kit! It's the Petal Party Simply Scrappin Kit (Item # 113059). I sooooo want this!


Okay! So, go ahead Make that Mother's Day card TODAY!

Don't have a Big Shot but still want this card? Give me a few days, I'm going to put some up on my Etsy Shop (MoMoStamper): momostamper.etsy.com! Got any ideas for Etsy Shop items? Just ask...and maybe you shall receive! I would love to hear your comments!

Bear with me....I hope to post over the weekend but I have some custom invitations I'm making for a client! This is my first endeavor in custom cardmaking!

I hope to have inspired!

For all the mom's out there, you guys ROCK! From the bottom of my heart,
HAPPY MOTHER'S DAY!!!

P.S. Enter my BLOGOVERSARY GIVEWAY (the post before this one...or click on the photo on the top right hand corner of the blog for info!) GOOD LUCK!

Wednesday, March 11, 2009

A Bird-Day Card

So, if you didn't already know, I'm on a mission to use up my scrap pieces! Tag along with me on this adventure and I will be posting at least every couple of days my new creations!!! Tap in to your stash of tiny, misshapen, and even torn pieces to make something SCRAPPY!

Here's another scrap card I made! It was fun knowing that my pieces of scrap paper were being put to good use. I made this BIRD-DAY card for a friend of mine and I think it turned out nicely :)

I try not to put too much thought into making them....just kinda "go with the flow". I find a pattern that catches my eye and pull colors from it. Sometimes, just looking at the pieces I pull out will tell me which way the card will open. I found this piece that was torn on one side....really scrappy looking!!!!

I tied some twine around the cardstock and then popped this piece up. I can't stop using my
Scallop Edge Punch by Stampin' UP!

I took a box I bought on clearance at the scrap store and decorated it with more scrap pieces of double sided patterned paper. I stock up on items like this box for gift giving. I think I payed about $3 for 3 boxes (2 smaller boxes fit into this one). I used this box to put a set of 10 cards and 10 envelopes in to give as a birthday gift.

I really liked a lot of the patterned papers in this paper pad by Me and My Big Ideas. I bought it at Michael's. I liked a lot of the color combinations they used....not combinations I would normally design with.


CLICK HERE for the Me and My Big Ideas website to check out more designs.

Below is a few close up's. I made another card using the design above and different patterned paper and color combinations. I thought the pattern brought enough color to the card and so I left the image of the bird un-colored. Ha Ha...TRUTH?????? L-A-Z-Y! I glued the top portion of this square piece to the patterned paper section I already had popped up off the card. So this left the bottom half of the square piece hanging off.


Fancy it up with different border punches......I don't have any others (hmmmmm.......I need to get more) so I just left them as strips.....still cute!
Hee Hee.....it says happy BIRD day.....can't stop giggling. Check out the rest of this set.....my fave is "I STINK you're sweet!" hehehehehehe. This set is called PUN FUN by Stampin' Up! I LOVE IT A LATTE! Okay, I'll stop now!


I glued a strip at the bottom inside of the card so that the scallops would stand out! This card is perfect to give to a TWEET friend!!!!

Tuesday, November 25, 2008

November Project of the Month: Super Quick Cards

I got this "quick card" idea when I attended a Stampin' Up! event last year. One of the great things about being a Stampin' Up! Demonstrator is being able to attend these events and swap cards with everyone! You leave with such inspiration and excitement!. But I have to apologize because I do not remember who I learned this technique from. It was one of the demonstrator booths at the event (when I do find out, I will post her name).
Supply List
Supplies Stampin' Up! unless otherwise noted

Stamp Sets:
Wanted 109395
Pocket Silhouettes 111672
Boho Backgrounds 111072
Upsy Daisy 111710

Cardstock:
Whisper White 100730

Ink:
Versamark Pad 102283

Accessories:
Sponge Daubers 102892
On Board Essentials 112085
Non-Smear Pastels by The Stencil Collection
*Stampin' Pastels 105542 blend better!

I knew I wanted to make some card packs to give to my friends last year and so I made these cards! It went pretty quick. I think it only took me a couple of hours to make about 80 cards!
I think Birthday and Thank You cards are most popular.

The best way to go about it is to decide how many cards you want in a pack. I think 3 are sufficient to give in a package. Design 3 cards which are simple. It is best to choose solid images which will pick up the color of the chalk.

You stamp your image with a watermark ink or Versamark Pad, then take a sponge dauber and chalk/pastels to rub the color on. The chalk sticks to the Versamark ink!

The stamp image I used here is in between an outlined image and solid image. It worked out well. But when you compare this to the other card with the horse, I actually like the horse image better because it is more solid.

As you can see on the video, I use a chipboard frame to "frame" the image. You could also use the left over negative space from your chipboard packs to use as stencils! Or, you could just not use a stencil and just rub the chalk on (as I did with the next card with the horse)....the effect is still very nice! I did this with the sentiment "friend to friend". I just took my chalk and rubbed it on in a circular motion over the words.


Here you see the horse card which I am so very fond of. I didn't use any stencils for the second card.....just rubbed on the chalk.


Here's a closer look the the horse image. I think the dark and bright colors look very nice against the white cardstock!


Chalk is very forgiving......it doesn't take a lot of know how to use it....you just rub it on!
I think I'll be giving these away again this year :)


I packaged them in medium sized cellophane bags 102757 with the envelopes and tied them with ribbon. You could also use raffia. You could choose to not use a cellophane bag and just tie ribbon around the 3 cards and envelops and it looks just as nice!


Stamp something inside if you wish. You can use dye ink or the same technique with Versamark ink and chalk.

People have told me how these cards have come in handy!
They're very inexpensive to make too!
Thanks for coming by my blog!
Happy Thanksgiving
and
Happy Stamping!
below is the YouTube video on this card


Here are some recommendations of Holiday Stamp Sets fthat would work well for this project:
1) Spotlight on Christmas 111694 p. 33 IBC (Idea Book & Catalog)
2) Season of Joy 110384 p. 34 IBC
3) Holiday Trinkets 111650 p. 35 IBC
4) Two Cool Dudes 111708 p. 41 IBC
5) A Holly, Jolly Christmas 111558 p. 41
6) Shalom Sayings 111686 p. 44 IBC
7) Happy Kwanzaa 111640 p. 45 IBC
8) Best Wishes & More 111602 p. 55 IBC
9) Season of Simple Grace 111778 p. 16 HMC (Holiday Mini Catalog)
Click on the catalogs below to download them!


2008/2009 IDEA BOOK AND CATALOG (IBC)


HOLIDAY MINI CATALOG (HMC)

Thursday, November 20, 2008

KWernerDesign.com Color Inspiration #31


Here we go again! I did find some spare time this week for the Color Inspiration challenge from KWernerDesign.com! It's my little sister's birthday.....so I had a perfect reason to make a card! I've been wanting to use my mini calendar stamp set! The Colors were Elegant Eggplant, Close to Cocoa, Pumpkin Pie, Whisper White, and So Saffron.....here's what I used.....
ALL SUPPLIES USED ARE STAMPIN' UP! UNLESS OTHERWISE NOTED


Supply List:
Stamps Sets
Mark the Date 111097
Full Calendar 111045


Ink:
Pumpkin Pie Classic Stampin' Pad*Elegant Eggplant Classic Stampin' Pad and marker*Close to Cocoa Classic Stampin' Pad

Paper:
Elegant Eggplant*Close to Cocoa*Whisper White*So Saffron*Pumpkin Pie
Accessories:
Pumpkin Pie 1/4" Grosgrain Ribbon
Small Oval Punch 107304
Large Oval Punch 107305
Stampin' Dimensionals
3/16" Corner Rounder Punch 109047
Spiral Clip Word Charm Alphabet "fun" by JoAnn Scrap Essentials


Funny how a lot of cardmakers can't seem to have a card made BEFORE someones birthday! I always find myself trying frantically to make a handmade card last minute! Why can't I just make a whole bunch of them??????? Well, here's a card you can mass produce and keep in a special box! You could pre-make a bunch of them for yourself ...minus the month and numbers, of course. Then, when you are ready to give one away, just stamp the month and write in the dates later!
If you haven't already noticed......I LOVE PUNCHES! Whenever I know I have to make a bunch to swap....I make sure I incorporate lots of punches!!!!!
 

BLOGWEAR