
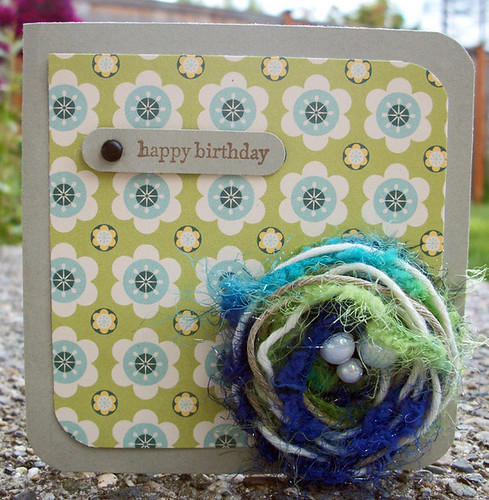
I love fluffy texture rich flowers like the one created for the card above. The fun part is that I created that flower with string and yarn! Yep! And here's a fun tutorial to show you guys how I created the flower above! In this tutorial, I used Glubers but all you really need is a piece of cardstock cut into a circle as the base for your flower. Just add some high tack glue like craft glue, Tombow Mono Multi glue or similar glue to the circle so that you can slowly wind and press your trim into a spiral starting at the center of the flower. For details, see my tutorial! Enjoy!

Supplies
Scissors
Glubers or Large Adhesive Dot
Ribbon
Tulle
Yarn

Step One: Cut about a 2 foot length of tulle, ribbon
and yarn. You can use the yarn to tie
together the ends of the braid. Note:
Experiment with different kinds of fabric, twine, and string.


Step Four: Tuck the end piece under so that it does not
show. Trim away any excess adhesive from
the bottom of the flower (if there is any).
Keep your flower on the glue dot until you are ready to use it on a
project.

Braided Trim Flower
by Maureen Esquillo-Kao Supplies Yarn: EK Success; Adhesive Dot/Gluber: Cosmo
Cricket; Other: Ribbon, tulle
If you want more fun and fabulous out-of-the-box ideas, you really need to take my Creating with String Class: Embellishments available soon.
Until then, you can check out my Creating with String class that focuses on creating backgrounds!

Get ready to get your hands good and inky with this inspiring class. I’ll show you how to stamp, masks and make impressions with string. I’ll even go over fun ways to store them either very cheap or even free! You’ll learn how to create beautiful backgrounds to incorporate onto your cards, pages, tags, ATCs and even altered items. You can also apply the techniques learned in this class to mixed media projects and art journal pages.
Everything you’ll learn in A String of Ideas: Creating with String is applicable to multiple disciplines of fun and you’ll see artwork in action as I share and discuss scrapbook pages, cards and tags created specifically for this class.
The class is presented in video format and accompanied by helpful PDFs to illustrate the ideas and techniques you’ll use over and over again. There are 6 finished projects in this class as well as 27 backgrounds. You'll never look at a piece of string the same way again!

Until then, you can check out my Creating with String class that focuses on creating backgrounds!

Yes, you read that right. A String of Ideas: Creating with String focuses on using string in your crafty play. You’ll also employ other stash busting items such as baker’s and hemp twine, embroidery thread, yarn and even ribbon as a tool in your artwork and to partner them with different mediums such as ink pads, reinkers, acrylic ink, mists and watercolor for a variety of looks. Spritz, splash, dribble, drizzle, roll and stamp until your heart’s content.
Everything you’ll learn in A String of Ideas: Creating with String is applicable to multiple disciplines of fun and you’ll see artwork in action as I share and discuss scrapbook pages, cards and tags created specifically for this class.
The class is presented in video format and accompanied by helpful PDFs to illustrate the ideas and techniques you’ll use over and over again. There are 6 finished projects in this class as well as 27 backgrounds. You'll never look at a piece of string the same way again!


Gorgeous!!!! I am LOVING that flower!!!!!
ReplyDelete