Showing posts with label Creating with String. Show all posts

Thursday, November 7, 2013

Create a Flower with Ribbon or Other Trim

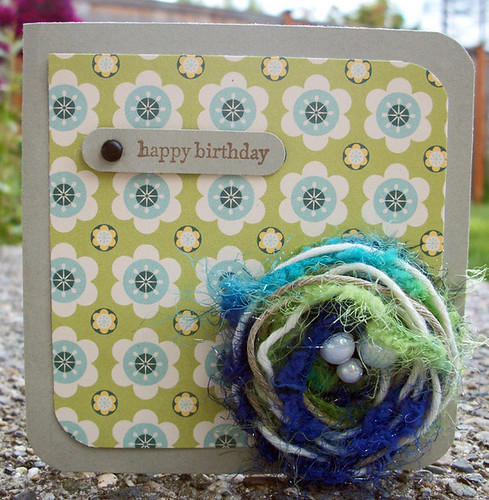
flower birthday card

I love fluffy texture rich flowers like the one created for the card above.  The fun part is that I created that flower with string and yarn!  Yep!  And here's a fun tutorial to show you guys how I created the flower above!  In this tutorial, I used Glubers but all you really need is a piece of cardstock cut into a circle as the base for your flower.  Just add some high tack glue like craft glue, Tombow Mono Multi glue or similar glue to the circle so that you can slowly wind and press your trim into a spiral starting at the center of the flower.  For details, see my tutorial!  Enjoy!


Supplies
Scissors
Glubers or Large Adhesive Dot
Ribbon
Tulle
Yarn


Step One:  Cut about a 2 foot length of tulle, ribbon and yarn.  You can use the yarn to tie together the ends of the braid.  Note: Experiment with different kinds of fabric, twine, and string.


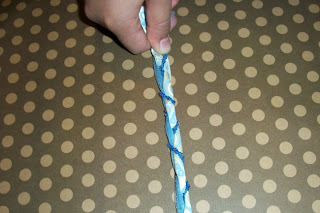
 Step Two:  Braid until you have about an 18 inch length of trim.  Again, use the yarn to tie off the end and snip off the excess trim.  This will be the piece you will wind into a flower.  Note: You may need varying lengths of trim depending on the width and thickness of each trim.  18 inches was just the amount I needed to create this flower.


 Step Three:  Take off the top layer of film from the Gluber and press one end of the braided trim into the center of the glue dot.  Slowly wind the trim into a spiral, using your thumb and fingertips to help flatten the trim as you continue to wind.  Wind until the flower is the size you like or until you’ve reached the edges of the glue dot.

Step Four:  Tuck the end piece under so that it does not show.  Trim away any excess adhesive from the bottom of the flower (if there is any).  Keep your flower on the glue dot until you are ready to use it on a project.


Braided Trim Flower by Maureen Esquillo-Kao Supplies Yarn: EK Success; Adhesive Dot/Gluber: Cosmo Cricket; Other: Ribbon, tulle

If you want more fun and fabulous out-of-the-box ideas, you really need to take my Creating with String Class:  Embellishments available soon.

Until then, you can check out my Creating with String class that focuses on creating backgrounds!


Yes, you read that right. A String of Ideas: Creating with String focuses on using string in your crafty play. You’ll also employ other stash busting items such as baker’s and hemp twine, embroidery thread, yarn and even ribbon as a tool in your artwork and to partner them with different mediums such as ink pads, reinkers, acrylic ink, mists and watercolor for a variety of looks. Spritz, splash, dribble, drizzle, roll and stamp until your heart’s content. 

Get ready to get your hands good and inky with this inspiring class. I’ll show you how to stamp, masks and make impressions with string. I’ll even go over fun ways to store them either very cheap or even free! You’ll learn how to create beautiful backgrounds to incorporate onto your cards, pages, tags, ATCs and even altered items. You can also apply the techniques learned in this class to mixed media projects and art journal pages. 

Everything you’ll learn in A String of Ideas: Creating with String is applicable to multiple disciplines of fun and you’ll see artwork in action as I share and discuss scrapbook pages, cards and tags created specifically for this class.   


The class is presented in video format and accompanied by helpful PDFs to illustrate the ideas and techniques you’ll use over and over again. There are 6 finished projects in this class as well as 27 backgrounds. You'll never look at a piece of string the same way again!


Sunday, May 6, 2012

Land Ho!

Hello again!  As predicted, I HAVE been busy with many many things!  I'll share when the time comes!  Let see, the big news will have to wait until at least mid June!  Trust me, it's a fun secret I've been keeping!

I've been also very busy with planning classes for the soon to arrive The Art Studio over at Scrapbook News and Review!  I'm one of the MANY instructors there who will be sharing our fun classes with you!  I'm so excited to have embarked on such a journey!  I'm currently planning new classes, shooting videos, and brainstorming ideas for future classes to offer!


Stay tuned for more info on class start dates!

And I've got some fun projects to share!
 
Land Ho is a layout I had lots of fun with!  I thoroughly enjoyed playing with twine here!  I used stickers to glue my twine loops securely to my layout.  These photos were taken out at a pirate ship playground.  So much fun for kiddie imaginations!


And these next two projects use lots of fun tickets!  Use up your stash to create borders and strips on layouts and cards.  Write on them like journaling cards!

 
On this card, I used a crepe paper strip and a large adhesive circle made by Cosmo Cricket.  All you do is add fabric, strips, or anything you can think of!  They're great when you need to create fun flowers!

 
And of course I have to share some digital fun!  My kids have the cutest cousins EVER!  I created this adorable layout of Hudson/Huddie!  Such an adorable kid!

Well, I hope you've been finding some time for some crafty goodness!  I'll have more fun to share real soon!


Tuesday, April 7, 2009

I Love You Big Time! Weaving Technique Tutorial

Okay! Here's a special treat! If you haven't already heard my ramble about Vintage Plum......here's more info! They sell scrapbooking kits and have an awesome website where you can shoot the breeze with other passionate crafters! There are weekly challenges and contests! Lots of awesome fun! I've met some amazing women with equally amazing talent over at VintagePlum.com! They have recently chosen their first design team! Cutie Patootie Beth P is one of them! And, of course, I was quite flattered when she asked me to do a tutorial on the Vintage Plum blog! I chose to do it in video format, of course!


So, my April Project of the month is a tutorial introducing a weaving technique. The idea came from a scarf I made a few years ago...and I applied it to cardmaking! Basically, you weave in pieces of ripped cardstock strips and yarn and or some ribbon. A card like this would be best given in person rather than mailed since it's too bulky. Or if sending a present in the mail, tuck it in your package or it may be sent back to you!

I will add the video to the end of this post for your viewing pleasure!

I decided to use VP's March 2009 kit called "Hill Country" to make this card! Having this kit available took the guesswork out of coordinating different cardstocks and fibers. I've since subscribed to the monthly kits at VP and I CANNOT WAIT till the April kit is released! Wooohooo!

Here's a close up of the card:

Look at the nummy yummy papers, fibers and buttons! Normally, I wouldn't think to add that cool yellow color to the card, but once again, thanks to the kit, I've been able to use colors I otherwise would not have chosen!

As you can probably see from the photos....it may take a little time to do...but it's soooooo worth it! You might not even want to give it away after you're done!!! Hahaha!
If you want to peek at the kit contents of Hill Country by Vintage Plum, CLICK HERE to go to VintagePlum.com and look at the kits! They consist of products MADE IN THE USA!


AND tune in to Creative Cafe on tonight at Vintage Plum!!! What is Creative Cafe? It will take place at VintagePlum.com every tuesday night at 6 pm CST and includes a live chat with step-by-step instructions and pictures of the project for the evening.

I am working on ANOTHER post and watch for it tomorrow or over the weekend! My project inspiration.....Carrie Bradshaw! That's the only hint you'll get!

Okee Pokey, as promised, here's the April Project of the Month video!  Enjoy!


For more creating with string inspiration click image below:


BLOGWEAR