Showing posts with label Scrapbooking. Show all posts

Sunday, July 19, 2015

Using Circles to Create a Filmstrip and Dimensional Flower - Scrapbooking with Punches and Die-Cuts Lesson 1

Lesson 1: Using Circles to Create a Filmstrip and Dimensional Flower


Supplies:
Alphabet stickers (for title)
Chipboard button and ribbon/twine (or something else to use for a flower center)
Circles punches: 1”, 1.5”, 2.75” (use similar sized punches or use circle templates
Crop-A-Dile which has a 3/16” punch OR standard size hole punch - 0.25”
Filmstrip templates (provided for this class)
Glue stick (recommended) or other adhesive
Hot glue gun (or very strong glue)
Journaling pen
Patterned paper
Pen or pencil
Printer (If you don’t have one, I’ll show you how to create a filmstrip without a printer.)
Ribbon, trim or twine
Scrap paper
Solid card stock in carious colors

If not using filmstrip template (ie: no printer), you will need black cardstock, white
card stock and a standard sized hole punch (see “alternative filmstrip” tutorial)

Doily (optional)
Foam dots/squares (optional)
Journaling sticker (optional)
Heating tool (optional)
Mist (optional)
Vellum (optional)

You can also view this tutorial on YouTube HERE!


Step One: Print out the filmstrip template on 8.5” x 11” white card stock. If NOT using template (you don’t have a printer), refer to the “Alternative Filmstrip” tutorial. Cut out both filmstrips. If needed, cut your photos down to size so that they fit inside the filmstrip. (There will be slight measurement variations depending on your printer so measure the height of the white strip to determine the measurement for your photo’s height to be able to fit inside the filmstrip.) You can leave the filmstrip holes alone or punch them out with either a standard sized hole punch or a Crop-A-Dile. Use the proper filmstrip template that corresponds to the hole punch you are using.
To put together a continuous filmstrip measuring 12” across, you will glue the two pieces so that they overlap in the middle. Add glue to the areas of the two filmstrip pieces that overlap to create a long filmstrip piece. Make sure the holes match up when they overlap. Also, the filmstrip should be slightly longer than 12” (if you’ve punched holes in your filmstrip). You will cut off the excess later. Glue your photos to the strip. Set aside your filmstrip.


Step Two: This step is optional if using a doily. You could also cut out the large circle on one of the templates provided in substitution. Mist your doily with yellow mist (or any mist that coordinates with your layout). Allow to dry or use a heating tool to dry the doily. Once dry, cut it down the middle.


Step Three: To create the dimensional flower, use the 2.75” punch to punch a circle from scrap cardstock. Take a 1.5” punch and punch out six circles from patterned or solid cardstock for use as flower petals. Take a 1.5” circle and place the pen/pencil in the middle. Fold the ends upward so that the circle folds into a taco. This will create a dip in the middle of your circle. Next, position your pen so that it runs perpendicular to the middle fold you just made. Curl the edge of the circle over the pen/pencil and curl the edge under. These steps will add texture to your flower petals. Do this for all six 1.5” circles.


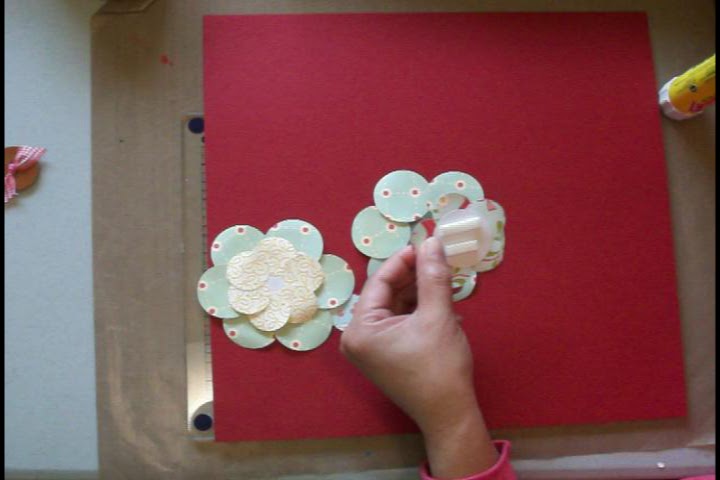
Step Four: Add glue to the middle of the 2.75” circle. Take the 1.5” circles and glue them on the outside edges of the large circle. Make sure the curled edges are positioned outward before gluing them down onto the large circle. Glue the 1.5” all around the large 2.75” circle so that it looks like flower petals. Flip the flower over to assist your in repositioning the petals evenly. Use firm pressure with your fingers to slide the petals so that they are evenly spaced around the large circle. Once you’re happy with the placement of the petals. Press down firmly on the middle of the flower. Set aside.


Step Five: Punch a 1.5” circle from scrap paper. Punch out six 1” circles to use as petals. Add glue to the middle of the 1.5” circle. Add texture to the 1” flower petals with a pen/pencil as explained in Step Four. Glue the flower petals to the 1.5” circle. Re-position petals if needed.


Step Six: Glue the smaller flower to the larger flower you created in Step Four. For added dimension, use adhesive foam. Press firmly around the flower so that all layers are secure. Add a flower center to your dimensional flower. I used a chipboard button and tied a ribbon in the middle of it to create one. If you do not have a pre-made chipboard button, follow instructions below.
To create a faux button/flower center: Punch a 1” circle from some coordinating card stock. Punch two smaller holes in the center with either a standard sized hole punch or a Crop-A-Dile. Tie some twine or ribbon through the holes. Add to the center of the flower you just created.


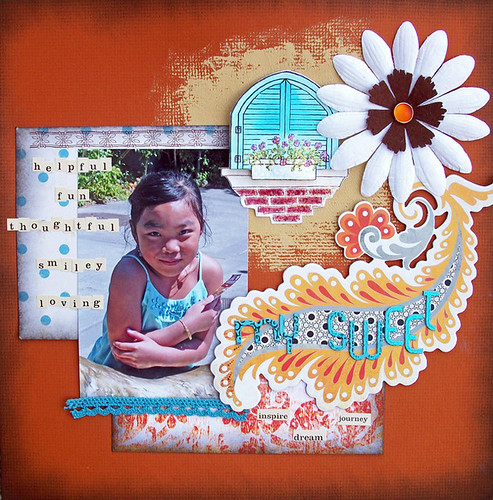
Step Seven: Position the doily pieces as shown in the sketch. Glue them down. Glue down the filmstrip and your photos and trim the overhanging edge if you have one. Glue on the dimensional flower to the top left hand corner of the layout.


All Aboard by Maureen Esquillo-Kao Supplies Cardstock: Recollections; Patterned Paper: Cosmo Cricket; Alphabet Stickers: American Crafts, Jenni Bowlin; Journaling Sticker: Jenni Bowlin; Mist: Maya Road; Circle Punches: EK Success, Fiskars; Other: Chipboard button, ribbon, doily, bingo piece, vellum; Filmstrip Template created by Maureen Esquillo-Kao

Step Eight: Add your title to the top left hand corner, next to the flower. Add journaling to the bottom right hand corner of your layout. You may have a place to journal on in the center of the doily. Add a journaling sticker if more journaling space is needed. Embellish your layout further if you desire. Now it’s complete!


To create a filmstrip photo mat, here's a tutorial:


HERE'S A FREE PRINTABLE TEMPLATE TOO

Enjoy, and thanks for watching!


Wednesday, February 26, 2014

Designing with Die-Cuts - Vellum Heart Background Tutorial


Designing with die-cuts is easier than you may think and fashioning stunning embellishments is much more cost effective than buying them pre-made. Handmade elements also add a personal touch where the love can easily be conveyed in your final masterpiece.
Supplies
Vellum
Die-cut hearts
Patterned paper
Solid colored card stock
Glue/adhesive


Step One: Trim the sheet of vellum to the desired size. I cut this piece down to a 5”x5” square. Arrange the photo, patterned paper and the vellum piece in a design that appeals to you. Do not glue the pieces down yet.


Step Two: Arrange the hearts on the vellum sheet and glue down. I used a glue pen so I could apply the adhesive easily to the small hearts.


Step Three: When you have most of the hearts glued down, glue your photo on top of the vellum piece so that it overlaps.


Step Four: Add the rest of the hearts, overlapping them with the photo on the right hand side.


Step Five: Add the adhesive to only the areas behind the hearts. This way the glue will not show through the vellum. Glue the photo to your card stock  Add a title and embellishments to finish your scrapbook page.


For even more fabulous design ideas, tips and tricks, check out my class called Scrapbooking with Punches and Die-Cuts.


Wednesday, October 9, 2013

Made With Love


Just cranking out some scrapbook pages.  I took an easy approach and cut a few pieces of patterned paper, arranged them on my solid piece of green cardstock along with my photo, and glued them down one I found a good design.  This was done in a matter of minutes.

This one is an old photo of my now 10 year old baby girl (in the photo she was 3).  My how time flies!


Groupings of embellishment complete the layout.  How often do you create using old stuff from your stash?

 xoxo Mo


Monday, October 7, 2013

Crazy Love - Scrapbooking Weddings

Here's another oldie but goodie I found!  I stuck with lots of black and white and splashes of colors like pink and blue.  It made for a beautiful scrapbook page.


I sanded the edges of my photo to give it a distressed look.

Using Core'dinations cardstock also helped to give this layout a distressed feel.

Aaaaah.....Amore!

P.S.  If you're looking for more Scrapbooking inspiration, design ideas, and ways to use your paper punches and die-cuts, check out my class!


Wednesday, September 18, 2013

Scrapbooking Children - My Sweet

my sweet

I created this layout awhile back for the manufacturer events held at Scrapbook News and Review a couple years ago.  For the background of this layout, I wanted some high texture paint behind that window to simulate the outside wall of a house.  I colored in the stamp and jazzed it up with Stickles for some bling.  For the texture behind the window, I built it up by using some textured cardstock for the base of this layout and painted on some crackle paint to simulate wall cracks and texture....fun!

Sometimes I'm at a loss of what to journal.  So here I simply used adjectives to describe my daughter and added inspirational words under the title.

I used stickles and other inks to color in the stamped image.  They help to bring lots of color to a stamped image without having to use paint or markers.


Wednesday, September 11, 2013

Easy Way to Color in a Stamped Image

Sometimes I'm not in the mood to color to my heart's content.  I know I want a stamped image but I also don't want to spend too much time coloring it.  I'll show you an easy way to achieve this with colored cardstock and pearlized inks (aka Smooches)!

I created this tutorial a couple years ago with Scrapbook News and Review magazine for a stamp manufacturer (Doggone Cute Stamps).  With the help of some punches, I was able to create a fun embellishment.

Here's a photo of all the supplies I used (the stamp is not included in this image).

I started by stamping my image using black ink.  I used regular dye ink.  I'm stamping on yellow cardstock because I decided that the dog should be yellow.

I used a total of 3 colors to color in the tiny details of my image.

Just cut your image out with some really good detail cutting scissors and you can add it to any project.

And the fun doesn't stop here!  Let me show you what you can add that fun image on.

I took a scalloped circle punch and went in with a handheld punch and punched holes into the centers of each scallop.

Take some yarn or thread and loop it in and out of the holes.

When you get to the other end, just tie a bow.

I punched a circle out of some bright patterned cardstock to serve as the background that I'm going to glue my dog to.

Glue on your image and some extra buttons and you're done!  Use this fun embellishment on any project you wish.

Hope you enjoyed that tutorial!  For more, check out my tutorial tab above and I've got them all grouped together for you!


BLOGWEAR