Showing posts with label Altered Projects. Show all posts

Wednesday, December 12, 2012

Photo Mat Tutorial - Halloween Style!

Hi!  Just dropping in for some fun Halloween projects.  I'm going to try and sneak another one in this week as well!  Stay tuned!  If you enjoy the project, you really should check out my Halloween class over at The Art Studio for Scrapbook News and Review!  I'll show you how to create a fun Convertible Halloween Mini Album to Banner!


Watch below for a sneak peek video!


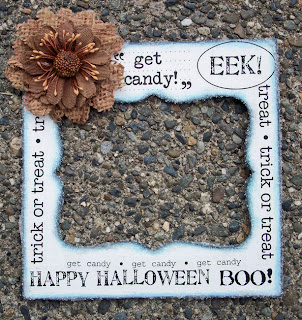
But here's my tutorial today I'd like to share.  This was originally featured at the event Scrapbook News and Review held for SRM Stickers.  I got to play with these cool clear stickers!  I love the versatility and quality of them.  It really is different from alot of the stickers on the market.  The clear stickers are a bit more sturdy and they really melt into your project.  It helps that it's not shiny at all, more matte and that's why it blends better.  Anyway, check out my fun photo mat/frame I made!

You can add it to a scrapbook layout or pop a photo into it and hang it with some ribbon and make it a frame!


Halloween Photo Mat by Maureen Esquillo-Kao Supplies Stickers: SRM Stickers; Flower: Prima; Finely Ground Glass: Floracraft; Ink: Ranger; Top Note Die: Sizzix; Other: Chipboard

Supplies
SRM Stickers
6x6 hipboard
Die-Cut Machine
Top Note Die
Ink
Inking tool
Craft glue
Diamond dust (finely ground glass) or glitter
Glue Gun
Flower
White acrylic paint
Foam brush


Step One: Use your die-cutting machine to cut out the top note from 6x6 sized chipboard.  Use the negative piece for your frame.  Lay your frame on top of a piece of scrap paper.


 Step Two: Paint your frame with white acrylic paint using a foam brush.  Let dry.  Paint a second coat and let dry.  Note: You can speed up the drying process with a heat gun.


Step Three: Ink the outside and inside edges with your inking tool.


Step Four: Add your SRM Stickers.  I trimmed some of the stickers to fit my frame.  Leave a space for your flower.  Plan your sticker placement around where your flower will be so that the flower doesn’t cover parts of your words.  For example, I placed the sticker that says “get candy” far enough so that the flower will not cover any of the words.


 Step Five: Add glue to the inside and outside edges of your frame and sprinkle with your glass glitter.  Lightly press the glitter in some of the areas where the glitter doesn't seem to stick.  Let your frame dry.  Note: You do not want to speed up the drying with a heat gun.  The glue will bubble.


Step Six:  Add your flower using a hot glue gun.  Use for a great scrappy project!  Note: Project ideas can include a scrapbook layout, magnet frame, hanging frame, shadow box, or a large card!

Thursday, October 4, 2012

This is Halloween....


Ahhhh....my favorite time of the year.  Dare I say, even more exciting than Christmas!  We're pulling out the Halloween decor.  And the kids are chompin' at the bit to get their little hands on the fun Halloween booties to help with the decorating!

And it's been awhile since my last post because I've been slaving on my new Halloween-themed class to offer at The Art Studio!  Soon it will be up and available....hopefully by Saturday.  But until then, here are some sneaks....


Now I don't know how the idea came about but I somehow got it in my head that I wanted to make a class where you can create a Halloween banner to hang or you mantle, doorway, or wall.  But I couldn't leave it at that...oh NO I couldn't and so I'm going to show you how to morph it into a mini-album to display after Halloween has graced us with it's spooky presence!


Take advantage of my digi skills and benefit from the fabulous downloadable patterned paper, journaling library cards with pocket, and journaling tag!  Oh and the fun doesn't stop there.....gosh....kinda sorta feels like Christmas, doesn't it????

Well, when the class debuts for sale (it's self-paced so you get it instantly when you buy...no waiting till class is in session), I will have FOR FREE a small tutorial to share via video on The Art Studio website.  I'm even contemplating a FREE printable as well!  So come by, sample some fun and if you likey....BUY-ee!

And to celebrate some Halloween fun I've got some Halloween projects created last year for the EK Success event we held on the Scrapbook News and Review forum!  I'm gonna keep some of them from you  to share later but this is what I've got for your viewing pleasure today!


Want a little sneak of some ideas on my Scrapbooking with Punches and Die-Cuts class?  Well, her ya go RIGHT HERE!  I'll be releasing this class soon available as a bundle or separately by shape (circles, squares, and hearts...oh my)!  Ahem, the best buy is the BUNDLE!  So watch the video now, because I'm thinking of editing it down because it really is a bonus for those who purchase the entire bundle.  I think I'm going to take out some of that content REAL SOON!  LOL!

So stay tuned!  I hope you are all happily busy with life and crafting!  And if not, just happy!  Thanks for stopping by to visit!


Monday, October 18, 2010

Crafty idea to keep Mommies Sane!


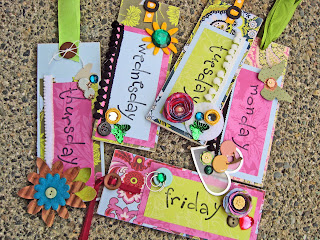
What are these?  My latest tool to keep me sane!

I've been meaning to make these for the LONGEST time....like....LAST YEAR....but only got the chance to make em now!
I usually set out Isabel's outfits ahead of time so that I don't have to rely on the Hubby (or Isabel) to put together outfits on their own.....YIKES!  Ha ha...you should see the outfits this father and daughter team have come up with in the past....lol!

So, these babies I hang onto the hangers with her outfits all made up for the week!
I got some of those wooden slats over at Michael's and covered them with some patterned paper and embellishments.  Way fun!

(Callista!  More goodies from the goodie box here!  He he!)

I did struggle with the Big Bite to make holes so I canned that idea and just hot glued on the ribbon loops.
Unless you're willing to take out the power tools to make those holes, I'd actually suggest cutting up chipboard instead of using the wood.  I'd say these were 1/4" thick...a little too thick for the Big Bite to easily chomp through.  You might even risk breaking it if you try.

Isabel LOVES them!
She thinks I'm so cool....he he.

I'm planning on taking photos of her shoes so that I can hang them on the hangers too.  She loves not having to stress over an outfit.  You see, my child is a worry wart.  Is that common for firstborn children?  I kind of recall being one myself!

While I'm at it, I've got a cool link to share!
A friend of mine shared it with me and I've been able to get some AWESOME ideas from it!

I am on board with ANY great ideas to make Mommyhood easier!
This link talks about chores...you think your kid's too young for chores?
They may not be....

(Sherry, thanks for the cool link!)

If you've got any tips of your own, I'd LOVE to hear them!!!!

Hugs,
Mo

Saturday, October 31, 2009

Day of the Dead

Also called, El Dia de los Muertos  or All Souls' Day.  It's a Holiday celebrated in Mexico and by Latin Americans living in U.S. and Canada.  Family and Friends gather to pray and remember those who have passed.  The Catholic Holiday is termed All Souls' Day and is celebrated on November 1st and 2nd.  Traditionally, altars are built to honor the dead and may incorporate favorite foods, beverages and flowers.  Gifts are brought to the graves of the deceased.  (Information taken from Wikipedia.  BTW, I feel like I"m in college writing a report and quoting a source!)

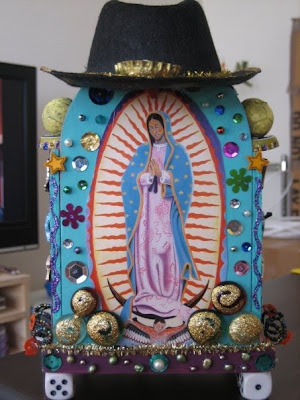
I wanted to share this beautiful altar my sister Emmy made in honor of our late Grandmother.  When Emmy told me she was creating this, I was sooooo excited!  But I tried to imagine what it would look like, and all I could think of was a LOT of black and skulls and was wondering....hmmmm...kinda creepy!


And she sent me the photo and I was soooo pleasantly surprised at the bright and cherry look!  I LOVE IT!  I've shared how close I was to my Grandmother.  We had a very special connection.  But so did Emmy.  When I look at my sister, I am reminded of my Grandmother...her strength and beauty...her feistiness.

Here's Emmy's description of the piece:
"I put lots of buttons and the spool of thread and thimble to represent Grandma Idad's work as a seamstress.  The fruit is a traditional part of Day of the Dead (DOTD).  In Mexico they put out food and candies called "ofrendas" as a gesture for the deceased.  Since Grandma was such a religous person, I put angel wings on the front and the Virgin Mary on the back." 


Oh! And I've got a story for you!  In the picture of my Grandmother you can see a Christmas Tree in the background.  It was made out of ribbon.  My father made it!  I think I was about 17 when we visited Hawaii for Christmas.  We got there right before Christmas and my parents went looking for a tree.  Well, being Hawaii, they do not have an abundace of trees on the corner....NOPE....ALL OUT!  So my father's brains started thinking...and planning.  He ran to the store and came back with a bag of green ribbon, garland and tape!  He strung some ribbon from the ceiling and created that tree.  I started cutting snowflakes out of white computer paper in various sizes and we trimmed the tree with them!

To this day, THAT was the only tree I can really remember.  It was my favorite tree and the only one which held such importance and meaning.  That Christmas I remember my Grandmother....our last Christmas with her...and that beautiful tree.  Without meaning to or even realizing it, my father created a beautiful touching memory and I'm so thankful for his efforts.

And I also relaize that I did not get the crafty gene from my mother...which I suspected...it's from Dad!

Here's another shrine my sister made last year.  It's more dark and Halloweeny!  FUN!


And here's the back side of the shrine.  I love that blue!

My family is from the Philippines, so this holiday is familiar to me.  Here is some information taken from Wikipedia:
"In the Philippines, the holiday is Araw ng mga Patay (Day of the Dead), Todos Los Santos or Undas (the latter two due to the fact that this holiday is celebrated on November 1, All Saints Day), and has more of a "family reunion" atmosphere.  Tombs are cleaned or repainted, candles are lit, and flowers are offered. Entire families camp in cemeteries, and sometimes spend a night or two near their relatives' tombs. Card games, eating, drinking, singing and dancing are common activities in the cemetery. It is considered a very important holiday by many Filipinos (after Christmas and Holy Week), and additional days are normally given as special non-working holidays (but only November 1 is a regular holiday)."

When I was a child, I didn't quite understand the whole celebrating in a cemetary thing and was kinda horrified when my Mother told me about how they don't Trick-or-Treat!  It's so  intereresting how the day can be filled with fun, joy, celebration, loss, grief and sorrow all at the same time.  I think of it all as a celebration of life and a Thank You to God for sending us the soul of our loved ones...if only for a brief time on Earth.

So there you have it!  Not the kind of Halloween post you were expecting, right?  Well, you got a little bit of a culture and history lesson instead!  Hope you enjoyed

 Have a fun and safe Halloween!

And Grandma....I MISS YOU!

Hugs,
Mo

Saturday, July 11, 2009

ATC?


I'm always up for trying something new in scrapping! Last week, the challenge over at Vintage Plum was to create an Artist Trading Card. So, I created my first one! It was quick and fun, and I thought I'd share them because they make me smile!

I'm loving these cupcake cups! I got a package of small and large ones! So....be prepared for cupcake cups in my projects!


I did some stamping here with the circles. I also did some embossing with those stamps! Fun fun fun! These cards were really my attempts at some sort of grungy style.....hmmmmmm.


I used some Crystal Effects (by Stampin' Up!) to add some clear glass like dots and texture to the top right corner of the card. Additional TIP: You can make some inexpensive bling by taking a glitter marker and place dots at desired areas on a project. Then, take the Crystal Effects and place a small dots over each area....be sure to set aside to dry. When it's all dry, it looks like a little tiny epoxy bling sticker!


I also experimented with my puff paint marker by Sakura....by adding yellow to the cupcake liner.


I love that these cards are full of TEXTURE! So fun!


Here's a close up of the clear dots.

Okay, this was a quick one!

Saturday, May 23, 2009

Cloning process COMPLETED!


Okay, I'm done with the cloning! I've cloned 2 more Lady Birds! They are actually more fantastic than the original.....I've genetically engineered them so that their feathers don't fall off as easily!!!! (It's okay Lady Bird, we'll fix you too.) They are hanging out in my MoMoStamper Etsy Shop right now!
I've also made a couple wrap around bracelets! Check out the newest inventory!
Shhhhh....Lady bird has some little brothers and sisters too. They're not quite ready, though! Check back!
xoxo,
Mo

Thursday, May 21, 2009

A birdie told me to........

SMILE!
Every time I look at this layout I SMILE! The photo was taken of my daughter, Isabel, in 2003. This was one of my favorite outfits! She wore hats very well! She loved them. Even when she was this young, she'd let you put a hat on her and she'd actually LEAVE IT ON!
She still loves to wear hats. She's got TONS of em! This layout was yet another one inspired by a Vintage Plum project :) We were to use chipboard on our layout. The other submissions were phenomenal! CLICK HERE to see the rest of them.

I ripped up some tulle I got in my May Vintage Plum Kit and weaved it in and out of the ripped white clouds.


And here is my super cute birdy bird. Her name is Lady Bird! Isn't she so pretty?

This was too fun! Did you know, I TORE MY SCRAP ROOM APART searching high and low for the yellow Sparkle Fibers I wanted to use on this cute lil birdy bird chipboard I have. The good news is my scrap room is clean again!

I've been itchin' to use this birdie on a LO. As always, VP gives me the motivation I need to GET STUFF DONE!

I painted the birdy body with yellow acrylic paint, then painted on some Versamark (from the refill bottle not the pad) and sprinkled on the Sparkle Fibers in Pineapple (by Clearsnap Holding Inc.). I colored the beak and birdy legs with pigment ink and added a googly eye!

I also used the ribbon gathering technique (which I can't seem to stop doing) for the grass.

Oh yes, let me share a crafty goof up with you! Okay, so above I explained how to make the bird (this was previously posted to the Vintage Plum Gallery). Well.....I messed up! I was SOOOOO EXCITED to sprinkle that stinkin' yellow sparkle fibers over the bird that I MISSED A STEP! Funny thing is this layout has been sitting on a shelf since I made it and I grabbed it to show my mother the other day and our fingers got all messy with sticky ?Versamark and sparkle fiber!!!! Why? Versamark doesn't really dry like glue. I forgot this! I SHOULD HAVE sprinkled some HEAT AND STICK POWDER on the Versamark THEN heated it so that it got sticky and THEN sprinkled the sparkle fibers on it! I used this technique because I wanted the glue to be clear/translucent and not white. No need to heat set after sprinkling...it might alter/warp your sparkle fibers!!!!

I haven't screwed up this big in a LONG LONG TIME! I have yet to fix my mistake!

Here are the ingredients to this nummy num layout:

Pacific Point card stock (CS) by Stampin' Up! (SU)
Pumpkin Pie textured CS by SU
Orange Flower Printed Paper is from a Simply Scrappin' Kit (retired by SU)
Whisper White CS by SU
Birdie chip board (who else....SU)
Old Olive 5/8" Grosgrain Ribbon by SU
Peacock Tulle (Vintage Plum)
Scrapbook paint in Spotlight by Making Memories
Adhesive chipboard pieces by K & Company
That super cute tag (which I won during the VP Crop for Jessi's Challenge was donated by Stephanie, one of the crop sponsors)

That birdy bird just about stole the show from my little Belly Bel's super cute picture!!!......ALMOST!

Oh Lady Bird....you sneaky sneaky bird! Isabel will always be the star!


Want a chipboard bird like Lady Bird?

Here's a photo. You can't see the larger bird but they are in there!:
Look at all the super cute chipboard pieces you get! This is one of my most favorite Stampin' Up products.....EVER!
While I'm at it, here's some way too cute BIRDIE STAMP SETS! AAAAAAAH!
And this stamps set coordinates with the chipboard! Yes! Stamp it on paper, cut it out and then mount on your birdie chipboard for added character!

This was fun! Hope you had fun looking too!
Shhhhhhh......I'm working on creating some Lady Bird Clones to put in my MoMoStamper Etsy Shop!
XoXo,
Mo

Wednesday, April 29, 2009

Our Memories....A Vintage Book

Once again, I had a BLAST participating in the Creative Cafe at Vintage Plum this past Tuesday! (CLICK HERE FOR THE TUTORIAL ON CC). Beth hosted CC and posted a tutorial on how she altered a vintage book! Miss Beth is so CRAZY TALENTED! (Click on that last link to learn more about my wonderful friend!)

I am soooooo happy with what I created! For the longest time I've been waiting to find a way to showcase some of my early childhood family photos. Then, Vintage Plum put together the April Kit called Hopscotch and I KNEW I had some wonderful materials to use! Then....Beth showed us some CRAZY vintage books she made a few weeks ago and I went BALLISTIC!

I have to say that I've learned few things about my scrap booking style these past couple of months being addicted to Vintage Plum! I've expanded my talents and learned so much! Thanks to all the VP Homies!!!!!! Woot woot!

Here's my book!I grabbed everything vintagy I had and laid it around the table and just let the MoJo flow! I loved these papers from the Hopscotch kit....the colors reminded me so much of Hawaii! I'm soooo happy!

And then my two-year-old son was running around with this little red fabric flower he pulled off one of my fake plants....I grabbed him and said "Can I have that?".....thank goodness he didn't pitch a fit...he handed it right over! It looks wonderful with the paper!


I love that turquoise color! And the font on the rub ons (another yummy part of the Hopscotch Kit) are sooooo perfect!

I grabbed my bag of ribbon scraps and went WACKY! The messier the ribbon looked...the better it worked! And I found that cute fabric heart in that stash. I actually saved it....it was part of he tag from a baby outfit that was given to my son! Isn't it so adorable! I knew I'd find a good way to use it in my crafting!

Here's a side view so you can see the tags and hanging-outy thingys that peek out from my book! I love that look. It's so here-and-there-and-everywhere....just like my brain! (Don't believe me? Ask my friends and family!)

And to be totally honest.....I wasn't sure about the whole doily thing in the VP Kit...but MAN did it look good on this book! I went from anti-doily to DOILY FREAK! I need more doilys!

My booky book...you're looking so beautiful! Beth! She looks so beautiful, doesn't she?????? (he he he)
I couldn't stop snapping pictures of this book! I can't wait for my sisters to see it in person! My mom saw it and thought it was wonderful!

Look at that red flower....it's like it's just lookin' at you and smiling!

So I got a good start on this...it's not done. I just started few pages. It's gonna take a bit because I have to scan my photos first (I can't cut up the originals!). I'm so glad I got a printer/scanner last year!

Here's my first page. I love this stamp! It's by Provo Craft and it's a rolling journaling stamp called CIRCA. I will be using this lots in my vintage book!

About the photo: For the first 3 years of my life we lived in Guam (Dad was in the Navy. GO NAVY!). Then we moved to Hawaii. Yes, my dad's first car was a VW bug!
I broke into my big button jar....yay! I'm using up all kinds of stuff! Here I am just chillin' and relaxin'.....yes, they made swings back then (1977)! Look....it's made of aluminum!!!! He he.


The little birdy was made with my trusty Big Shot (It's the Birds and Blooms Sizzlits Die)! Order from Stampin' Up! If you don't already have a SU Demonstrator....order from ME ME ME! The black and white paper is part of a journaling book by Making Memories called 5th Avenue.

I asked my dad why they didn't smile in these old photos....he said they hadn't invented smiling in photos yet.....(he's a smart a**)! I never got a straight answer.

Here's a couple pages I started. I used another journaling page from my MM 5th Avenue spiral notebook. That beautiful strip of orange patterned paper is part of the March VP Kit "Hill Country" (can't remember the manufacturer).

Hope you liked the pics! I'll show you guys the pages as I complete them! This was tons of fun! Creative Cafe is on Tuesday at Vintage Plum (here are all the projects so far)! Can't be there on Tuesdays? The tutorials are posted and so you can do them later on your own time! Post your creations to the gallery! Want to peek at the other vintage books? CLICK HERE! Check back often to see new photos!

Okay your link lovers! I'm officially link overloaded AND I've got carpal tunnel! I'm done! See you soon!


BLOGWEAR