Showing posts with label card making. Show all posts
Sunday, July 20, 2014
Creating a New Card using an Old Card? CAN DO!
I do this often. I pre-make my cards and organize them into sections. When I find one section running low, I peek into another section of cards and see if I can change them up or re-do them to create a card with a different theme or sentiment.
In my newest video, I show you how I re-do a Valentine's Card and turn it into a Birthday Card. It's a quickie video just over 4 minutes!
Hope you enjoy! If you've got any requests for a special type of card making or scrapbooking/crafting video, just leave a comment on either the YouTube channel or this post and I'll work on it!
Thanks so much for watching!
Thursday, January 30, 2014
To My Hunny Bunny - A Valentine's Day Card
Some of my favorite cards are the ones that are pretty easy to put together. I get to use up my stash items, and fun finds, and BOOM...I'm done! This is the perfect way to use up scraps, alphabet stickers, die-cut stickers, mist, and rub-ons!
There's lots of Studio Calico goodness here for you! Studio Calico was gracious enough to provide some Scrapbook News and Review staffers with fun goodies to use in an SNR event a couple years ago. These were one of my favorite manufacturers to work with.
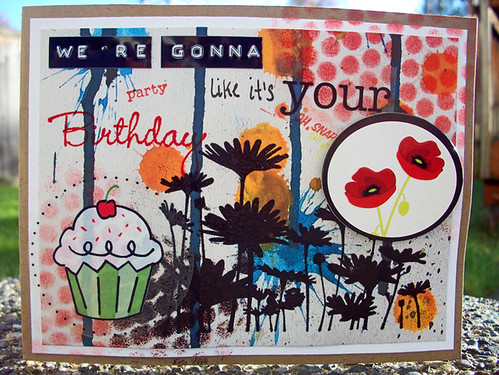
Here are some fun elements of the card:
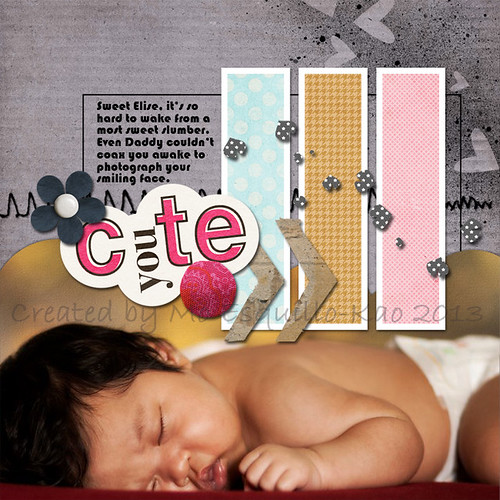
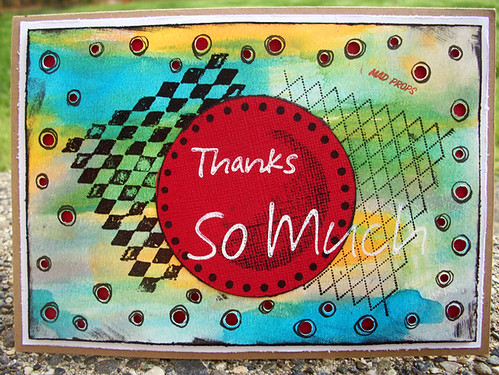
1) I used leftover strips and showcased the different patterned papers and patterned die-cut stickers on this card. Just arrange them in a way that pleases you or use a sketch to help you with your design.
2) Instead of stamps or fancy sentiment embellishments, spell out your greeting with alphabet stickers. If you're a hoarder like me, you probably have tons of these laying around! Mix and match fonts from leftover sticker sheets! As long as the colors work, you're golden!
3) Same with rub-ons - hunt through your stash and find phrases that would work with your card. Team them up with letter stickers to create your sentiment.
4) For a splash of fun color, I spritzed some green mist onto my card before I added the rub-ons and letters.
5) Not sure how to use veneer pieces? I just added them to this card just the way they were. Use some strong glue to stick them onto each other and onto the front of your card. I like E-6000!
See where your creative mind takes you. Gather some coordinating papers, embellishments, stickers, rub-ons, and any other stash items you need to use up and go to town! Make more than one card in one sitting and save them for future use!
I have a photo box full of cards I create for an event or on a whim. If you need some therapeutic time to yourself, this is the perfect project for you! Throw on some music, sip on some coffee (or wine) and you'll finish knowing you've created some cards to use later, you've had time to decompress from your daily duties, and hopefully you feel refreshed and productive all at the same time!
What crafty projects bring you the most joy? Do you use scrappy creating as therapy?
This year as part of my Goals of 2014, I plan on dedicating some time here and there to creating cards. What I like about creating cards is I GIVE them away and they don't take up room in my craft room! Start now to build your card stash or plan to create a lovely scrapbook for a beloved family member or friend. If you start now, you'll have an impressive scrapbook to gift by the Holidays!
Wednesday, January 22, 2014
Let's Party - Creating an Easy Banner on a Birthday Card
Okay this card was created using some old Nikki Sivils paper and stickers. I used the patterned paper also as embellishments here with the help of some baker's twine and a couple trusty circle punches. I thought the party hats were perfect for making a fun banner - I just needed to add glitter. All I needed to add texture and bling was Stickles and I was DONE!
Before you dive in and purchase all those fun embellishment stickers, stop and think - could you use some of that lovely patterned paper to create eye-catching focal points to your projects?
And now it's January. If your hand made card stash is running a little low, it's time to start making more to build it back up! Stay tuned for more fun cards! If you haven't already, subscribe to my YouTube channel (Mo K) or to my blog's feed.
I'm currently working on my next class at The Art Studio at Scrapbook News and Review. If you haven't caught it already, check out my newest classes:
Peace and Love!
Tuesday, January 14, 2014
Quotes on Cards - What to do with quotes on vellum? Here you go!
Now I've got TONS of those booklets with quotes on vellum purchased from years ago! It's so hard to figure out to do with those suckers, but here's one way I used a popular quote/phrase. I thought it would make a nice card sentiment and added it to my card as the focal point. You could also cut down the words into sections and glue them to your card from or scrapbook page (or whatever project you're working on).
This was such an easy card to put together. I added a fun border sticker on the bottom and some splash of color with pink ribbon on the top. I punched out a circle to bring more green into the card and used another die-cut sticker (the bracket looking one up at the top). Finish off with bling-y gems or pearls!
Stickers and patterned papers are from Studio Calico.
Thursday, January 2, 2014
Fall Card - Handmade Burlap Flower
I love the traditional colors of fall but sometimes, the color palette needs a nice POP! Here I chose to use some bright blue card stock and a decorated chipboard frame.
There's lots of texture in this card...twine, ribbon, heat embossed crackles, and burlap.
The handmade flower was created using burlap which I glued to some card stock. I simply hand cut all the "circles" and stacked them together for that purposefully imperfect look!
The papers are by Nikki Sivils created for an event at Scrapbook News and Review a couple years ago.
Hope you enjoyed! May your new year be filled with health, peace, love, happiness, and joy!
Wednesday, November 13, 2013
Card Making with Liquid Pearls - A Makeover!
Hi guys! Just a quick share and fun "before and after" photos to show you just how much Liquid Pearls can transform a card from blah to Wow! Below is a fun stamped card made with watercolor markers. It's pretty cool all on it's own.....
Adding a layer of Liquid Pearls transformed the card by giving it a sassy star quality! It just took a couple minutes.
My newest class Card Making with Liquid Pearls is available for purchase! For an in-depth look at all the techniques you can use with your Liquid Pearls, this class is a steal! Take your Liquid Pearl prowess a step further with Card Making with Liquid Pearls!
Wednesday, October 30, 2013
Butterfly Card Tutorial - Creating with Die-Cut Butterflies
Here is another card I created using We R Memory Keepers cardstock and stickers. This was a tutorial created for Scrapbook News and Review Magazine. I added pops of red behind each butterfly for added texture and depth. All the interesting embellishments on this card were created using die-cuts and my trusty Sizzix Big Shot!
Create a card full of texture, dimension and visual appeal
using butterfly shapes and lots of patterns.
This design employs lots of die-cutting, punching and pasting. Very easy!
Supplies
We R Memory Keepers patterned cardstock
Red textured cardstock
Brown textured cardstock
We R Memory Keepers stickers
Rhinestones
Grass die
Butterfly die
Heart punch
Alphabet die
Die-cutting machine
Glue
Glue
Step One: Die-cut
four grass strips out of two different patterned papers (two of each
pattern). You can use a grass die,
punch, or even hand cut your own grass strip.
Layer the four strips, gluing the straight edge of each strip down
individually.
Step Two: Glue the
red die-cut flowers onto your card as shown.
Step Three: Add a
strip of glue down the middle of each butterfly.
Step Four: Layer each
patterned die-cut butterfly on each solid butterfly.
Step Five: Add 3 rhinestones to the middle of each butterfly to create a body, then fold up the wings so that they pop off your card.
Step Six: Finish off
your card by layering solid brown cardstock onto patterned cardstock. Then, add the sticker, punched heart, and
die-cut letters to complete the greeting and adhere to your card.
Hope you enjoyed this tutorial!
Tuesday, August 6, 2013
Too C(You)te Onions and Calendars!
I thought I'd share about two classes I'm currently taking at The Art Studio. Virginia's Onion envelope class is FABULOUS! If you're looking for a fun quick class to take in a day, this is it! It's like a non-traditional mini album. You'll have to check it out and read the description HERE!
And yall know I'm into digi but for those of you hesitant on jumping in because of the cost of the program, you really should check out Paint Shop Pro X5 (from Corel). It's quite affordable. Cassel's class is a great introduction to digi! You'll have downloadable calendars, fonts, letters/alphas, and awesome PDFs to help you along. Cassel is also quick to respond by e-mail for any questions as are all the instructors at The Art Studio! For more info, go HERE!
Speaking of digi! I've got a couple scrapbook pages to share. These digital scrapbook pages were published in the April issue of Scrapbook News and Review.
Digital scrapooking allows you to do lots of fun things you can't easily achieve with traditional scrapbooking. That's why I love this layout of my cute niece.
In this layout the idea was to use lots of blue. I threw in some yellow to balance it out a bit. We played around with stick mustaches and frames at a family party. I had to capture some of the fun!
And documenting day-to-day activities is always fun. I don't think I set out to document this day, I just made it a point to remember to snap a few photos. Periodically I do this and come up with some day-in-the-life type of layouts that are priceless.
I hope you're having a faboo day! As always, thanks for stopping by!
xoxo,
Mo
Tuesday, July 23, 2013
All you need is some STRING...
Yes, you read that right. Creating with String focuses on using string in your crafty play. Employ other stash items such as baker's and hemp twine, embroidery thread, yarn and even ribbon as a tool in your artwork and partner them up with different mediums such as ink pads, reinkers, acrylic ink, mists and watercolor for various looks. Spritz, splash, dribble, drizzle, roll and stamp until your heart's content. Get ready to get your hands good and inky with this inspiring class.
I'll show you how to stamp, mask and make impressons with string. I'll even go over fun way to store them either very cheap or even free! You'll learn how to create beautiful backgrounds to incorporate onto your cards, pages, tags ATCs and even altered items. You can also apply the techniques to mixed media projects and art journal pages. Everything you'll learn in Creating with String is applicable to multiple disciplines of crafty fun. You'll also get to see artwork in action as I share and discuss scrapbook pages, cards and tags created for this class.
The class is presented in video format and accompanied by helpful PDFs to illustrate the ideas and techniques you'll be using over and over again. CLICK HERE for a peek at the outline!
For a chance to win a FREE seat in my class, check out my YouTube video (a free technique share from the class) and comment there for a chance to win. Spread the word and give me some love by hitting the THUMBS UP button!
I will be offering more opportunities for a free seat in this class soon so stay tuned. If you subscribe to my YouTube Channel, I'll be sure to let you know when and where you can enter to win!
xoxo
Mo
Thursday, July 4, 2013
Lucky Me...When "I" Became "We"

Hello Fellows! My goodness, it's been almost a month! I've been working on my Creating with String class as well as purging all the years of junk from my home. I'm in the process of organizing everything and that's been such a challenging but rewarding job!
I've also been hard at work painting my patio furniture and plastic planters! I'll snap a photo and share it soon!
This morning I had some time to edit a video for you all and I'd love to share this very special card I made for my sister's birthday last year. I remember the day she came home. I was presented with my very first best friend that day and boy was it an unforgettable occasion in my life!
I hope you all have a wonderful Fourth of July!!! I am off to some family BBQs!
xoxo,
Mo
Wednesday, April 24, 2013
Mixed Media with Less Mess!
I've got some things in the works. I'm editing a tutorial right now which will likely be shared on my YouTube channel and blog. This is going to be easier than it looks....
I'll fill you in on it later, so I'll tease you with this sneaky peek!
Here's a card that was published in Scrapbook News and Review Magazine's January 2013 issue. It was a card I created for someone at work. It's probably one of my most favorite cards and I created it with a specific person in mind. Usually when I do this, I'm able to infuse a lot of personality into the card and I always love what I end up with!
Believe it or not, this is a hybrid card. When I say hybrid, it's really not that difficult. You don't even need a computer program, just a trusty camera!
Can you pick out the digitally generated part of the card? Even in person, it's difficult to tell! Here's the secret...
All I did was create that background (the one with the yellow, blues and greens) on mixed media paper. You can use watercolor paper or even some white cardstock. I brushed on some watercolor in several colors and ended up with a 11" x 14" background (watercolor paper). I then photographed the background and cropped it to a more manageable 8.5" x 11" digital image. From there you can print it out or even use it as digital paper when creating a digital project. I've used this very same idea to create this scrapbook page (published in the January 2013 issue of Scrapbook News and Review Magazine):
This wasn't the same background paper as above. Here I played with a dauber-topped mist bottle and some dark mist. I created this new background that I photographed and turned it into digital paper to make more projects. If you saw the SNR January 2013 issue, I have another hybrid card using this background.
I love this because your artwork adds an something extra special to all your projects. It's truly one of a kind artwork you can continue to bring in to several different projects.
So there are two ways you can use personal artwork to give your projects a mixed media feel without all the extra time and mess! I love love looooove it!
And for more ideas on using your Crop-A-Dile in more projects, check out my steal of a class. The card above uses a technique from the class. I've got lots more just waiting for you to learn about all wrapped up in my jam-packed class at The Art Studio!
Stash CPR: Breath new life into your stamps and Crop-A-Dile
Hugs,
Mo
Friday, April 19, 2013
We're Gonna Party Like it's Your Birthday!
So do you have the song stuck in your mind yet? If you don't, maybe now you do! Today I have a card to share that was published in the January 2013 issue of Scrapbook News and Review Magazine. I've got some fun layers of ink, stickers, chipboard, stamping, heat embossing, and stenciling. Of course, I've got lots of bright colors as well. I can't seem to create without a splash of color.

And if you're curious about a supply list, just click on the photo to get to my Flickr gallery. Direct any questions to my email momostamper(at)yahoo(dot)com.
What have you found yourself using lately? Have you been creating your own backgrounds or using fun patterned paper? I continue to play with paints, media, and mist so hopefully for those of you that love that stuff, you'll get to see my shares soon!
Saturday, February 2, 2013
Give your Crop-a-Dile a Workout!
Hello Everyone! Boy do I have a treat for you! I have for you a sneak peek into my newest class. This time I've come up with a fun cardmaking class which focuses on stamping and using your Crop-a-Dile!
For more details, just check out my Class Outline for Stash CPR: Breath new life into your stamps and Crop-a-Dile!
I'm so very excited!
If you’ve got stamps and a Crop-a-Dile, then you’ve got
what it takes to learn how to use them together to create fabulously fun cards.
Whether or not you’ve been getting some good use out of the investment you’ve
put into your stamp collection, my class will help fuel your mojo to create
cards galore.
A Crop-a-Dile isn’t just a hole punch. It’s so much more!
Join me in this jam-packed class that features photos and a combination of
step-by-step written and video tutorials to illustrate the many techniques
you’ll learn.
You’ll be inspired by the smart and savvy tips and tricks I’ve developed to
transform cardstock, scraps and ink into beautiful cards you may not want to
give away.
I’ll even show you how to jazz up your cards with equally
ignored items such as glitter glue, Liquid Pearls, embossing powders and chalk
pastels. They’re not a necessity, so it’s okay if you don’t have such lovely
materials -- you’ll still be inspired to use what you’ve got on hand.
Stop neglecting your stamps and Crop-a-Dile and learn how to revive them with
this class. No CPR certification required.
For more details, just check out my Class Outline for Stash CPR: Breath new life into your stamps and Crop-a-Dile!
I'm so very excited!
Sunday, January 6, 2013
Vintage Feel Birthday Card

Here's another fun project created for the Donna Salazar event at SNR. I had tremendous fun creating this card. I did a tutorial for some of the elements in the card (3 tutorials) and I'll share them with you. Today we'll start with how I created that cracked effect on the rose (my fave part ot the card)!
Supplies
Donna Salazar patterned paper (Spring In Bloom)
Detail cutting scissorsDonna Salazar patterned paper (Spring In Bloom)
Versamark pad or embossing ink
Ultra Thick Embossing Enamel (UTEE)
Heat gun
Bone folder
Alcohol ink (Ranger – Black Soot)
Inking tool
Step One: Cut out the
corner piece from the patterned paper.
Step Three: Layer on
some Versamark or embossing ink.
Sprinkle with UTEE and heat with heat gun.

Step Four: Layer
again with Versamark/embossing ink, sprinkle with UTEE and heat crystals until
melted. Repeat a third time for a nice
thick layer. You can do more layers if
you desire.
Step Seven: Ink the
edges with alcohol ink. Allow flower to
dry before handling and assembling your card.
Subscribe to:
Posts (Atom)