Showing posts with label Stamping. Show all posts

Wednesday, September 18, 2013

Scrapbooking Children - My Sweet

my sweet

I created this layout awhile back for the manufacturer events held at Scrapbook News and Review a couple years ago.  For the background of this layout, I wanted some high texture paint behind that window to simulate the outside wall of a house.  I colored in the stamp and jazzed it up with Stickles for some bling.  For the texture behind the window, I built it up by using some textured cardstock for the base of this layout and painted on some crackle paint to simulate wall cracks and texture....fun!

Sometimes I'm at a loss of what to journal.  So here I simply used adjectives to describe my daughter and added inspirational words under the title.

I used stickles and other inks to color in the stamped image.  They help to bring lots of color to a stamped image without having to use paint or markers.


Wednesday, September 11, 2013

Easy Way to Color in a Stamped Image

Sometimes I'm not in the mood to color to my heart's content.  I know I want a stamped image but I also don't want to spend too much time coloring it.  I'll show you an easy way to achieve this with colored cardstock and pearlized inks (aka Smooches)!

I created this tutorial a couple years ago with Scrapbook News and Review magazine for a stamp manufacturer (Doggone Cute Stamps).  With the help of some punches, I was able to create a fun embellishment.

Here's a photo of all the supplies I used (the stamp is not included in this image).

I started by stamping my image using black ink.  I used regular dye ink.  I'm stamping on yellow cardstock because I decided that the dog should be yellow.

I used a total of 3 colors to color in the tiny details of my image.

Just cut your image out with some really good detail cutting scissors and you can add it to any project.

And the fun doesn't stop here!  Let me show you what you can add that fun image on.

I took a scalloped circle punch and went in with a handheld punch and punched holes into the centers of each scallop.

Take some yarn or thread and loop it in and out of the holes.

When you get to the other end, just tie a bow.

I punched a circle out of some bright patterned cardstock to serve as the background that I'm going to glue my dog to.

Glue on your image and some extra buttons and you're done!  Use this fun embellishment on any project you wish.

Hope you enjoyed that tutorial!  For more, check out my tutorial tab above and I've got them all grouped together for you!


Thursday, July 4, 2013

Lucky Me...When "I" Became "We"

Lucky Me

Hello Fellows!  My goodness, it's been almost a month!  I've been working on my Creating with String class as well as purging all the years of junk from my home.  I'm in the process of organizing everything and that's been such a challenging but rewarding job!

I've also been hard at work painting my patio furniture and plastic planters!  I'll snap a photo and share it soon!

This morning I had some time to edit a video for you all and I'd love to share this very special card I made for my sister's birthday last year.  I remember the day she came home.  I was presented with my very first best friend that day and boy was it an unforgettable occasion in my life!


In the video,  I employ stamping and spray resist techniques using Versamark and Goosebumps spray from Tsukineko.  I also used my fabulous Versacolor cubes and watered them down for a watercolor effect.  This card was so much fun to make!


I hope you all have a wonderful Fourth of July!!!  I am off to some family BBQs!

xoxo,
Mo

Friday, April 19, 2013

We're Gonna Party Like it's Your Birthday!

So do you have the song stuck in your mind yet?  If you don't, maybe now you do!  Today I have a card to share that was published in the January 2013 issue of Scrapbook News and Review Magazine.  I've got some fun layers of ink, stickers, chipboard, stamping, heat embossing, and stenciling.  Of course, I've got lots of bright colors as well.  I can't seem to create without a splash of color.

Party Like Its Your Birthday

And if you're curious about a supply list, just click on the photo to get to my Flickr gallery.  Direct any questions to my email momostamper(at)yahoo(dot)com.

What have you found yourself using lately?  Have you been creating your own backgrounds or using fun patterned paper?  I continue to play with paints, media, and mist so hopefully for those of you that love that stuff, you'll get to see my shares soon!

Saturday, February 2, 2013

Give your Crop-a-Dile a Workout!

Hello Everyone!  Boy do I have a treat for you!  I have for you a sneak peek into my newest class.  This time I've come up with a fun cardmaking class which focuses on stamping and using your Crop-a-Dile!


If you’ve got stamps and a Crop-a-Dile, then you’ve got what it takes to learn how to use them together to create fabulously fun cards. Whether or not you’ve been getting some good use out of the investment you’ve put into your stamp collection, my class will help fuel your mojo to create cards galore.
 
A Crop-a-Dile isn’t just a hole punch. It’s so much more! Join me in this jam-packed class that features photos and a combination of step-by-step written and video tutorials to illustrate the many techniques you’ll learn.

You’ll be inspired by the smart and savvy tips and tricks I’ve developed to transform cardstock, scraps and ink into beautiful cards you may not want to give away.

I’ll even show you how to jazz up your cards with equally ignored items such as glitter glue, Liquid Pearls, embossing powders and chalk pastels. They’re not a necessity, so it’s okay if you don’t have such lovely materials -- you’ll still be inspired to use what you’ve got on hand.

Stop neglecting your stamps and Crop-a-Dile and learn how to revive them with this class. No CPR certification required.


For more details, just check out my Class Outline for Stash CPR: Breath new life into your stamps and Crop-a-Dile!

I'm so very excited!


Sunday, November 25, 2012

uR Priceless: A Doodled Effect/Stamped Background Card Tutorial

Let me start with some amazing deals!  I can't believe how packed this issue is!  I've recently posted a few  projects on my Facebook page inspired by tutorials from this issue as well as past issues.  I'm someone who lives and breathes scrappy happiness, and I tell you YOU CAN'T EVER know everything!   Be inspired by countless projects and tutorials in this issue and 2013 will bring fabulous inspirational themes and tutorials (just wait and see).  Ahem...I have a few tutorials in here too...


ready to hear the news?????

***
Between now and Monday night (November 26, 2012 at 11:59 pm), purchase a Lifetime subscription (of Scrapbook News and Review) at the deeply discounted price of $39.99 for yourself and we'll give a free Lifetime subscription to the person of your choice and send the proceeds to those who have lost so much this holiday season from Hurricane Sandy. 

Purchase the Lifetime subscription here and then drop us a note at helpdesk@scrapbooknewsandreview.com with the name and e-mail address of the person you want to gift the subscription to and we'll do the rest!

P.S. If you already have a subscription, then grab a subscription for a friend and we'll give another friend a free subscription and then pass on the proceeds to charity.  


You can also SEE THE MAGAZINE FOR FREE until Monday night (as referenced above).  Just go HERE (subscription page) and use promo code FREESNR12.
***

Here's another tutorial I'm sharing, previously published in 
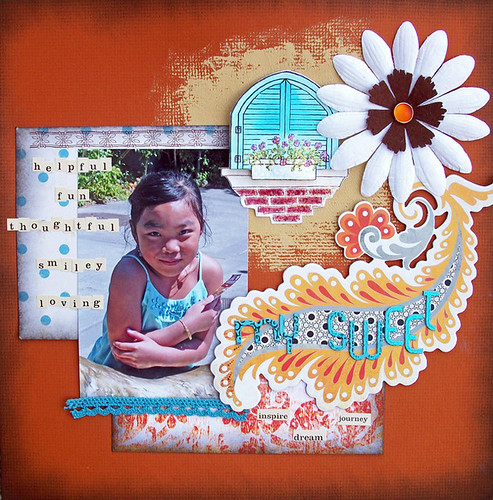
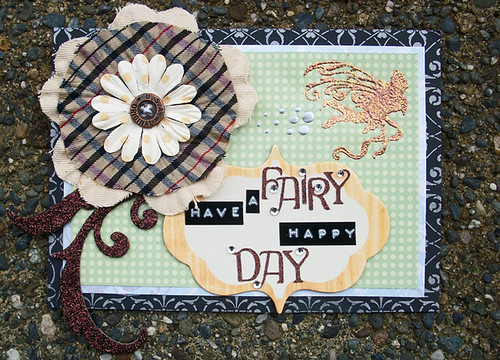
Scrapbook News and Review's July 2012 issue.  If you haven't realized it by now, I try to stretch my scrappy supplies by using stamps in various ways.  Doodles are fun and popular right now.  If you don't feel confident in your doodling skills, try using a doodled image stamp(s) to create a patterned paper.  Here I've added pops of color to the stamped images, completing my card with felt flowers, chipboard, twine, and brads from my stash.

U R Priceless
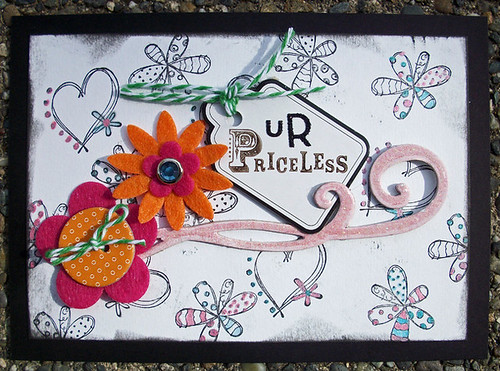
(click on photo above for a supply list)


Supplies
Black cardstock
White cardstock
Small alphabet stickers
Felt flowers
Brad
Chipboard button
Bakers twine
Chipboard swirl
Chipboard tag
Outline stamps
Sentiment or word stamp
Pearlized ink (Smooches) or any colored pens/pencils
Black ink
Solvent ink (if using glossy/smooth finished chipboard tag)
Hot glue gun (or other strong adhesive)
Paper trimmer


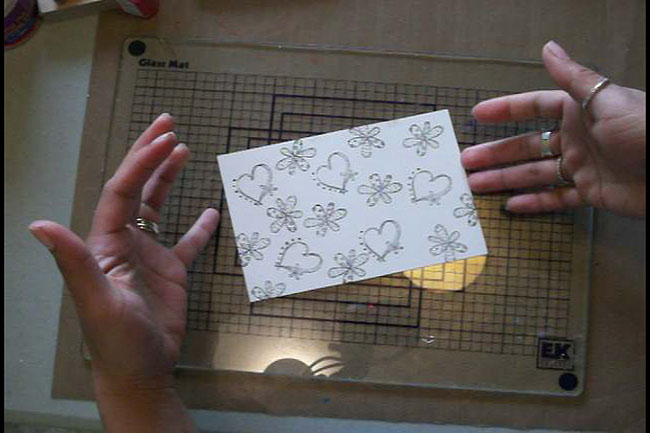
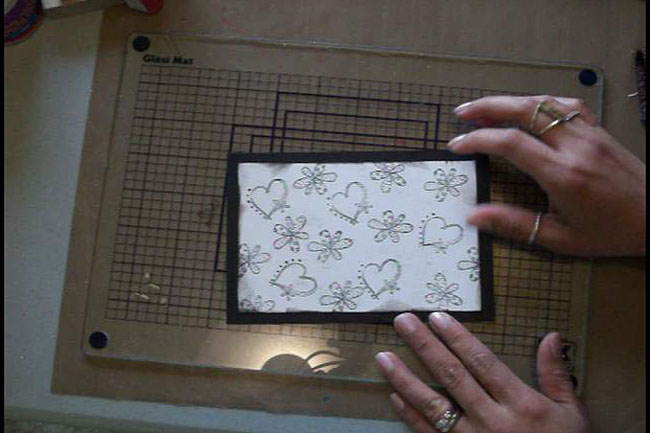
Step One:  You will want to use a couple stamps with an outlined image you can color in.  I used two stamps and some black ink.  You can use one or more stamps to stamp a background onto some white cardstock.  Stamp some images off the edge of the cardstock.


Step Two:  Ink the edges of the white cardstock with black ink.


Step Three:  Glue the white cardstock onto some black cardstock so that you have a black border around the stamped background.


Step Four:  My chipboard tag has a glossy finish to it.  In order to stamp my word stamp onto the tag, I need to use Solvent Ink so that the ink doesn’t smear.  If your tag doesn’t have a smooth finish, you can use the same ink you used to stamp your background.


Step Five:  Color in the stamped outlined images with colored inks.  I used Pearlized inks by Smooches (Clearsnap).  You could also use colored pens or pencils.


 Step Six:  Add some baker’s twine to the chipboard tag.  Put together your felt flowers with brads or chipboard buttons and some twine.  I like to use a hot glue gun to glue the flowers together.


Step Seven:  Use a hot glue gun (or other strong adhesive) to glue your chipboard swirl onto your card.  


 Step Seven:  Use a hot glue gun (or other strong adhesive) to glue your chipboard swirl onto your card. 


Step Nine:  Add the felt flowers to the card with the hot glue gun.


Step Ten:  I added some alphabet stickers (“u” and “r”) above the word “priceless”.


Step Eleven:  If needed, trim the twine on the tag and the flower.


Don't forget to hop over to SNR and get in on those great deals!  You have till Monday November 26th at 11:59 pm...so HURRY!

Happy Crafting!


Sunday, October 14, 2012

It goes in Circles...Circle Card Tutorial


A Little Something by Maureen Esquillo-Kao Cardstock: Bazzill; Patterned Paper: October Afternoon; Stamps: Stampin Up; Ink: Tsukineko; Liquid Pearls: Ranger; Circle Punches: EK Success, Fiskars

This card tutorial was featured in the May 2012 issue of Scrapbook News and Review Magazine.  We were covering some design principals when creating and I came up with this quick tutorial.

Circle Cluster Card

Embellishment placement is easier than you may think.  If you keep in mind two concepts, you can create eye-pleasing embellishment arrangements on your projects.  First, remember that arrangements generally look better with odd numbers.  So, a minimum of three elements put together are more visually appealing than two or four element groupings.  The second concept to keep in mind is balance.  Balance out your elements/embellishments on your project.  The following tutorial will show you how I created a card with these two concepts in mind.

Supplies
Solid cardstock
Circle patterned cardstock
Cardstock in 3 shades that coordinate with patterned cardstock
3 circle stamps in 3 sizes
3 circle punches in 3 sizes, large enough to punch out each stamped circle
Foam dots
Craft or pigment ink in coordinating colors
Liquid Pearls (optional)


Step One:  Stamp 3 circle images on 3 different color cardstock.  Choose shades that are not too dark for pigment ink to show on.  Punch out each stamped image with a punch large enough to fit the image (or slightly larger).  The point is to have 3 different sizes of circles.  Odd numbered groupings of elements look best together.


Step Two:  Stamp a greeting on the left side of the largest circle.  Note:  If you choose a stamp that does not have an empty space in it like this one, just stamp your image on another piece of cardstock and glue to the left side of your circle.


Step Three:  Arrange your circles so that they are centered on your card, but also create a balanced cluster in the center.  Glue down the larges circle when you've decided on placement of your circle cluster.  I balanced out the large blue circle on the left side with the two smaller circles.  The orange circle is placed in the middle but slightly below the yellow circle (positioned to the right).  Play with your shapes/elements and re-position them until you find an arrangement that appeals to you.


Step Four:  To add dimension to my card, I popped up the two smaller circles with foam dots.  The yellow circle was popped up with one layer of foam and the orange circle was popped up with 2 layers of foam so that it would be slightly higher than the yellow circle.  Note: I decided to add some liquid pearls to the orange circle. Again, I kept in mind odd numbers and balance when adding the liquid pearls. I decided on a grouping of 5 with varying sizes of dots, slightly positioned towards the middle of my embellishment cluster. Grouping the liquid pearls at the top left side of the orange circle seemed to balance the cluster well.

I use LOTS of die-cuts and punches in my scrappy creations.  So much so that I've created a class around it!  In Scrapbooking with Punches and Die-Cuts we cover some design tips and tricks.  It's got tons of sketches and I show you how I complete 9 scrapbook layouts using many fun techniques to employ basic die-cut shapes like circles, squares and hearts!

So check it out!  The Bundle includes them all and soon I'll be releasing them separately into each shape so you can choose to purchase the class in segments ;)


I'll let you know when it's released!  Right now I'm focusing on my Halloween Class.  Would love it it you'd spread the word!  


GO HERE for a sample class video if you want a peek into the class!  Tootles!


Thursday, October 4, 2012

This is Halloween....


Ahhhh....my favorite time of the year.  Dare I say, even more exciting than Christmas!  We're pulling out the Halloween decor.  And the kids are chompin' at the bit to get their little hands on the fun Halloween booties to help with the decorating!

And it's been awhile since my last post because I've been slaving on my new Halloween-themed class to offer at The Art Studio!  Soon it will be up and available....hopefully by Saturday.  But until then, here are some sneaks....


Now I don't know how the idea came about but I somehow got it in my head that I wanted to make a class where you can create a Halloween banner to hang or you mantle, doorway, or wall.  But I couldn't leave it at that...oh NO I couldn't and so I'm going to show you how to morph it into a mini-album to display after Halloween has graced us with it's spooky presence!


Take advantage of my digi skills and benefit from the fabulous downloadable patterned paper, journaling library cards with pocket, and journaling tag!  Oh and the fun doesn't stop there.....gosh....kinda sorta feels like Christmas, doesn't it????

Well, when the class debuts for sale (it's self-paced so you get it instantly when you buy...no waiting till class is in session), I will have FOR FREE a small tutorial to share via video on The Art Studio website.  I'm even contemplating a FREE printable as well!  So come by, sample some fun and if you likey....BUY-ee!

And to celebrate some Halloween fun I've got some Halloween projects created last year for the EK Success event we held on the Scrapbook News and Review forum!  I'm gonna keep some of them from you  to share later but this is what I've got for your viewing pleasure today!


Want a little sneak of some ideas on my Scrapbooking with Punches and Die-Cuts class?  Well, her ya go RIGHT HERE!  I'll be releasing this class soon available as a bundle or separately by shape (circles, squares, and hearts...oh my)!  Ahem, the best buy is the BUNDLE!  So watch the video now, because I'm thinking of editing it down because it really is a bonus for those who purchase the entire bundle.  I think I'm going to take out some of that content REAL SOON!  LOL!

So stay tuned!  I hope you are all happily busy with life and crafting!  And if not, just happy!  Thanks for stopping by to visit!


Tuesday, July 31, 2012

A Winner and Eye Candy!


Hi Folks!  I have a winner of the free seat to my online class Scrapbooking with Punches and Die-Cuts!  Barb Turpin, if you don't already know, you won!  Thanks so much to everyone for your interest!  Class starts August 3rd if you'd like to sign up!  You don't have to be there the first day or any of the days I actually post the class.  I'll be there for questions and feedback and for at least a couple weeks after the class  finishes up!  You will have access to the class material for an unlimited time so it doesn't go away after the class ends, it will be there hanging out for you!  :)

And because I haven't posted anything to look at for awhile, here is some creations full of love.  The first layout was created for one of my bestest buddies ever!  Oh how I love this girl!  She and her Hubby have continually inspired me to strive and work at my marriage.  For those married, it's not that easy at times, it takes lots of work!  Am I right?  These two serve as a constant reminder of how to stay thoughtful, how to understand each other, and an example of immense loyalty.  I love these two with all my heart.


My dear S and T if you're reading this, I love you guys so much!  Thank you for bringing both of those beautiful babies into this world.  I love your two rug-rats with all my heart and am so honored I am blessed with you all in my life.

I Wish You Love by Maureen Esquillo-Kao Supplies Patterned Paper: Luxe Designs, My Mind’s Eye; Overlay: Luxe Designs; Alphabet Stickers: American Crafts; Journaling Card, Tab: My Mind’s Eye; Flowers: Petaloo; Button: Nikki Sivils; Mists: Lindy’s Stamp Gang, Maya Road; Label Maker: Dymo; Other: Felt hearts, rhinestones, flowers, ribbon

And this next card was very fun to create.  I think my favorite part is the dotting of liquid pearls behind that glittered fairly.  Such a fabulously textured card!  For supply lists of the next two creations, just click on the photos and you will be brought to my Flickr account which has supplies listed!


Fairy Happy Day


This third project is actually a hybrid layout.  Most of it is digitally created and I went in and added buttons and bling, liquid pearl smatterings and some fun flower trim!  If you don't want bulky pages, this is the way to go!  And in this day and age of skimping and saving, digital creating is a viable option.  Buy a digital kit and you can use it over and over and over.  Think of all the moolah you can save!  Create hybrid or fully digital layouts.  I'm so happy I explored Digi!

Things I Heart

All three projects were created for the March 2012 issue of Scrapbook News and Review.

Have you tried digital creating?  If you've been intrigued and haven't started learning, what's stopped you?
I hope you are all having a fabulous week.

The newest issue of Scrapbook News and Review is available!


My class is starting this Friday and I am beyond excited...but nervous as well!  Wish me luck!  Wish me more students while you're at it (wink wink)!


BLOGWEAR