Let me start with some amazing deals! I can't believe how packed this issue is! I've recently posted a few projects on my Facebook page inspired by tutorials from this issue as well as past issues. I'm someone who lives and breathes scrappy happiness, and I tell you YOU CAN'T EVER know everything! Be inspired by countless projects and tutorials in this issue and 2013 will bring fabulous inspirational themes and tutorials (just wait and see). Ahem...I have a few tutorials in here too...
ready to hear the news?????
***
Between now and Monday night (November 26, 2012 at 11:59 pm), purchase a Lifetime subscription (of Scrapbook News and Review) at the deeply discounted price of $39.99 for yourself and we'll give a free Lifetime subscription to the person of your choice and send the proceeds to those who have lost so much this holiday season from Hurricane Sandy.
Purchase the Lifetime subscription here and then drop us a note at helpdesk@scrapbooknewsandreview.com with the name and e-mail address of the person you want to gift the subscription to and we'll do the rest!
P.S. If you already have a subscription, then grab a subscription for a friend and we'll give another friend a free subscription and then pass on the proceeds to charity.
You can also SEE THE MAGAZINE FOR FREE until Monday night (as referenced above). Just go HERE (subscription page) and use promo code FREESNR12.
***
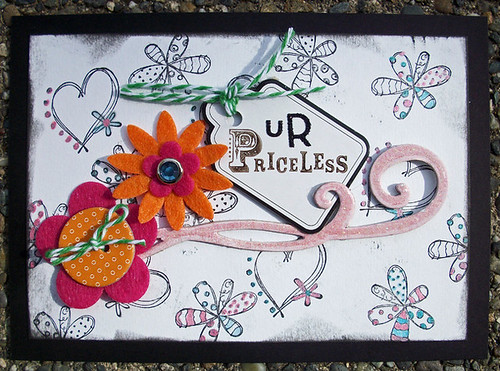
Here's another tutorial I'm sharing, previously published in Scrapbook News and Review's July 2012 issue. If you haven't realized it by now, I try to stretch my scrappy supplies by using stamps in various ways. Doodles are fun and popular right now. If you don't feel confident in your doodling skills, try using a doodled image stamp(s) to create a patterned paper. Here I've added pops of color to the stamped images, completing my card with felt flowers, chipboard, twine, and brads from my stash.

(click on photo above for a supply list)
Supplies
Black cardstock
White cardstock
Small alphabet stickers
Felt flowers
Brad
Chipboard button
Bakers twine
Chipboard swirl
Chipboard tag
Outline stamps
Sentiment or word stamp
Pearlized ink (Smooches) or any colored pens/pencils
Black ink
Solvent ink (if using glossy/smooth finished chipboard tag)
Hot glue gun (or other strong adhesive)
Paper trimmer
Step One: You will want to use a couple stamps with an
outlined image you can color in. I used
two stamps and some black ink. You can
use one or more stamps to stamp a background onto some white cardstock. Stamp some images off the edge of the
cardstock.
Step Two: Ink the edges of the white cardstock with
black ink.
Step Three: Glue the white cardstock onto some black
cardstock so that you have a black border around the stamped background.
Step Four: My chipboard tag has a glossy finish to
it. In order to stamp my word stamp onto
the tag, I need to use Solvent Ink so that the ink doesn’t smear. If your tag doesn’t have a smooth finish, you
can use the same ink you used to stamp your background.
Step Five: Color in the stamped outlined images with
colored inks. I used Pearlized inks by
Smooches (Clearsnap). You could also use
colored pens or pencils.
Step Six: Add some baker’s twine to the chipboard
tag. Put together your felt flowers with
brads or chipboard buttons and some twine.
I like to use a hot glue gun to glue the flowers together.
Step Seven: Use a hot glue gun (or other strong adhesive)
to glue your chipboard swirl onto your card.
Step Seven: Use a hot glue gun (or other strong adhesive)
to glue your chipboard swirl onto your card.
Step Nine: Add the felt flowers to the card with the hot
glue gun.
Step Ten: I added some alphabet stickers (“u” and “r”)
above the word “priceless”.
Step Eleven: If needed, trim the twine on the tag and the
flower.
Don't forget to hop over to SNR and get in on those great deals! You have till Monday November 26th at 11:59 pm...so HURRY!
Happy Crafting!


Your card is GORGEOUS!! I loveeeeeeeeee the hearts and the flowers!!!!
ReplyDelete