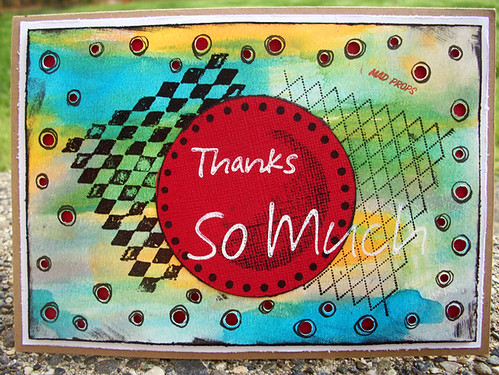
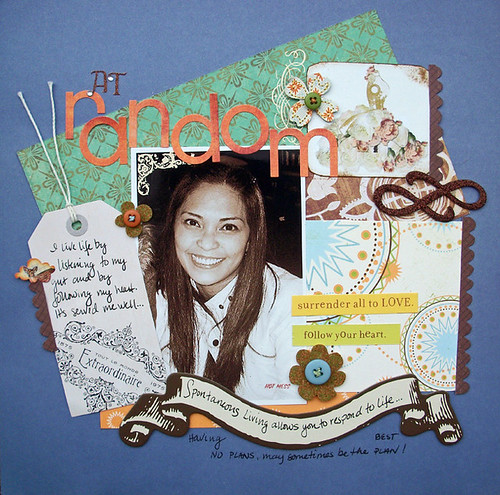
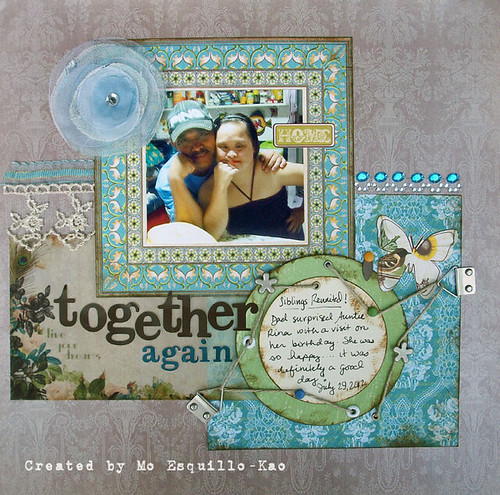
Showing posts with label Scrapbook News and Review. Show all posts

Wednesday, May 8, 2013

Using Metal Embellishments to Create a Journaling Block on Your Scrapbook Pages

Together Again

Hardware Hodgepodge
Create an eye-catching journaling circle simply by raiding your stash of hardware!  See how I mix various photo hangers, brads, eyelets, flower brads, and photo holders to create a scrapbook page you can’t help but run your hands over!

Supplies:
Patterned paper in greens, blues, and browns
Vellum accent paper
Circle punches or circle cutter (two sizes)
Hardware: photo hangers, brads, eyelets, flower brads, photo holders
Stickers
Lace trim and ribbon
Fabric flower
Alphabet stickers
Hemp twine
Glue
Gem border trim
Brown ink
Crop-A-Dile
Paper piercer
Tape


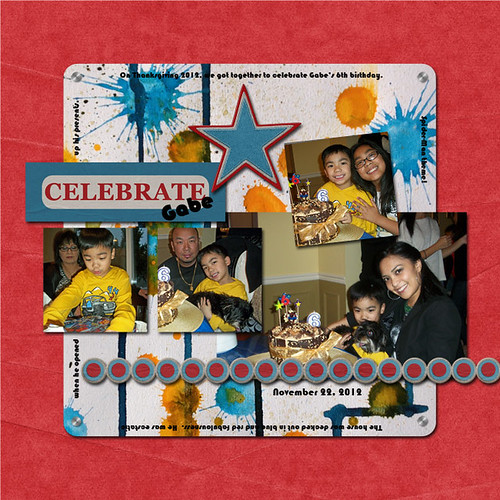
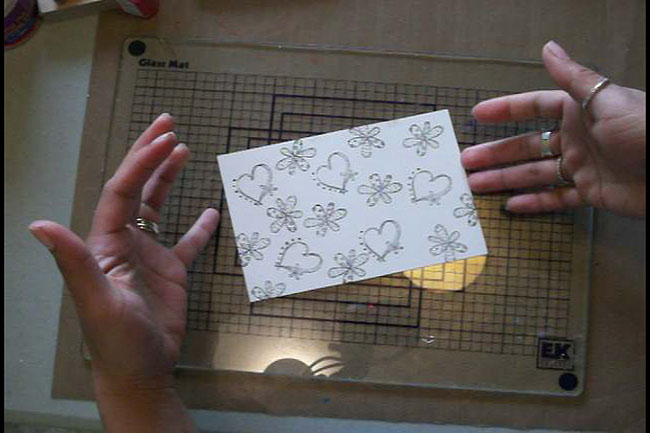
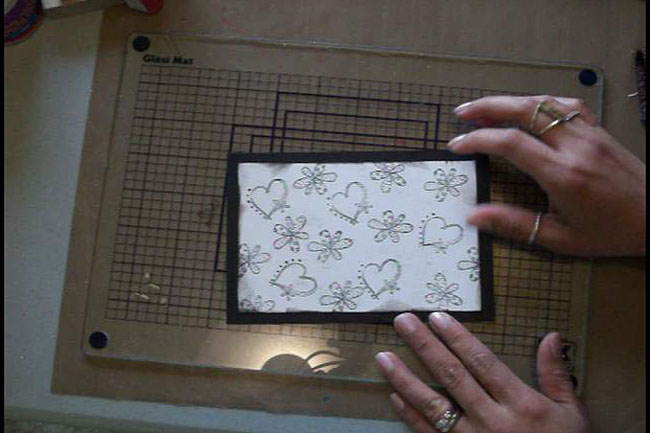
Step One:  Arrange a grouping of patterned paper squares.  Cut or punch two circles.  Ink the edges of all the elements including the circles.  Glue together the bottom square and rectangle papers but do not glue any of these papers to the base patterned cardstock of the scrapbook page.  Glue together the circles but do not glue the circle down to the papers yet.


Step Two:  Arrange some brads, eyelets, photo hangers and a photo holder in varying areas around the journaling circle.  You will be stringing a piece of hemp twine through and around these pieces.  I am also adding a couple photo hangers to the outside edges of the patterned paper cluster.

Step Three:  Use a pencil to mark where the holes for the brads and eyelets will be placed. 


Step Four:  Use a Crop-A-Dile and a paper piercer to create holes into which you will anchor your metal pieces to.


Step Five:  Start the hemp twine in one of the eyelets.  Secure the twine to the back of the journaling circle with tape.

Step Seven:  Finish threading and winding the twine through the rest of the metal pieces.  

Step Eight:  Thread the twine through the first eyelet again to complete the design.
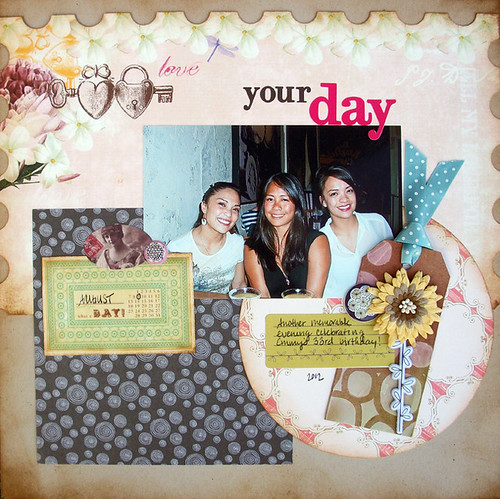
Step Nine:  Cut off the excess twine and secure to the back of the journaling circle with more tape.  Your fancy fun journaling circle is all jazzed up!

I hope you enjoyed that tutorial!  If you want to see more scrapbooking or cardmaking tutorials on my YouTube Channel, just comment here or send me an email letting me know what you want to see or learn!

Hugs!
Mo


Wednesday, April 24, 2013

Mixed Media with Less Mess!

I've got some things in the works.  I'm editing a tutorial right now which will likely be shared on my YouTube channel and blog.  This is going to be easier than it looks....
I'll fill you in on it later, so I'll tease you with this sneaky peek!


Here's a card that was published in Scrapbook News and Review Magazine's January 2013 issue.  It was a card I created for someone at work.  It's probably one of my most favorite cards and I created it with a specific person in mind.  Usually when I do this, I'm able to infuse a lot of personality into the card and I always love what I end up with!

Believe it or not, this is a hybrid card.  When I say hybrid, it's really not that difficult.  You don't even need a computer program, just a trusty camera!

Thanks So Much

Can you pick out the digitally generated part of the card?  Even in person, it's difficult to tell!  Here's the secret...
All I did was create that background (the one with the yellow, blues and greens) on mixed media paper.  You can use watercolor paper or even some white cardstock.  I brushed on some watercolor in several colors and ended up with a 11" x 14" background (watercolor paper).  I then photographed the background and cropped it to a more manageable 8.5" x 11" digital image.  From there you can print it out or even use it as digital paper when creating a digital project.  I've used this very same idea to create this scrapbook page (published in the January 2013 issue of Scrapbook News and Review Magazine):

Celebrate Gabe

This wasn't the same background paper as above.  Here I played with a dauber-topped mist bottle and some dark mist.  I created this new background that I photographed and turned it into digital paper to make more projects.  If you saw the SNR January 2013 issue, I have another hybrid card using this background.

I love this because your artwork adds an something extra special to all your projects.  It's truly one of a kind artwork you can continue to bring in to several different projects.

So there are two ways you can use personal artwork to give your projects a mixed media feel without all the extra time and mess!  I love love looooove it!

And for more ideas on using your Crop-A-Dile in more projects, check out my steal of a class.  The card above uses a technique from the class.  I've got lots more just waiting for you to learn about all wrapped up in my jam-packed class at The Art Studio!

Stash CPR: Breath new life into your stamps and Crop-A-Dile


Hugs,
Mo

Monday, April 22, 2013

Remember...

Will you look at that....I titled this post "Remember" and I TOTALLY forgot to share it!  This was digital scrapbook page I created for the Color Palettes on the Scrapbook News and Review blog in January!  Better late than never, right?
***

Do you love playing with color palettes?  I really really do too!  What I'm loving is that we've got Color Palettes now up at the Scrapbook News and Review Blog!  The fabulous Candace has been creating them and she's so talented and inspiring!

The blog has so many great inspirational posts almost everyday and I've subscribed to get the latest and greatest news there is!  The wonderful Christy Strickler has done such an amazing job in keeping the blog full of great ideas, tips, tricks, and fun!

I created this layout using one of the January color palettes.  I really don't scrap purple, though I adore the color!  These color palettes take me out of my color pairing comfort zone and help me create something slightly different from what I normally do....and I love that!

Remember_Maureen_Isabel_Isabel's Birthday_2012_PRINT
click on photo for credits

If you wanna see that post using the color palette...go HERE!  There's usually a new one every week!

Have a wonderful week!

Friday, April 19, 2013

We're Gonna Party Like it's Your Birthday!

So do you have the song stuck in your mind yet?  If you don't, maybe now you do!  Today I have a card to share that was published in the January 2013 issue of Scrapbook News and Review Magazine.  I've got some fun layers of ink, stickers, chipboard, stamping, heat embossing, and stenciling.  Of course, I've got lots of bright colors as well.  I can't seem to create without a splash of color.

Party Like Its Your Birthday

And if you're curious about a supply list, just click on the photo to get to my Flickr gallery.  Direct any questions to my email momostamper(at)yahoo(dot)com.

What have you found yourself using lately?  Have you been creating your own backgrounds or using fun patterned paper?  I continue to play with paints, media, and mist so hopefully for those of you that love that stuff, you'll get to see my shares soon!

Thursday, April 11, 2013

Sister Sister Sister

In celebration of sibling day (yeah, I didn't know there was a day - apparently it was yesterday according to Facebook posts...he he), I'm sharing a sister scrapbook page!

Your Day


I totally forgot to share this one!  This is a scrapbook page I did in celebration of my sister's birthday last August!  This page was published in the September 2012 issue of Scrapbook News and Review Magazine.


I played with modeling paste and added it to that kraft colored tag above.  I've been using lots of the techniques I learned in Christy Butters' class at The Art Studio.  I absolutely loved that class!


I've got an evening to myself coming up and I think I'll be spending it in my craft room playing around with mixed media supplies!  What are you up to?


Tuesday, April 9, 2013

It's been a few...

Hello all.  It's been awhile.  2013 has proved to be a bit of a challenge.  I'm trying to keep it as manageable as possible.  My family has lost two beloved souls...two grandparents in a span of 2 months.  It's sad and it takes some time to mourn, support others in the loss and then trying to get back to life.  But slowly I'm getting back into the swing of things.

It's been quite a challenge as far as mojo is concerned but I'm mustering it as fast as I can so I can bring you all more fun quick tutorials and also fun classes.  I've got a few ideas rolling around in my head and a couple classes in the planning stage.  I was hoping to get them up and running in April but I don't think that's going to happen.

So hopefully you'll hear more soon and I'll get them running by May.

I haven't shared a traditional scrapbook page with you all in awhile.  Here's a rare one...scrapping about moi is necessary but doesn't happen often.  If they do happen, it's in response to a prompt or challenge and I'm always pleasantly surprised at what transpires.

I'm a spontaneous person.  That can be a blessing and a curse.  I tend to run my mouth unfiltered which puts me at risk for foot-in-mouth moments-a-plenty.  But luckily most of the time I think with my heart and not often do I say horrific or hurtful things...I hope....lol!

This scrapbook page was published in Scrapbook News and Review Magazine's August 2012 issue.  I don't think I had a chance to share it yet so here ya go!  If you'd like to see a supply list, click on the photo of the layout and you'll be brought to my Flickr photostream.

At Random

Here's some more fun stuff to share.  I recently created this tag for The Art Studio blog.  I play with layers of ink.  If you want to see the full tutorial, just click HERE!

Sunburst Layered Ink Tag

There are a few new classes by the other instructors, you should check em out!

Thanks for stopping by!

Hugs,
Mo

Saturday, February 23, 2013

Color My World

I love challenging myself with employing color palettes.  The blog at Scrapbook News and Review features a weekly color palette to inspire you!  I created a fun layout using this week's color palette which consists of pink, gray, and blue.

Hugs

I loved how this turned out.  I tend to stick to super bright colors like reds, turquoise, and blues in many of my projects.  To break free from that cycle, I turn to color palettes for variety.

A couple other staffers created other projects using this same color palette so check it out HERE!

Hope you are having a grand weekend!

Hugs,
Mo

Tuesday, February 19, 2013

Good Times with Color Palettes!

Here's another color palette inspired layout I have to share!  I don't think I'd ever come up with this combination of colors but I adore them together!

I am loving sunburst patterns lately and I think the purple pairs wonderfully with these shades of yellow and red...and orange!

Aren't my niece and nephews adorable!  I just wanna pinch their cheeks!

Good Times

You really should check out the January SNR color palette I used HERE, because you'd probably gravitate toward a different color!  Play with the color combos to spark some inspiration and creativity!


Sunday, November 25, 2012

uR Priceless: A Doodled Effect/Stamped Background Card Tutorial

Let me start with some amazing deals!  I can't believe how packed this issue is!  I've recently posted a few  projects on my Facebook page inspired by tutorials from this issue as well as past issues.  I'm someone who lives and breathes scrappy happiness, and I tell you YOU CAN'T EVER know everything!   Be inspired by countless projects and tutorials in this issue and 2013 will bring fabulous inspirational themes and tutorials (just wait and see).  Ahem...I have a few tutorials in here too...


ready to hear the news?????

***
Between now and Monday night (November 26, 2012 at 11:59 pm), purchase a Lifetime subscription (of Scrapbook News and Review) at the deeply discounted price of $39.99 for yourself and we'll give a free Lifetime subscription to the person of your choice and send the proceeds to those who have lost so much this holiday season from Hurricane Sandy. 

Purchase the Lifetime subscription here and then drop us a note at helpdesk@scrapbooknewsandreview.com with the name and e-mail address of the person you want to gift the subscription to and we'll do the rest!

P.S. If you already have a subscription, then grab a subscription for a friend and we'll give another friend a free subscription and then pass on the proceeds to charity.  


You can also SEE THE MAGAZINE FOR FREE until Monday night (as referenced above).  Just go HERE (subscription page) and use promo code FREESNR12.
***

Here's another tutorial I'm sharing, previously published in Scrapbook News and Review's July 2012 issue.  If you haven't realized it by now, I try to stretch my scrappy supplies by using stamps in various ways.  Doodles are fun and popular right now.  If you don't feel confident in your doodling skills, try using a doodled image stamp(s) to create a patterned paper.  Here I've added pops of color to the stamped images, completing my card with felt flowers, chipboard, twine, and brads from my stash.

U R Priceless
(click on photo above for a supply list)


Supplies
Black cardstock
White cardstock
Small alphabet stickers
Felt flowers
Brad
Chipboard button
Bakers twine
Chipboard swirl
Chipboard tag
Outline stamps
Sentiment or word stamp
Pearlized ink (Smooches) or any colored pens/pencils
Black ink
Solvent ink (if using glossy/smooth finished chipboard tag)
Hot glue gun (or other strong adhesive)
Paper trimmer


Step One:  You will want to use a couple stamps with an outlined image you can color in.  I used two stamps and some black ink.  You can use one or more stamps to stamp a background onto some white cardstock.  Stamp some images off the edge of the cardstock.


Step Two:  Ink the edges of the white cardstock with black ink.


Step Three:  Glue the white cardstock onto some black cardstock so that you have a black border around the stamped background.


Step Four:  My chipboard tag has a glossy finish to it.  In order to stamp my word stamp onto the tag, I need to use Solvent Ink so that the ink doesn’t smear.  If your tag doesn’t have a smooth finish, you can use the same ink you used to stamp your background.


Step Five:  Color in the stamped outlined images with colored inks.  I used Pearlized inks by Smooches (Clearsnap).  You could also use colored pens or pencils.


 Step Six:  Add some baker’s twine to the chipboard tag.  Put together your felt flowers with brads or chipboard buttons and some twine.  I like to use a hot glue gun to glue the flowers together.


Step Seven:  Use a hot glue gun (or other strong adhesive) to glue your chipboard swirl onto your card.  


 Step Seven:  Use a hot glue gun (or other strong adhesive) to glue your chipboard swirl onto your card. 


Step Nine:  Add the felt flowers to the card with the hot glue gun.


Step Ten:  I added some alphabet stickers (“u” and “r”) above the word “priceless”.


Step Eleven:  If needed, trim the twine on the tag and the flower.


Don't forget to hop over to SNR and get in on those great deals!  You have till Monday November 26th at 11:59 pm...so HURRY!

Happy Crafting!


Sunday, November 11, 2012

Cards for Cute 'Lil Love Bugs!

I have the most fun creating cards for cute little ones!  Today I have a couple cards to share that were created and published in the May 2012 issue of Scrapbook News and Review Magazine!  I can't tell you how enriched my life has been since the gang at SNR has been in my life.  I have all these fabulous creations that have brought me joy and have passed on that joy to others in my life.  Such priceless moments...

TODAY is the LAST DAY you can peep the mag for FREE!  They want you to see just how AMAZING it is!  And to top it off, there is a grand sale on subscriptions!  If you purchase a lifetime sub, proceeds go to victims of Hurricane Sandy.  How great is that!  So, with the sale going on, you're not paying much more for a lifetime sub than you would a 1 year sub!

Purchase one for yourself and think about gifting another sub to someone else!  I'll include details below for y'all!

Now let's talk about some of my Love Bug inspiration...

Love Bug

I think for this card, we had to use found objects on it.  I found that bug laying on the floor while cleaning the kid's room.  It's a game piece.  I popped it into a old bottle cap (yes, I save these along with wine corks) and topped it off with some clear lacquer and I got myself a fun crafty piece for any project!


One Year Older

And on this card, we were to use chipboard.  All I did was color some chipboard pieces with craft ink and there I had some pops of beautiful bright color to add to my card!  I raided my stash for some stickers and vellum and viola, my card was done!

BOTH cards were projects to use us my stash.  I feel so much better when I create items.  So the next time you feel some guilt mounting, raid your stash and make it right!!!!

Here is the info about the mag I copied from my newsletter:


Take a Look Inside the Magazine for FREE


We’re blowing open the doors for a good cause!
 We want everyone to know what an awesome magazine Scrapbook News and Review Magazine is and the best way to do it is to show you.

For one weekend only, you can have unrestricted access to Scrapbook News and Review Magazine and there are two issues available for you to enjoy.

Check out how big it is. There are literally hundreds of layouts, cards, mixed media and altered art projects as well as scrapbook and card sketches, product reviews, Featured Artist and Digital Designer Spotlights...and oh gosh, too much to list.

Head on over and see for yourself. Keep in mind that this double issue doesn’t have any public submissions. This means that all content was created by our talented staffers. The reason? Because we want you to see how much you get when it’s just us. Can you imagine how large an issue is when we have other paper crafters joining in on the fun??? 

So, how does it work? Three easy steps.


  1. Login or register for an account.
  2. Go to Subscribe on the top menu.
  3. Click on One Time Only, click on subscribe and you’re in!

The next issue will be available on November 25, 2012 and a mini holiday issue will be available on December 11, 2012. Don’t miss them – get a subscription today while the sales are hot!!!


IN ORDER TO SEE THE MAGAZINE, YOU MUST USE PROMO CODE FREESNR12.

***
DO NOT SKIP THIS! - LET'S HELP THOSE AFFECTED BY HURRICANE SANDY


As a business owner, I’ve never wanted to become the type of business owner where you forget the kindness of others and those who helped get you to the top. It’s been five years since we opened our doors and it’s not often that we have a sale. For one reason, I don’t think it’s fair to those who have paid full price for a subscription. It’s a yucky feeling when you buy something and then it goes on a sale a couple days later and I never want to be associated with yucky feelings.


Which is why, when I do have a sale, it’s for the right reason: to help others. The devastation that Hurricane Sandy has levied upon the East Coast is unbelievable and we want to do everything we can to help.

As a way of raising relief funds for those who have lost their homes or can’t get to their jobs and their lives have become broken and scary, I want to hold a very special sale.

Simply share some love and get some love. All of our subscription plans, except for monthly, are on sale. But here’s how you can really help! Purchase the Lifetime Subscription (already a screaming deal before the sale) and we’ll give every bit of the proceeds to help those affected by Hurricane Sandy.

The Lifetime subscription is just that. It never expires. And for a limited time, it’s roughly the same amount as a one-year subscription! That’s unlimited years of fabulous content for just a few bucks more than a year!

To purchase the Lifetime Subscription at a discounted rate, please use promotion code SANDY. To receive 25% off any term subscription (semi-annual or annual), please use promotion code SPECIAL.

Do it now before you forget! Don’t let this awesome opportunity—for you and many others—slip by! And don’t forget that you can purchase subscriptions as gifts for friends and loved ones. They’ll appreciate your kindness, too!

You can even renew your own subscription. It doesn't matter how much time you have left. It will add it on to what you have.
We sincerely thank you for being a part of the Scrapbook News and Review community and for all the love and support you’ve sent our way over the years.

P.S. Remember that yucky feeling I was talking about? If you've purchased a subscription in the last 14 days, drop me an e-mail for a special thank you gift. 

***
Thanks for stopping by today!

Much Love!
Mo


Tuesday, July 31, 2012

A Winner and Eye Candy!


Hi Folks!  I have a winner of the free seat to my online class Scrapbooking with Punches and Die-Cuts!  Barb Turpin, if you don't already know, you won!  Thanks so much to everyone for your interest!  Class starts August 3rd if you'd like to sign up!  You don't have to be there the first day or any of the days I actually post the class.  I'll be there for questions and feedback and for at least a couple weeks after the class  finishes up!  You will have access to the class material for an unlimited time so it doesn't go away after the class ends, it will be there hanging out for you!  :)

And because I haven't posted anything to look at for awhile, here is some creations full of love.  The first layout was created for one of my bestest buddies ever!  Oh how I love this girl!  She and her Hubby have continually inspired me to strive and work at my marriage.  For those married, it's not that easy at times, it takes lots of work!  Am I right?  These two serve as a constant reminder of how to stay thoughtful, how to understand each other, and an example of immense loyalty.  I love these two with all my heart.


My dear S and T if you're reading this, I love you guys so much!  Thank you for bringing both of those beautiful babies into this world.  I love your two rug-rats with all my heart and am so honored I am blessed with you all in my life.

I Wish You Love by Maureen Esquillo-Kao Supplies Patterned Paper: Luxe Designs, My Mind’s Eye; Overlay: Luxe Designs; Alphabet Stickers: American Crafts; Journaling Card, Tab: My Mind’s Eye; Flowers: Petaloo; Button: Nikki Sivils; Mists: Lindy’s Stamp Gang, Maya Road; Label Maker: Dymo; Other: Felt hearts, rhinestones, flowers, ribbon

And this next card was very fun to create.  I think my favorite part is the dotting of liquid pearls behind that glittered fairly.  Such a fabulously textured card!  For supply lists of the next two creations, just click on the photos and you will be brought to my Flickr account which has supplies listed!


Fairy Happy Day


This third project is actually a hybrid layout.  Most of it is digitally created and I went in and added buttons and bling, liquid pearl smatterings and some fun flower trim!  If you don't want bulky pages, this is the way to go!  And in this day and age of skimping and saving, digital creating is a viable option.  Buy a digital kit and you can use it over and over and over.  Think of all the moolah you can save!  Create hybrid or fully digital layouts.  I'm so happy I explored Digi!

Things I Heart

All three projects were created for the March 2012 issue of Scrapbook News and Review.

Have you tried digital creating?  If you've been intrigued and haven't started learning, what's stopped you?
I hope you are all having a fabulous week.

The newest issue of Scrapbook News and Review is available!


My class is starting this Friday and I am beyond excited...but nervous as well!  Wish me luck!  Wish me more students while you're at it (wink wink)!


BLOGWEAR