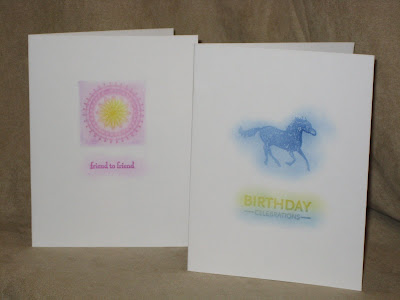
 I got this "quick card" idea when I attended a Stampin' Up! event last year. One of the great things about being a Stampin' Up! Demonstrator is being able to attend these events and swap cards with everyone! You leave with such inspiration and excitement!. But I have to apologize because I do not remember who I learned this technique from. It was one of the demonstrator booths at the event (when I do find out, I will post her name).
Supply List
Supplies Stampin' Up! unless otherwise noted
Stamp Sets:
Wanted 109395
Pocket Silhouettes 111672
Boho Backgrounds 111072
Upsy Daisy 111710
Boho Backgrounds 111072
Upsy Daisy 111710
Cardstock:
Whisper White 100730
Ink:
Versamark Pad 102283
Accessories:
Sponge Daubers 102892
On Board Essentials 112085
Non-Smear Pastels by The Stencil Collection
*Stampin' Pastels 105542 blend better!
*Stampin' Pastels 105542 blend better!
I knew I wanted to make some card packs to give to my friends last year and so I made these cards! It went pretty quick. I think it only took me a couple of hours to make about 80 cards!
I think Birthday and Thank You cards are most popular.
The best way to go about it is to decide how many cards you want in a pack. I think 3 are sufficient to give in a package. Design 3 cards which are simple. It is best to choose solid images which will pick up the color of the chalk.
You stamp your image with a watermark ink or Versamark Pad, then take a sponge dauber and chalk/pastels to rub the color on. The chalk sticks to the Versamark ink!
 The stamp image I used here is in between an outlined image and solid image. It worked out well. But when you compare this to the other card with the horse, I actually like the horse image better because it is more solid.
As you can see on the video, I use a chipboard frame to "frame" the image. You could also use the left over negative space from your chipboard packs to use as stencils! Or, you could just not use a stencil and just rub the chalk on (as I did with the next card with the horse)....the effect is still very nice! I did this with the sentiment "friend to friend". I just took my chalk and rubbed it on in a circular motion over the words.
 Here you see the horse card which I am so very fond of. I didn't use any stencils for the second card.....just rubbed on the chalk.
Here's a closer look the the horse image. I think the dark and bright colors look very nice against the white cardstock!
Chalk is very forgiving......it doesn't take a lot of know how to use it....you just rub it on!
I think I'll be giving these away again this year :)
I think I'll be giving these away again this year :)
I packaged them in medium sized cellophane bags 102757 with the envelopes and tied them with ribbon. You could also use raffia. You could choose to not use a cellophane bag and just tie ribbon around the 3 cards and envelops and it looks just as nice!
Stamp something inside if you wish. You can use dye ink or the same technique with Versamark ink and chalk.
People have told me how these cards have come in handy!
They're very inexpensive to make too!
Thanks for coming by my blog!
Happy Thanksgiving
and
Happy Stamping!
below is the YouTube video on this card
and
Happy Stamping!
below is the YouTube video on this card
Here are some recommendations of Holiday Stamp Sets fthat would work well for this project:
1) Spotlight on Christmas 111694 p. 33 IBC (Idea Book & Catalog)
2) Season of Joy 110384 p. 34 IBC
3) Holiday Trinkets 111650 p. 35 IBC
4) Two Cool Dudes 111708 p. 41 IBC
5) A Holly, Jolly Christmas 111558 p. 41
6) Shalom Sayings 111686 p. 44 IBC
7) Happy Kwanzaa 111640 p. 45 IBC
8) Best Wishes & More 111602 p. 55 IBC
9) Season of Simple Grace 111778 p. 16 HMC (Holiday Mini Catalog)
Click on the catalogs below to download them!

2008/2009 IDEA BOOK AND CATALOG (IBC)

HOLIDAY MINI CATALOG (HMC)


No comments:
Post a Comment
Thanks so much for visiting and commenting!!! You've brightened my day!