Wednesday, March 25, 2009

My Prince! Scrapbooking a Wedding Photo...FINALLY!

I am on a roll! Here's another project I busted out this week! I entered this layout (LO) in the "Favorite Quote" contest over at the Vintage Plum website! I'm tellin' ya, the contests and kits are really helping me get some scrapbooking done! This photo from my wedding was taken nearly 7 years ago! I'm lovin' the colors in the March 2009 Kit I got last week! And their products are made in the USA!


This LO is of me and my Prince....my Hubby Luke. We will be celebrating our 7 th Anniversary this May. Whoa does time fly!

This photo was taken on my wedding day. We were married in a Cambodian (Khmer) Wedding Ceremony which was elaborate, symbolic and amazing. It was based on a beautiful legend of the origin of Cambodia and a re-enactment of the marriage of the first Khmer prince, Preah Thong, to the naga princess, Neang Neak. It has been said that the father of the naga princess swallowed a part of the ocean, forming the land of Cambodia...this was his marriage gift to the couple. Our ceremony was a very abbreviated one, lasting only one day but these ceremonies usually last anywere from 3 days to a week!

If you're interested in reading more about the Cambodian Wedding Ceremony, I found some very detailed info on this website:
KhmerInstitute.org


I had a wonderful time creating this LO! I love using kits because it helps speed up the process of creating! I worry too much about all the little details sometimes! Having everything coordintated shaves off SO MUCH TIME!!!! I've got 2 rugrats pounding on my scraproom door every few mintues!!!! I don't have much time to waste going...."does this patterned paper go with this?"...."hmmmmm".....thanks VP for putting together such a great kit!


I used one of my favorite quotes by Amy Tan:
"I am like a falling star who has finally found her place next to another in a lovely constellation, where we will sparkle in the heavens forever."

Most items I used were INLCUDED IN the MARCH 2009 KIT purchased from Vintage Plum!

Patterned Papers:
Stella Ruby-Ladies Book Club (Basic Grey)
Office Lingo-Outside the Box (Pink Paislee)

Prism Cardstock:
Razzleberry Dark
Spring Willow Medium
Sunflowers Medium

Embellishments:
Boardwalk-Sea Mist Stickers (October Afternoon)
Family Time Rub-ons (Scenic Route)
Free Bird "My Friend" Die Cut Transparency (My Mind's Eye)
Assorted Buttons (Scenic Route)
2 fibers (Basic Grey)
White Card and White Envelope (Halcraft USA)
Other materials used in this project included -
Colorbox Fluid Chalk Inkpads in Creamy Brown and Charcoal
Cricut Cartridge (George Font)
Making Memories Scrapbook Colors in Spotlight
Foam or flat paintbrush
White Signo Gel Pen
Pigma Micron 05 Pen by Sakura
Java Walnut Ink (Antiquing Solution) by Tsukineko
If you have any questions, just leave a comment! I enjoy hearing from you guys! Have a wonderful week!

Wednesday, March 18, 2009

Gabe in the Garden

Hello hello hello! So, I got the "Mo"Jo goin' on today!!!! I wanted to enter the weekly contest over at Vintage Plum which is called "Scrap Nature"....so if you are up for the challenge, go over to Vintage Plum, create an account and start struttin' your stuff!

There are so many great people there and AMAZING talent! Very inspirational! Oh! And go blog hopping through the different member blogs!!! It was sooooooo fun discovering new people and their blogs!

I just got a subscription and got the March Kit in the mail! It's called Hill Country. CLICK HERE for a link to the photo and kit contents!

But this post is not about the VP kit....that one will be later...I'm still working on a layout....I'll share later!
For this page, I used mostly items from a paper kit called Bloom & Grow "Bloom" line made by My Mind's Eye. CLICK HERE to see the papers in the kit....warning....you may just fall in LOVE!

I constructed some cute flowers from my Blossoms & Blooms Kit and placed them down the left side of the page so that they looked like they were popping out of the vine design of the patterned paper. The scallop piece was a die cut strip. I used 2 colors of ink to give the distressed look to the layout. I inked the torn edge of the vine paper, the scallop strip, photo mats, journaling blocks, and chipboard piece.

I really enjoyed using the colors in this kit!

Close up of the journaling:
I used a really dark brown Cats Eye chalk ink to ink up the edges of the journaling card (see below for link).


Materials Used:


Jo-Ann Scrap Essentials Chipboard Letters


by Making Memories


Cats Eye Stylus Set by Color box: I used the black/brown ink.


by Stampin' Up!
(light brown ink)


Crop-A-Dile


by EK Success


Orange Peel Cardstock in Olive by Bazzil Basics Paper

Here are photos of my son, Gabe, playing under the sprinkler in the back yard last summer! In the end, he ended up naked....so, of course, I took photos!

I LOVE that the photos were taken at strategic angles.....NOT...nothing strategic about it...I didn't realize how funny these photos were until I saw them later downloaded to my computer! He's gonna hate me when he's older for taking these photos!!!!


I placed my new layout in my super cool frame! I've talked about this awesome frame before. It's by Creative Memories and it holds this 12" x 12" layout. It also comes with these tiny clothespins you can clip onto the "clothesline" located on the lower half of the frame.


Well, that does it! Remember to check out Vintage Plum....it's soooo fun there! Check out the forum because there is so much info there! Keep checking back because there are lots of new things going on there all the time!!!!

Saturday, March 14, 2009

Happy New Baby Card (Baby Boy Card): March Project of the Month


A friend of mine had her baby boy on March 13! She was a bit distressed that it was Friday the 13th, but I reassured here everything would be fine. Baby and mommy is doing well!! I thought creating the card was another opportunity for a quick video!!!! Wooohoooo! It's on my YouTube channel but I will also include it at the end of this post! Hey, if you guys have got any requests let me know and I'll see what I can come up with! I do a lot of videos with cards but have also done lots of different projects. It would have to be something not too involved, though! So feel free to put project video request either on this blog, by email or through my YouTube channel!


Stampin' Up! Items:
Curvy Verses Stamp Set Item# 114948
For a Friend Stamp Set (retired hostess set)
Natural Hemp Twine Item #100982
Vintage brads #109109
Kiwi Kiss Cardstock
Old Olive Cardstock
Baja Breeze Classic Stampin' Pad #111833

Non Stampin' Up! Items:
Epoxy button by Making Memories (no longer available)
Paper Piercer by unknown (an old style from Making Memories?)
Star brads by Making Memories (no longer available)
White Cardstock (Michael's)
Patterned Cardstock (Can't remember, but it was a paper pack purchased from Michael's)


Directions:

1) I cut the vanilla cardstock so that it would open horizontally (from left to right). So the measurements of the piece would be 4.25" x 11" which you then would fold in half.

2) I missed this step in the video (I pulled up the edge which was already stuck and snuck the brads back behind the patterned piece of paper later.) but be sure you place the 2 brads on the right hand side FIRST, then adhere to the vanilla piece of cardstock. I like doing it this way because it looks nicer than having the back of the brad showing through to the inside of the card.

3) Stamp the greeting "Happy New Baby" on white cardstock using the Baja Breeze (light blue ink). It's easier to stamp first then cut the piece out so that it's centered. Mount the piece on an piece of old olive cardstock (darker green). I don't usually measure, so my pieces are oddly shaped but centered by eyeing it just right.

4) Next, I added the items to the Kiwi Kiss (lighter green) strip, starting with the hemp twine. I tied the first one on and made sure the knot was in the back because the epoxy button would not lay flat. You then take another piece of twine and thread it through the holes of the epoxy button and tie it. Adhere the button to he piece with 3D foam (one on top and one on bottom) on either side of the piece of twine so that the button sits flat against the piece. Then, tie the second piece of twine so that the knot is in the front.

5) Add the 2 star brads to the left side of the Kiwi Kiss strip (lighter green) just to the left of the area where you will place the stamped piece of cardstock that says "happy new baby". I like using a paper piercer instead of a hand held punch because they make smaller holes. Sometimes when using mini brads you can see the holes behind them if you don't use a paper piercer.

6) Adhere the left side of the stamped piece to the Kiwi Kiss (lighter green) strip so that the right side hangs off.

7) Place foam behind the long kiwi kiss piece. I stacked them 2 pieces high to achieve the height I wanted. Adhere it to the card. (Tip: Remember to take into account, when using foam or any heaving embellishments, whether you are mailing your card. If you know it will be mailed, you may have to alter your card a little to make sure your card isn't too think or to heavy.)

8) Lastly, I added my greeting to the inside of the card. The one used "One little baby, many happy hearts."

9) I always stamp the back of my cards to show the recipient that it was handmade specially for them! (Tip: Have a stamp made with your email or website address so that if someone would like you to handmake something in the future, they can contact you! Or print small labels with your name and phone number/contact info on them and adhere to back of your cards......a little bit of advertising...if you need it!)

The image below is of the stamp set Curvy Verses (one of my most favoritest sets)...I've used it over and over and over! (Image below copyright Stampin' Up!)


Here's the video!!!!! Enjoy!!!
The Music info:
Artist: Marisa
Song: Angel's Wings
Album: East of Everything
Genre: Gospel & Religious


Thursday, March 12, 2009

Fun with Flowers, Buttons, and Brads.......oh my!!!!!


I found some pieces of Bali Breeze DSP (Designer Series Paper). Sorry, if you love it too, it's RETIRED :( You'll have to search for it!!! I've tried to find some...boo hoo. Oh well, there's tons of new cute DSP now!!!!


I love the colors in this embellishment jar! It is one of the Noteworthy Embellishment Jars by Making Memories and the color group is named Hillary. Click on the image above to check out other colors choices for these super cute flower/button jars! Love love LOVE em!!!!!


One of my favorite stamp sets is the Upsy Daisy set that Stampin' Up! makes! I've definitely used it enough to pay for itself ten times over!!!! Click on the stamp set image (copyright Stampin' Up!) to see more ideas or to order. (There is an awesome sale going on called Sale-A-Bration and you get a free stamp set for every $50 spend! Contact me to order and I will tell you about specials only available through ME!)


Here's a close up! I used Zots to adhere my flowers to the card. Those suckers really stick!!!! You can be sure that when you use Zots adhesive dots, your card won't fall apart on it's recipient!


Another cute flower card made with only a few scraps. I used Zots to adhere the buttons onto the card...be careful because they are not repositionable! When it sticks....it's pretty much STUCK!

Below is a view of all the patterns in the Urban Garden DSP which was used in this "thank you" card. Click on the image below (copyright Stampin' UP!) for more information on this patterned paper pack!

What's so cool about this DSP is that it actually coordinates with the Upsy Daisy stamp set!


Well, that's it for today's scrappy show and tell!!!! But I got more....just you wait! If you haven't already, be sure to check out my Stampin' Up! website! There are lots more ideas there!!!!! There are even supply lists for a lot of the projects!
Thanks for stopping by!!!!

Wednesday, March 11, 2009

A Bird-Day Card

So, if you didn't already know, I'm on a mission to use up my scrap pieces! Tag along with me on this adventure and I will be posting at least every couple of days my new creations!!! Tap in to your stash of tiny, misshapen, and even torn pieces to make something SCRAPPY!

Here's another scrap card I made! It was fun knowing that my pieces of scrap paper were being put to good use. I made this BIRD-DAY card for a friend of mine and I think it turned out nicely :)

I try not to put too much thought into making them....just kinda "go with the flow". I find a pattern that catches my eye and pull colors from it. Sometimes, just looking at the pieces I pull out will tell me which way the card will open. I found this piece that was torn on one side....really scrappy looking!!!!

I tied some twine around the cardstock and then popped this piece up. I can't stop using my
Scallop Edge Punch by Stampin' UP!

I took a box I bought on clearance at the scrap store and decorated it with more scrap pieces of double sided patterned paper. I stock up on items like this box for gift giving. I think I payed about $3 for 3 boxes (2 smaller boxes fit into this one). I used this box to put a set of 10 cards and 10 envelopes in to give as a birthday gift.

I really liked a lot of the patterned papers in this paper pad by Me and My Big Ideas. I bought it at Michael's. I liked a lot of the color combinations they used....not combinations I would normally design with.


CLICK HERE for the Me and My Big Ideas website to check out more designs.

Below is a few close up's. I made another card using the design above and different patterned paper and color combinations. I thought the pattern brought enough color to the card and so I left the image of the bird un-colored. Ha Ha...TRUTH?????? L-A-Z-Y! I glued the top portion of this square piece to the patterned paper section I already had popped up off the card. So this left the bottom half of the square piece hanging off.


Fancy it up with different border punches......I don't have any others (hmmmmm.......I need to get more) so I just left them as strips.....still cute!
Hee Hee.....it says happy BIRD day.....can't stop giggling. Check out the rest of this set.....my fave is "I STINK you're sweet!" hehehehehehe. This set is called PUN FUN by Stampin' Up! I LOVE IT A LATTE! Okay, I'll stop now!


I glued a strip at the bottom inside of the card so that the scallops would stand out! This card is perfect to give to a TWEET friend!!!!

Wednesday, March 4, 2009

Premade Cards....just add a sentiment!!!

Okay, I finally had the chance to do some cardmaking! Wooohoooo!! I am trying to prepare for the summer which I HOPE will be busy. I'm planning on selling cards and other items at a booth in Bothell, Washington. When I finalize the application and info, I will post it :) And maybe if you're nearby, come and visit! Anyways, I always find that I do not have time to hand make cards...so I end up giving presents away without one.....I KNOW! What kind of cardmaker does this?????? The kind that blogs, experiments with new techniques, an hand makes a lot of gifts but runs out of time to make the card to go with the gift I'm giving!

So here's my solution! I premade a bunch of cards ahead of time! I decided to leave off the sentiments, though. My thought was to also premake a bunch of sentiments. Then, when it comes time to give away a card, I choose the proper sentiment and pop it on!

I would recommend bold patterned papers, especially if you are going to use primarily word sentiment stamps.

With this project, I decided to use my scraps again!!!! My file folder is getting WAY TOO FULL!!!! You can use scrap pieces of ribbon too!


A great way to somewhat "organize" your scraps is to place them in file folders by color. I organize patterned paper by patterns: polka dots/circles, floral, vintage, stripes, and miscellaneous. Another way would be to place your patterned cardstock with the dominant color in the pattern.


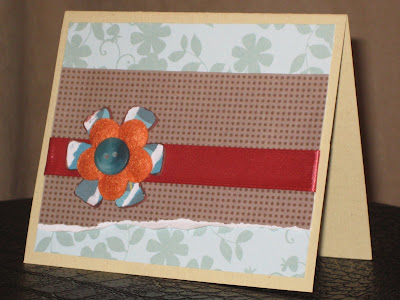
This was the first card I made, then I realized I could leave the sentiment off. You could also use sentiments that are pretty broad like the one above "from the heart" or "thinking of you" or "friendship"....they could work for a number of occasions. If I decide to change the sentiment, I could place one of the premade pieces right over the existing one.


I love the colors used in the "in bloom" flowers by Making Memories.....red, oranges, peach, light blue....so cheerful!

The premade sentiments included various themes: birthday, friendship, thinking of you, congratulations, baby, love...etc. You can choose to place your foam dots on them so that they are ready to go. If you choose not to, you then have the option to keep them flat if you desire. You can always add foam later.
Tip: use white and neutral cardstock for your card base and for your sentiments. Above, my sentiments are stamped on white carstock and mounted on a neutral colored cardstock which happens to be textured as well. This way, your sentiment pieces coordinate with all the other cards. I would recommend stamping in a dark brown ink like Staz On Timber brown so that later you can water color them if you happen to have the time :) Use Staz On for images you want to water color later to prevent the image from bleeding.

So now your cards are all premade and all you have left to do right before you give it away is pop on your sentiment....viola.....your card is done!!!!


Below is the specific stamp set I used. I believe it is retired though. If you REALLY love it and have to have it, check out Ebay. The name of the set is "For a Friend". It was one of he hostess sets offered in a past catalog.


Below are some other sentiment stamp sets you could use. (Available in the current catalog.)


(Image below copyright Stampin' Up!)

(Image below copyright Stampin' Up!)

(Image below copyright Stampin' Up!)


for other sentiment stamp sets, CLICK HERE TO BROWSE MY STAMPIN' UP WEBSITE
(click "shop") at the tip right corner of the page)

Another tip would be to use punches. Below is a really cute set you could use with a coordinating scallop punch!
Say It With Scallops 111678
image below copyright Stampin' Up!


Scallop Square Punch 112081
image below copyright Stampin' Up!


Here's another tip. Foam adhesive can be a little pricey. You can purchase sheets of foam. I like the ones that have one side with adhesive backing already. You cut them all up in tiny squares or rectangles. When you add a square to something, you just have to place glue on the side that doesn't have the adhesive. (I got this cool idea from my Stampin' Up! upline Caroline.) Remember though that these are not usually acid free so I only use it on cards...not scrapbooks.

Another option would be to place 3 D dots on the backs of the premade sentiment pieces when you are ready to mount them on your card. If you do not have any glue dots or foam adhesive, just glue your sentiment down without them and your card will look great anyway!

Another thing to keep in mind as you are creating your cards is to be sure to make some fairly flat (if you plan on mailing some). Stampin' Up! makes foam adhesive that is thin enough to go through the mail....I've never had any problems sending cards when I use them). They aren't as thick as some foam dots or squares. The 3D glue dots from Zots probably are too thick to use on cards you plan on mailing.

I used a chipboard flower which I glued ripped scraps of patterned paper to. You take your chipboard piece and place adhesive on one entire side. Add your strips right on top of it. When adding strips, you need to make sure you put adhesive on the entire bottom side of the paper (the side glued on to the chipboard). If you don't, your strip will fall right off after you cut the chipboard away from the excess paper. (I will make a tutorial on this and post hopefully within 2-4 days so CHECK BACK!)


I used my craft marker (the side with the flexible felt tip) to color the edges of my chipboard flower. It can get right in between the petals. I really like using glue dots when gluing chipboard to cards and scrapbook pages. To secure layers of flowers on each other, I use glue dots. Zots are VERY sticky and you don't have to worry about your embellishments falling off! They're really secure! I like to have many different sizes on hand.

When gluing on buttons to a project.....glue dots are AWESOME!!!!

I made sure that I also had a masculine looking card available if needed.

The card below leaves enough room to add a word sentiment or a larger stamp with an image.
I used lots of buttons and flowers on these cards. I've got tons of buttons in jars that I need to use up!
A set of cards like this would also make a great gift! Just be sure to include some foam adhesive or tape adhesive so that the recipient can add the sentiments later!
I plan on making more cards as time allows! Before you know it, I'll have enough cards to last me the rest of the year!!!!
Have fun with this project! As always, let me know if you have questions. I would love to hear other ideas as well! Have a great week!

BLOGWEAR