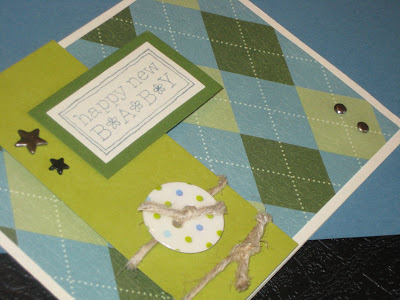
A friend of mine had her baby boy on March 13! She was a bit distressed that it was Friday the 13th, but I reassured here everything would be fine. Baby and mommy is doing well!! I thought creating the card was another opportunity for a quick video!!!! Wooohoooo! It's on my YouTube channel but I will also include it at the end of this post! Hey, if you guys have got any requests let me know and I'll see what I can come up with! I do a lot of videos with cards but have also done lots of different projects. It would have to be something not too involved, though! So feel free to put project video request either on this blog, by email or through my YouTube channel!

Stampin' Up! Items:
Curvy Verses Stamp Set Item# 114948
For a Friend Stamp Set (retired hostess set)
Natural Hemp Twine Item #100982
Vintage brads #109109
Kiwi Kiss Cardstock
Old Olive Cardstock
Baja Breeze Classic Stampin' Pad #111833
Non Stampin' Up! Items:
Epoxy button by Making Memories (no longer available)
Paper Piercer by unknown (an old style from Making Memories?)
Star brads by Making Memories (no longer available)
White Cardstock (Michael's)
Patterned Cardstock (Can't remember, but it was a paper pack purchased from Michael's)
 Directions:
1) I cut the vanilla cardstock so that it would open horizontally (from left to right). So the measurements of the piece would be 4.25" x 11" which you then would fold in half.
2) I missed this step in the video (I pulled up the edge which was already stuck and snuck the brads back behind the patterned piece of paper later.) but be sure you place the 2 brads on the right hand side FIRST, then adhere to the vanilla piece of cardstock. I like doing it this way because it looks nicer than having the back of the brad showing through to the inside of the card.
3) Stamp the greeting "Happy New Baby" on white cardstock using the Baja Breeze (light blue ink). It's easier to stamp first then cut the piece out so that it's centered. Mount the piece on an piece of old olive cardstock (darker green). I don't usually measure, so my pieces are oddly shaped but centered by eyeing it just right.
4) Next, I added the items to the Kiwi Kiss (lighter green) strip, starting with the hemp twine. I tied the first one on and made sure the knot was in the back because the epoxy button would not lay flat. You then take another piece of twine and thread it through the holes of the epoxy button and tie it. Adhere the button to he piece with 3D foam (one on top and one on bottom) on either side of the piece of twine so that the button sits flat against the piece. Then, tie the second piece of twine so that the knot is in the front.
5) Add the 2 star brads to the left side of the Kiwi Kiss strip (lighter green) just to the left of the area where you will place the stamped piece of cardstock that says "happy new baby". I like using a paper piercer instead of a hand held punch because they make smaller holes. Sometimes when using mini brads you can see the holes behind them if you don't use a paper piercer.
6) Adhere the left side of the stamped piece to the Kiwi Kiss (lighter green) strip so that the right side hangs off.
7) Place foam behind the long kiwi kiss piece. I stacked them 2 pieces high to achieve the height I wanted. Adhere it to the card. (Tip: Remember to take into account, when using foam or any heaving embellishments, whether you are mailing your card. If you know it will be mailed, you may have to alter your card a little to make sure your card isn't too think or to heavy.)
8) Lastly, I added my greeting to the inside of the card. The one used "One little baby, many happy hearts."
9) I always stamp the back of my cards to show the recipient that it was handmade specially for them! (Tip: Have a stamp made with your email or website address so that if someone would like you to handmake something in the future, they can contact you! Or print small labels with your name and phone number/contact info on them and adhere to back of your cards......a little bit of advertising...if you need it!)
The image below is of the stamp set Curvy Verses (one of my most favoritest sets)...I've used it over and over and over! (Image below copyright Stampin' Up!)
The Music info:
Artist: Marisa
Song: Angel's Wings
Album: East of Everything
Genre: Gospel & Religious
Song: Angel's Wings
Album: East of Everything
Genre: Gospel & Religious


Girl...that is sooo awesome! It is so cool to see how you work your "mo-magic"! ahhaha Ah, I crack myself up! lol
ReplyDeleteAnd no way...the frames are not on the back burner! lol Just the side one! haha Seriously, though. I MIGHT wait until I get my April kit in to finish them. So, for you darling, I will get them done in a couple of weeks! hehe
How long will you be gone to Cali?
Nevermind...I will Plum Mail you. I have a couple of questions for ya! :D
B