Tuesday, November 25, 2008

November Project of the Month: Super Quick Cards

I got this "quick card" idea when I attended a Stampin' Up! event last year. One of the great things about being a Stampin' Up! Demonstrator is being able to attend these events and swap cards with everyone! You leave with such inspiration and excitement!. But I have to apologize because I do not remember who I learned this technique from. It was one of the demonstrator booths at the event (when I do find out, I will post her name).
Supply List
Supplies Stampin' Up! unless otherwise noted

Stamp Sets:
Wanted 109395
Pocket Silhouettes 111672
Boho Backgrounds 111072
Upsy Daisy 111710

Cardstock:
Whisper White 100730

Ink:
Versamark Pad 102283

Accessories:
Sponge Daubers 102892
On Board Essentials 112085
Non-Smear Pastels by The Stencil Collection
*Stampin' Pastels 105542 blend better!

I knew I wanted to make some card packs to give to my friends last year and so I made these cards! It went pretty quick. I think it only took me a couple of hours to make about 80 cards!
I think Birthday and Thank You cards are most popular.

The best way to go about it is to decide how many cards you want in a pack. I think 3 are sufficient to give in a package. Design 3 cards which are simple. It is best to choose solid images which will pick up the color of the chalk.

You stamp your image with a watermark ink or Versamark Pad, then take a sponge dauber and chalk/pastels to rub the color on. The chalk sticks to the Versamark ink!

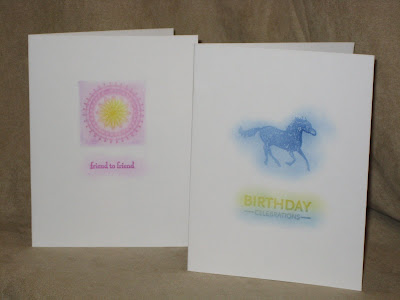
The stamp image I used here is in between an outlined image and solid image. It worked out well. But when you compare this to the other card with the horse, I actually like the horse image better because it is more solid.

As you can see on the video, I use a chipboard frame to "frame" the image. You could also use the left over negative space from your chipboard packs to use as stencils! Or, you could just not use a stencil and just rub the chalk on (as I did with the next card with the horse)....the effect is still very nice! I did this with the sentiment "friend to friend". I just took my chalk and rubbed it on in a circular motion over the words.


Here you see the horse card which I am so very fond of. I didn't use any stencils for the second card.....just rubbed on the chalk.


Here's a closer look the the horse image. I think the dark and bright colors look very nice against the white cardstock!


Chalk is very forgiving......it doesn't take a lot of know how to use it....you just rub it on!
I think I'll be giving these away again this year :)


I packaged them in medium sized cellophane bags 102757 with the envelopes and tied them with ribbon. You could also use raffia. You could choose to not use a cellophane bag and just tie ribbon around the 3 cards and envelops and it looks just as nice!


Stamp something inside if you wish. You can use dye ink or the same technique with Versamark ink and chalk.

People have told me how these cards have come in handy!
They're very inexpensive to make too!
Thanks for coming by my blog!
Happy Thanksgiving
and
Happy Stamping!
below is the YouTube video on this card


Here are some recommendations of Holiday Stamp Sets fthat would work well for this project:
1) Spotlight on Christmas 111694 p. 33 IBC (Idea Book & Catalog)
2) Season of Joy 110384 p. 34 IBC
3) Holiday Trinkets 111650 p. 35 IBC
4) Two Cool Dudes 111708 p. 41 IBC
5) A Holly, Jolly Christmas 111558 p. 41
6) Shalom Sayings 111686 p. 44 IBC
7) Happy Kwanzaa 111640 p. 45 IBC
8) Best Wishes & More 111602 p. 55 IBC
9) Season of Simple Grace 111778 p. 16 HMC (Holiday Mini Catalog)
Click on the catalogs below to download them!


2008/2009 IDEA BOOK AND CATALOG (IBC)


HOLIDAY MINI CATALOG (HMC)

Thursday, November 20, 2008

KWernerDesign.com Color Inspiration #31


Here we go again! I did find some spare time this week for the Color Inspiration challenge from KWernerDesign.com! It's my little sister's birthday.....so I had a perfect reason to make a card! I've been wanting to use my mini calendar stamp set! The Colors were Elegant Eggplant, Close to Cocoa, Pumpkin Pie, Whisper White, and So Saffron.....here's what I used.....
ALL SUPPLIES USED ARE STAMPIN' UP! UNLESS OTHERWISE NOTED


Supply List:
Stamps Sets
Mark the Date 111097
Full Calendar 111045


Ink:
Pumpkin Pie Classic Stampin' Pad*Elegant Eggplant Classic Stampin' Pad and marker*Close to Cocoa Classic Stampin' Pad

Paper:
Elegant Eggplant*Close to Cocoa*Whisper White*So Saffron*Pumpkin Pie
Accessories:
Pumpkin Pie 1/4" Grosgrain Ribbon
Small Oval Punch 107304
Large Oval Punch 107305
Stampin' Dimensionals
3/16" Corner Rounder Punch 109047
Spiral Clip Word Charm Alphabet "fun" by JoAnn Scrap Essentials


Funny how a lot of cardmakers can't seem to have a card made BEFORE someones birthday! I always find myself trying frantically to make a handmade card last minute! Why can't I just make a whole bunch of them??????? Well, here's a card you can mass produce and keep in a special box! You could pre-make a bunch of them for yourself ...minus the month and numbers, of course. Then, when you are ready to give one away, just stamp the month and write in the dates later!
If you haven't already noticed......I LOVE PUNCHES! Whenever I know I have to make a bunch to swap....I make sure I incorporate lots of punches!!!!!
 

Wednesday, November 12, 2008

KWerner Design Blog Color Inspiration 30


Yay! Here's my second round doing this! It's a rainy day here in Washington....lots of flood warnings! But part of me missed rainy days like this.....perfect days for enjoying a cup of cocoa next to the fireplace and scrapbooking in my craft room! Aaaaaaaah! I LOVE AUTUMN!

I pulled out some of my Hodgepodge Hardware......FINALLY!


Materials
(all Stampin' Up! unless otherwise noted)

Stamps
Best Yet 111604
Eastern Blooms 111626
Ink
Old Olive Craft Ink
Versamark (watermark ink)
Colorbox Ink in Dune (for Sahara Sand)
Paper
Old Olive
Certainly Celery
Whisper White

Acessories
Hodgepodge Hardware
Certainly Celery Grosgrain Ribbon
White Paper Flowers (I think they are Making Memories)
Heat and Stick Powder
Scallop Edge Punch
Stampin' Dimensionals

I used craft ink so that I could stamp the large flower image and "to you from me" and emboss it using the heat and stick powder. I popped up the lower old olive section of cardstock with Stampin' Dimensionals (with whisper white scallop edge adhered to it).
I also stamped a smaller flower in Versamark ink so I could emboss it again with Heat n' Stick powder. I stacked the three flowers on top of each other and mounted it onto the card with Stampin' Dimensionals.

I wanted to add some old olive flowers, so I again used the craft ink and pressed some small white paper flowers in it to color them!
I wanted a slightly distressed look so I used my Colorbox pigment ink in Dune to ink the edges! You definitely would need pigment ink for this project since I'm using them to emboss and ink on dark cardstock (dye ink does not do this)!
Please leave any comments or questions! I LOVE to hear from other crafters! Now I'm super excited because I can peek at the other submissions (I reward myself in the end by allowing myself to look at the other CI entries.)......he he he.....
Happy Stamping!


Thursday, November 6, 2008

Dinosaur Birthday Invitations and Favors!

My son is turning 2! My how time flies!


I took this photo the other day....had to share it!

I have been thinking about a theme since September for Gabriel's 2nd birthday party. I have finally settled on a design for the invitations! I wanted to go fairly fast as far as putting together the inviations....since I knew I'd be making about 20-30 (we have a huge family). I searched the internet but it wasn't so easy to find ideas as far as handmade cards.....I probably wasn't searching right. Anyway, I think I REALLY just needed a reason to buy a Cricut! Heee Heee! So I got one!!!!!


I decided on dinosaurs because we have a nickname for my son....Pterodactyl....because of this squealing-shout he does.....it's weird. He's a funny little guy!


Here is a look at the invitations. I'm not sure if my mom wants me to plaster her address over the internet, so on Saturday I'll have to make a SPECIAL one to post online. Check back and I'll add all the other dinosaur stuff I'm planning....it's still in the works!


The invitations measured 4.25" x 5.5".....standard size so I didn't have to buy specially sized envelopes....I already had a ton! I used two cartridges.....


1) Paper Doll Dress Up


2) Tags Bags Boxes & More


(Note: Many images are now shown on the back of the box for the Paper Doll Dress Up cartridge....like the dinosaurs! This cartridge has TONS of images that are not shown! You would have to peek at all the images through the Cricut website to see them all.)


And if you are trying to decide between the standard Cricut or the Cricut Expression, I've got some tips. If you are going to want something that can cut a bunch of images at the same time, you might want to invest in the Expression. I had to do a lot of standing by because the machine could only cut out 2 dinosaur images from one 6" x 11" sheet (I cut down an 8.5" x 11" paper and set the height to 3" to fit on my invitation. ) And then when I made the bags, I could only cut 1 bag out at a time (height dial was set to 5") I acqtually wanted to make the bag bigger but the machine couldn't cut it out any bigger. Oh well, I'm still satisfied....I won't be doing this much! I will just be using my machine for scrapbooking and making cards...stuff I don't plan to mass produce!


The dinosaur images themselves didn't need a whole lot of embellishing. By just adding googly eyes and drawing with opaque gel pens, you can make a pretty cute dino! I drew in the dinosaur mouth, nostrils, and toes (which al already cut into the image) with Souffle 3-D opague Puffy Ink pens by Sakura. You could also draw in spots with different color pens to add character to your dinosaurs! Don't want to invest in a set of gel pens? A Signo Gel Pen looks great! If you're looking to get a little more fancy with the dinosaurs, Jessica Tolbird gives you instructions on the Cricut website (click here).


I used the Tags Bags Boxes & More cartridge to make this bag and one of the extra dinosaurs I cut for the invitations! Simple but cute! I stuffed it with Gabriel's favorite candies....M & Ms, dum dums, and twix....and a dinosaur!

I'll be posting more photos so check back! Having a toddler means doing things a little bit at a time!!!!!!!! A very challenging thing for me! I'm just happy he's not glued to the TV!!!

BLOGWEAR