Hi Folks! Just a quick post! I'd like to share the Gift Card Tutorial I submitted to Scrapbook News and Review over a year ago when I was one of the Featured Artists! Some of you might have already seen it but for those of you that haven't, here you go! xoxo
Gift Card Holder/Greeting
Card
Although I find myself scrapbooking for the most part, I
fell in love with crafting through my first endeavor…cardmaking! My interests are always evolving, and my
newest obsession is digital scrap booking.
I have also dabbled in knitting, jewelry making, crochet, and sewing,
and am self-taught in all these areas. I
learn best that way! Today, we’ll play
with something simple but still unique and fun!
These days, so many of us are crunched for time. Between being a wife, mother of two and
working part-time, I sometimes find it challenging to work in some crafty time.
I’m a notorious scrapbooking addict, so I feel guilty when I give store-bought
greeting cards – but I’ve found a way to solve that problem. I make batches of cards in an assembly-line
approach. I switch out my greetings so
that I have some “happy birthday,” “thank you,” “best wishes” and “congratulations”
cards. Now you too can create a crafty
reputation by giving out handmade cards!
Let me share my approach with you!
I’m going to show you how to make a gift card
holder/greeting card that you can use for a broad range of occasions with
additional photos of a second card design.
The body of this tutorial will include a step-by-step process of
creating your card. As I conclude this
tutorial, I will discuss tips for mass production of your card.
In approaching your card design, it’s important to pick the
appropriate cardstock – more feminine cardstock for girls/women and, of course,
masculine cardstock for boys/men.
Alternately, you could choose a neutral cardstock that would work for
both.
I’ve chosen a printed, double-sided cardstock for my card. For this design, it is important to use a
double-sided cardstock that is printed on one side and fairly light and solid
on the other. This way, you can write a
note on the inside of the card.
Supply List:
Double-sided cardstock for body of card
(one printed side and one light colored, solid side)
My Mind’s Eye
Dream Street Papers
Solid textured (or un-textured cardstock)
Bazzill in light blue and charcoal
Double-sided cardstock (for flowers)
Pink Paislee
Standard-sized envelopes (A2 or 4-3/8” x 5-3/4”)
Sizzix Die Cutting Machine and accessories for embossing
plates and die cuts
Sizzix Embossing Plate
Flourish
Harlequin
Sizzix Originals Die
Flower Layers
Star Paper Punch (masculine card option)
Stampin’ Up!
Black buttons
Stamp(s) with desired greetings.
Stampin’ Up!
Bone folder
Paper trimmer
Adhesive
Black ink (or other ink to coordinate with your card design)
Ranger (black soot)
Step One: You will start by cutting down a 12” x 12” double-sided cardstock to 4 inches so that it measures 4” x 12”. This card will be folded into 3 sections, which will fold into a square shaped card measuring 4” x 4”. After you’ve cut your 4” x 12” piece, you’ll need to score
4” on each side of the piece. Be sure to
place the printed side of your cardstock facing downward before scoring. You want to score your lines onto the solid
side of your cardstock so that your scores fold inward.

Step Two: After scoring, fold each end inward so that your card will easily fold into itself.
Step Three: You will then create a fold in the middle square so that the solid parts of your cardstock meet or “kiss” each other. Start by folding the left side of the card downwards. (Note: I would NOT suggest scoring a diagonal line because it is difficult to get a precise fold this way. It’s best to hand fold this section.)
Step Four: Then, you will fold the flap backward, then upward, using the score line to guide the fold.
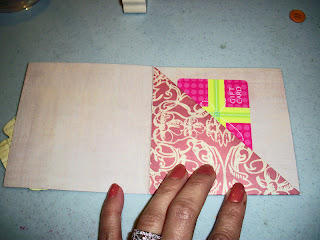
When folded correctly, your card face should have a print on
it. When opened, the left side of your
card should be solid (to house your greeting), the bottom half of your diagonal
pocket should be printed, and the back section of your card will be solid.
Step Five: On the printed card face, I’ve chosen to layer a solid
cardstock.
Now, keep in mind, you should design your card so that you
can make many of them in one sitting. Some of the things that will assist
you with this are implementing embossing plates, a cutting
machine like the Sizzix/Cuttlebug/Cricut, stamps and/or punches.
Think of a way you would be able to mass-create cards with as little effort as
possible. If you’re great at digital scrapbooking,
you could even use your computer to create multiple copies of your card face
design that can then be cut out (hybrid technique). Remember, efficiency is
the key.

 Step Six:
 The next step is to take your solid piece of cardstock and
cut it down to 3.5” x 3.5”. Because my card is fairly simple, I wanted to
fancy it up by adding additional texture. I achieved this by opting for a
textured, solid piece of cardstock which will then be embossed using an
embossing plate and my Sizzix.
Step Seven: Next we will cut some flowers to embellish our card.
It is best to choose a die or punch that has 2 or more sizes
of flowers and a double-sided cardstock. This will allow you to create a
nice layered flower that has great patterns, depth, and dimension.
Step Eight: Next is to choose another solid or mostly solid colored
cardstock which you will cut into strips. On this strip, you will stamp
your salutation/greeting (i.e.: happy birthday, congratulations, thank you,
best wishes…etc). The strips should measure ¾” x 3.5” (according to my
size of the word/greeting stamp I used, yours may differ slightly).
 Step Nine:
 It is important, especially when creating cards that will
have different greetings on them, to lay out your card without adhering
anything. This way, you will know where to position your strip, stamped
greeting, and flowers so that it will look pleasing to the eye.
Have your greetings pre-selected before you design your card
to make sure they will fit on the strip. Each card will differ slightly
because of the different greetings you will use.
 Step Ten:
 After you’ve determined your strip and stamp placement, go
ahead and adhere the strip onto the solid/embossed cardstock. Now you can
stamp your greeting.
Note: If you are using wood mounted stamps and
desire precise placement of your greeting, you might want to use a
stamp-a-majig (or other stamp positioner) or a clear greeting stamp to aid you
in positioning your greeting/salutation perfectly.
 Step 11:
 Add your flower and flower center (i.e.: button/brad).
If you are planning on sending some of these cards in the mail, you probably
don’t want to use chunky buttons for the flower centers. Instead, you
might want to consider mini brads or small punched circles.
Glue down the pocket by placing a line of adhesive down the
left edge of the back flap/part of the card.
 Step 12:
 Now all that’s left to do is to tuck your gift card into the
diagonal pocket when you’re ready to give it to its recipient. Jot down a
quick note or greeting, tuck it in an envelope and you have a beautiful
handmade card and present to give!
Here, I also have a masculine card variation:
For this card, I used the same
solid-colored, textured cardstock (
Bazzill) and a
paper punch (
Stampin’ Up!) instead of a die
cutting machine.
These cards should fit easily in a standard sized envelope
(A2 or 4-3/8” x 5-3/4”).
Tips on mass production:
Keep in mind that in order to mass-produce this card, you
will need to be sure you have enough supplies to create the amount of cards you
would like and a fairly simple card design to save time. The easiest way
to do this, especially if you tend to spend a lot of time designing, is to use
a scrapbooking kit which consists of coordinating solid and printed
cardstocks. You could also choose one of those coordinating double-sided
cardstock pads. After designing your card, create your prototype to make
sure the process will go smoothly before you continue to create the rest of
your cards. After any needed adjustments to your card design, you’re
ready to divide the tasks for your assembly-line approach:
Cut down your 12” x 12” double sided sheet to three 4” x 12”
strips
Score your 4” x 12” strips
Fold on score lines
Fold diagonal into middle square and fold card up to 4” x 4”
square
Cut down your solid cardstock to 3.5” x 3.5”
Emboss your solid cardstock
Cut down your mostly solid strips (to allow for a stamped
greeting/salutation) to ¾” x 3/5” strips (or the size required to accommodate
your word/greeting stamp)
Cut or punch out your flowers/stars
Gather enough buttons/brads for the flower center and/or
punch out small circles for the flower middles
Adhere the ¾” x 3.5” strip to the solid embossed cardstock
Stamp your greetings
Adhere your flowers/stars
Set aside enough envelopes for your pre-made cards
I hope you’ve found some ideas with this tutorial. If you're interested in taking scrapbooking and cardmaking classes, I will be advertising classes soon as an Instructor at The Art Studio. The launch of the website is on the horizon so check back soon or you can click on the "The Art Studio" button on the sidebar and I will have it linked up to the website after the launch! I hope to see you there!