I do this often. I pre-make my cards and organize them into sections. When I find one section running low, I peek into another section of cards and see if I can change them up or re-do them to create a card with a different theme or sentiment.
In my newest video, I show you how I re-do a Valentine's Card and turn it into a Birthday Card. It's a quickie video just over 4 minutes!
Hope you enjoy! If you've got any requests for a special type of card making or scrapbooking/crafting video, just leave a comment on either the YouTube channel or this post and I'll work on it!
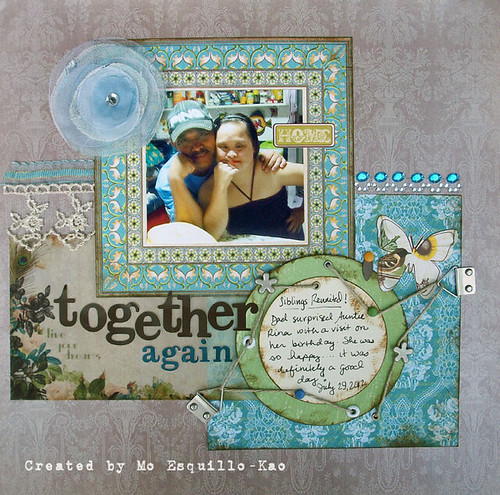
Create an
eye-catching journaling circle simply by raiding your stash of hardware! See how I mix various photo hangers, brads,
eyelets, flower brads, and photo holders to create a scrapbook page you can’t
help but run your hands over!
Step One: Arrange a grouping of patterned paper squares. Cut or punch two circles. Ink the edges of all the elements including the circles. Glue together the bottom square and rectangle papers but do not glue any of these papers to the base patterned cardstock of the scrapbook page. Glue together the circles but do not glue the circle down to the papers yet.
Step Two: Arrange some brads, eyelets, photo hangers and a photo holder in varying areas around the journaling circle. You will be stringing a piece of hemp twine through and around these pieces. I am also adding a couple photo hangers to the outside edges of the patterned paper cluster.
Step Three: Use a pencil to mark where the holes for the brads and eyelets will be placed.
Step Four: Use a Crop-A-Dile and a paper piercer to create holes into which you will anchor your metal pieces to.
Step Five: Start the hemp twine in one of the eyelets. Secure the twine to the back of the journaling circle with tape.
Step Six:
You will then thread the twine through eyelets and wind it around the
brads as shown. You can now add a small
amount of glue behind the areas of the journaling circle you have already wound
the twine through. Do not put glue on
the bottom half of the journaling circle.
You still have a couple places to thread the twine through. You will need to lift up the bottom half of
the circle to do this.
Step Seven:
Finish threading and winding the twine through the rest of the metal
pieces.
Step Eight:
Thread the twine through the first eyelet again to complete the design.
Step Nine:
Cut off the excess twine and secure to the back of the journaling circle
with more tape. Your fancy fun
journaling circle is all jazzed up!
I hope you enjoyed that tutorial! If you want to see more scrapbooking or cardmaking tutorials on my YouTube Channel, just comment here or send me an email letting me know what you want to see or learn!
Hello Everyone! Boy do I have a treat for you! I have for you a sneak peek into my newest class. This time I've come up with a fun cardmaking class which focuses on stamping and using your Crop-a-Dile!
If you’ve got stamps and a Crop-a-Dile, then you’ve got
what it takes to learn how to use them together to create fabulously fun cards.
Whether or not you’ve been getting some good use out of the investment you’ve
put into your stamp collection, my class will help fuel your mojo to create
cards galore.
A Crop-a-Dile isn’t just a hole punch. It’s so much more!
Join me in this jam-packed class that features photos and a combination of
step-by-step written and video tutorials to illustrate the many techniques
you’ll learn.
You’ll be inspired by the smart and savvy tips and tricks I’ve developed to
transform cardstock, scraps and ink into beautiful cards you may not want to
give away.
I’ll even show you how to jazz up your cards with equally
ignored items such as glitter glue, Liquid Pearls, embossing powders and chalk
pastels. They’re not a necessity, so it’s okay if you don’t have such lovely
materials -- you’ll still be inspired to use what you’ve got on hand.
Stop neglecting your stamps and Crop-a-Dile and learn how to revive them with
this class. No CPR certification required.
I tuned in to Celebrity Apprentice last night. This woman, Emily West is AMAZING! I love her!
And below is a clip from my FAVE talk show...Wendy Williams! How YOU doin'?
Ya GOTTA watch these cute kids!
That's all folks, just needed to share! I'll be having a grand time at work, I'm sure!
Ugh, last week was CRAZY (at work)! Can U say...adrenaline rush????? Can't say the details but the good thing that came out of it was making goo goo eyes at the Fire Dept guys who responded to the 911 call! Ha ha!
And a BIG thank you to all my friends who extended your thoughts and prayers on my last post. My blogging may be much less in next few months because of higher priority things I will be doing. I will tell u a little more soon.
Okay! Here's a special treat! If you haven't already heard my ramble about Vintage Plum......here's more info! They sell scrapbooking kits and have an awesome website where you can shoot the breeze with other passionate crafters! There are weekly challenges and contests! Lots of awesome fun! I've met some amazing women with equally amazing talent over at VintagePlum.com! They have recently chosen their first design team! Cutie Patootie Beth P is one of them! And, of course, I was quite flattered when she asked me to do a tutorial on the Vintage Plum blog! I chose to do it in video format, of course!
So, my April Project of the month is a tutorial introducing a weaving technique. The idea came from a scarf I made a few years ago...and I applied it to cardmaking! Basically, you weave in pieces of ripped cardstock strips and yarn and or some ribbon. A card like this would be best given in person rather than mailed since it's too bulky. Or if sending a present in the mail, tuck it in your package or it may be sent back to you!
I will add the video to the end of this post for your viewing pleasure!
I decided to use VP's March 2009 kit called "Hill Country" to make this card! Having this kit available took the guesswork out of coordinating different cardstocks and fibers. I've since subscribed to the monthly kits at VP and I CANNOT WAIT till the April kit is released! Wooohooo!
Here's a close up of the card:
Look at the nummy yummy papers, fibers and buttons! Normally, I wouldn't think to add that cool yellow color to the card, but once again, thanks to the kit, I've been able to use colors I otherwise would not have chosen!
As you can probably see from the photos....it may take a little time to do...but it's soooooo worth it! You might not even want to give it away after you're done!!! Hahaha!
If you want to peek at the kit contents of Hill Country by Vintage Plum, CLICK HERE to go to VintagePlum.com and look at the kits! They consist of products MADE IN THE USA!
AND tune in to Creative Cafe on tonight at Vintage Plum!!! What is Creative Cafe? It will take place at VintagePlum.com every tuesday night at 6 pm CST and includes a live chat with step-by-step instructions and pictures of the project for the evening.
I am working on ANOTHER post and watch for it tomorrow or over the weekend! My project inspiration.....Carrie Bradshaw! That's the only hint you'll get!
Okee Pokey, as promised, here's the April Project of the Month video! Enjoy!
For more creating with string inspiration click image below:


+CLOSE+UP.JPG)
+SIDE+VIEW.JPG)
+FLAT+VIEW.JPG)

