Showing posts with label handmade gifts. Show all posts

Tuesday, December 3, 2013

Handmade Ornament Tutorial - Handmade Tag Tutorial

Well, I've been kicking it into high gear with lots of things to do this month!  Here's a tutorial on that ornament/tag I teased about!  I basically covered a chipboard piece with patterned paper, added some fun buttons and a hat pin and I had a beautiful ornament which can double as a tag!  If you didn't get to see it, HERE is the previous post in which I used it as a tag on a gift bag.

Flower Tag by Maureen Esquillo-Kao Supplies Button: Bazzill; Trinket Pin: Maya Road; Chipboard: Stampin Up; Stamp: Prickley Pear; Watermark Ink: Tsukineko; Glitter: Stampin Up; Other: Twine, cardstock, patterned paper, pearl

Supplies
Chipboard shape with flower in the center
Patterned Paper
Blue cardstock
Red cardstock
Clearly Beautiful Tree stamp set from Prickley Pear
Watermark ink, embossing ink, or craft ink (one of the three)
Glitter
Blank Ink
Inking tool (optional)
Button with bling
Pearl
Trinket Pin
Glue
Cutting blade
Scissors
Twine
Crop-a-Dile
File/sanding block
Glass mat/cutting mat


Christmas Ornament/Christmas Tag

Christmas Ornament/Christmas Tag
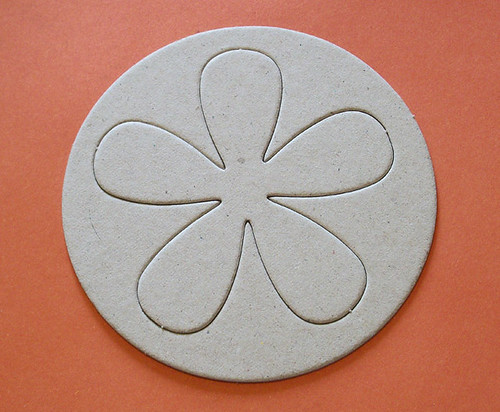
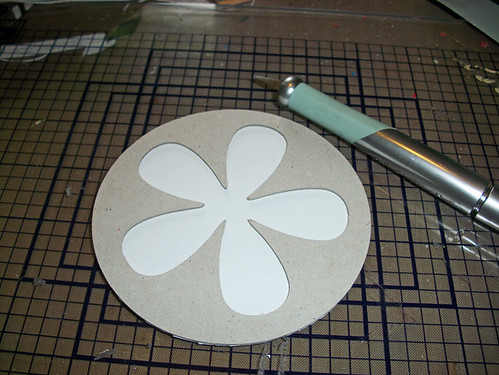
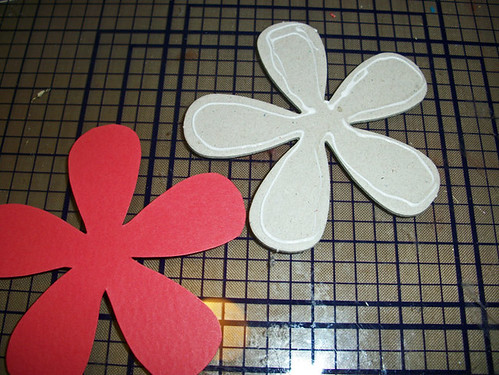
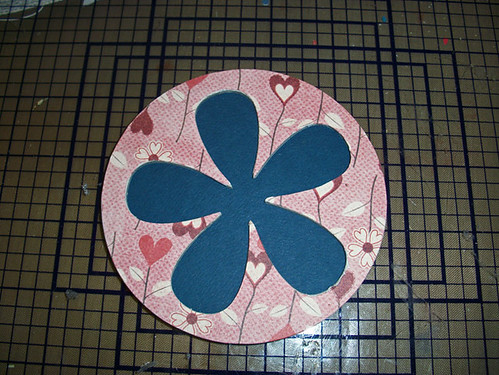
Step One: Take your piece of chipboard and pop out the flower.  You can choose to sand the edges.


Christmas Ornament/Christmas Tag
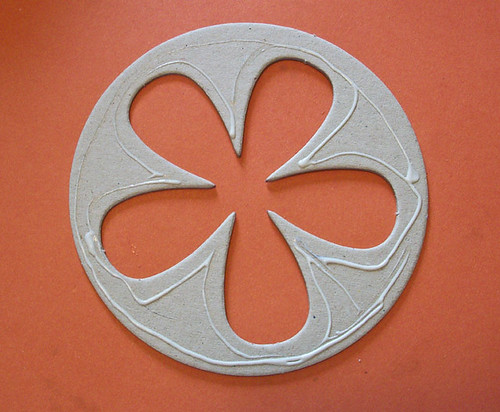
Step Two: Place glue on the front/top piece of your chipboard.


Christmas Ornament/Christmas Tag
Step Three: Turn over the chipboard piece and place on the backside of your patterned paper.  I like to line my chipboard at the corner of the paper to conserve paper.


Christmas Ornament/Christmas Tag
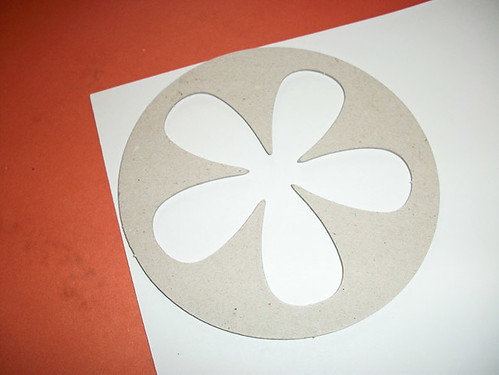
Step Four: Cut out the circle with regular scissors or your cutting blade.


Christmas Ornament/Christmas Tag
Step Five: Turn the chipboard over so that you can cut the flower shape from the patterned paper.


Christmas Ornament/Christmas Tag
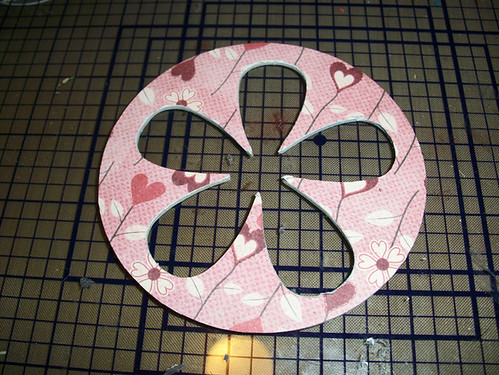
Step Six: This is how your chipboard piece will look after you cut out the middle.  Turn this piece over onto the red piece of cardstock.  You will use it as a template to trace out the flower.


Christmas Ornament/Christmas Tag

Christmas Ornament/Christmas Tag
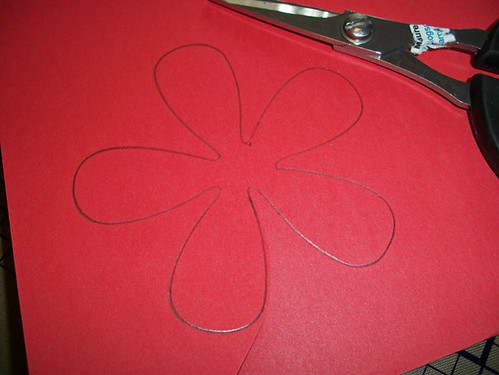
Step Seven: After tracing out the flower, cut the shape out, but be sure to allow some space (about two millimeters) between your penciled line and your actual cut (the template is smaller than the actual flower).  This way, the flower will fit on the chipboard flower you set aside earlier.


Christmas Ornament/Christmas Tag
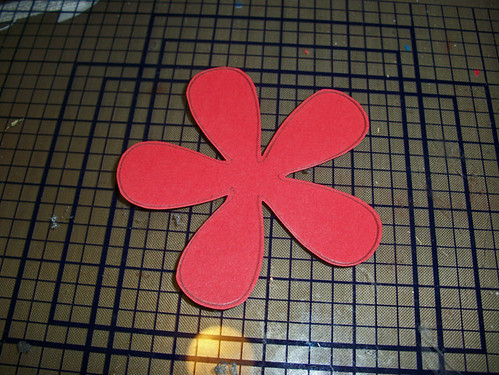
Step Eight: Turn your flower over after cutting so that you do not see the penciled outline.  Place glue on your flower and adhere the red cardstock flower onto the chipboard flower.


Christmas Ornament/Christmas Tag
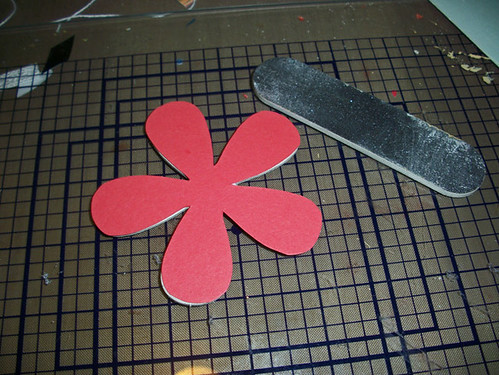
Step Nine: Sand the edges if needed.


Christmas Ornament/Christmas Tag
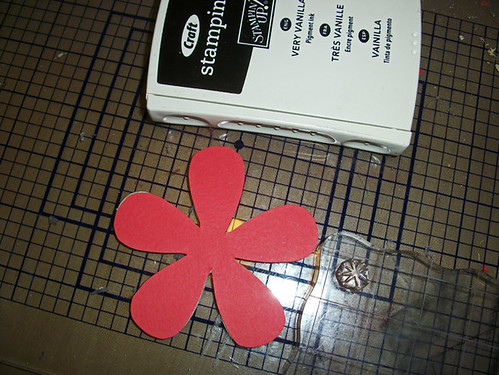
Step Ten: Ink up your stamp with white craft ink, watermark ink, or embossing ink. (Note: I used craft ink but after heat setting, I prefer watermark ink or embossing ink because it holds the glitter better.) Stamp several times, covering the flower. You won’t need to stamp the middle of your flower because this area will be covered later.


Christmas Ornament/Christmas Tag
Step 11: Add glitter and heat set with your heat gun.
Step 12: Ink the edges of the chipboard flower. Also, ink the outside edges of the chipboard circle (photo not shown).


Christmas Ornament/Christmas Tag

Christmas Ornament/Christmas Tag
Step 13: Place glue on the back side of the outside/circle piece of chipboard and glue down onto a piece of blue cardstock.  Cut out the chipboard circle with a pair of scissors or cutting blade.


Christmas Ornament/Christmas Tag
Step 14: Using a Crop-a-Dile, punch a hole through the center of the red chipboard flower and insert the button.  (The button I used had prongs. You may skip this step if the button you use is flat.)  Add some glue to the ends of the flower petals (on your red chipboard flower) and adhere to the circle piece as shown in photo.


Christmas Ornament/Christmas Tag
Step 15: Add the pearl and trinket pin (insert carefully behind your flower).  Punch a hole at the top of the tag and tie on some twine.  Because the back of your tag is covered with paper, you can write your greeting back there.  Your ornament is ready!

Hope you enjoyed that tutorial!  You can see on THIS POST how I used it as a gift tag!


Tuesday, November 25, 2008

November Project of the Month: Super Quick Cards

I got this "quick card" idea when I attended a Stampin' Up! event last year. One of the great things about being a Stampin' Up! Demonstrator is being able to attend these events and swap cards with everyone! You leave with such inspiration and excitement!. But I have to apologize because I do not remember who I learned this technique from. It was one of the demonstrator booths at the event (when I do find out, I will post her name).
Supply List
Supplies Stampin' Up! unless otherwise noted

Stamp Sets:
Wanted 109395
Pocket Silhouettes 111672
Boho Backgrounds 111072
Upsy Daisy 111710

Cardstock:
Whisper White 100730

Ink:
Versamark Pad 102283

Accessories:
Sponge Daubers 102892
On Board Essentials 112085
Non-Smear Pastels by The Stencil Collection
*Stampin' Pastels 105542 blend better!

I knew I wanted to make some card packs to give to my friends last year and so I made these cards! It went pretty quick. I think it only took me a couple of hours to make about 80 cards!
I think Birthday and Thank You cards are most popular.

The best way to go about it is to decide how many cards you want in a pack. I think 3 are sufficient to give in a package. Design 3 cards which are simple. It is best to choose solid images which will pick up the color of the chalk.

You stamp your image with a watermark ink or Versamark Pad, then take a sponge dauber and chalk/pastels to rub the color on. The chalk sticks to the Versamark ink!

The stamp image I used here is in between an outlined image and solid image. It worked out well. But when you compare this to the other card with the horse, I actually like the horse image better because it is more solid.

As you can see on the video, I use a chipboard frame to "frame" the image. You could also use the left over negative space from your chipboard packs to use as stencils! Or, you could just not use a stencil and just rub the chalk on (as I did with the next card with the horse)....the effect is still very nice! I did this with the sentiment "friend to friend". I just took my chalk and rubbed it on in a circular motion over the words.


Here you see the horse card which I am so very fond of. I didn't use any stencils for the second card.....just rubbed on the chalk.


Here's a closer look the the horse image. I think the dark and bright colors look very nice against the white cardstock!


Chalk is very forgiving......it doesn't take a lot of know how to use it....you just rub it on!
I think I'll be giving these away again this year :)


I packaged them in medium sized cellophane bags 102757 with the envelopes and tied them with ribbon. You could also use raffia. You could choose to not use a cellophane bag and just tie ribbon around the 3 cards and envelops and it looks just as nice!


Stamp something inside if you wish. You can use dye ink or the same technique with Versamark ink and chalk.

People have told me how these cards have come in handy!
They're very inexpensive to make too!
Thanks for coming by my blog!
Happy Thanksgiving
and
Happy Stamping!
below is the YouTube video on this card


Here are some recommendations of Holiday Stamp Sets fthat would work well for this project:
1) Spotlight on Christmas 111694 p. 33 IBC (Idea Book & Catalog)
2) Season of Joy 110384 p. 34 IBC
3) Holiday Trinkets 111650 p. 35 IBC
4) Two Cool Dudes 111708 p. 41 IBC
5) A Holly, Jolly Christmas 111558 p. 41
6) Shalom Sayings 111686 p. 44 IBC
7) Happy Kwanzaa 111640 p. 45 IBC
8) Best Wishes & More 111602 p. 55 IBC
9) Season of Simple Grace 111778 p. 16 HMC (Holiday Mini Catalog)
Click on the catalogs below to download them!


2008/2009 IDEA BOOK AND CATALOG (IBC)


HOLIDAY MINI CATALOG (HMC)

BLOGWEAR