Showing posts with label Heat Embossing. Show all posts
Thursday, January 2, 2014
Fall Card - Handmade Burlap Flower
I love the traditional colors of fall but sometimes, the color palette needs a nice POP! Here I chose to use some bright blue card stock and a decorated chipboard frame.
There's lots of texture in this card...twine, ribbon, heat embossed crackles, and burlap.
The handmade flower was created using burlap which I glued to some card stock. I simply hand cut all the "circles" and stacked them together for that purposefully imperfect look!
The papers are by Nikki Sivils created for an event at Scrapbook News and Review a couple years ago.
Hope you enjoyed! May your new year be filled with health, peace, love, happiness, and joy!
Sunday, July 31, 2011
Fun shares and a special announcement!
I hope you all are well. As the summer wraps up, I'll be able to visit my bloggy buddies more! So sorry for being MIA! I'm just trying to keep my head above water at this point!
It's been a fun ride with Scrapbook News and Review and I have been expanding my talents, learning new things, and having fun creating and enjoying my scrappy time! I've been immersed in it!
The May issue of SNR featured the following projects I now can share! They are two of my favorite creations so far.
The above digi layout might just be my most fave one. I enjoyed creating it. I employed lots of "stitching" into the design. Digi has so many options I tell you! I scrapped about my 35th birthday dinner at my favorite Korean restaurant. My mouth is watering just thinking of it right now!
I used Instagram (on my iPhone) for the photo effects. Yes, it's very addicting!
Next up, a card. Lots of stamping goodness here!
I just love how your work pops off a black background. It's so classic!
I stamped my image a few times and embossed, inked, and blinged it all out for your viewing pleasure!
And now for the EXCITING news! This is the reason I've been MIA for soooooo stinkin' long! Scrapbook News and Review is featuring a summer's worth of exciting creations from the SNR staffers! You will NOT WANT TO MISS IT! Every week, there will be at least one manufacturer showcased!
You've GOT to see the list of the manufacturers featured in PART 1! Here, lemme throw a couple out there for you.....CRATE PAPER.....COSMO CRICKET.....
Want to hear more? Well, lemme help you out....
check out SNR's home page for more info and return frequently to catch the lastest news!
Hugs,
Mo
Saturday, October 16, 2010
stamps + scraps = CARDS!
With October, comes busy busy busy! There's brithdays, babies, school functions, decorating...WOW! No time!!! But I managed to make some time for some fun cardmaking!
I love making chunky, busy cards!
Callista, can you see some goodies from that box of treasures you gave me?
I've got more things I've made...you'll see!!!!
I've got a new niece. Stay tuned for photos!
I can't stop using grids in my creations.
Today I've designed two DT layouts for AAM and the Ninja's using a grid....
he he....but you can't see them yet!
Have you made any cards lately?
Hugs,
Mo
Friday, January 29, 2010
The Journey
Hello my friends! Thanks for visiting me today!
I've got another layout to share!
Some of you might know I've been scrappin' up a storm lately.
I used the September 2009 Simply Obsessed Kit (the one I've been hoarding) for this layout. I LOVE this kit because of all the BEAUTIFUL Bo Bunny printed papers! I love all these colors together!
I also played with my stamps and Distressing Inks as well as some gold UTEE!!! Soooo fun! I took my stamp and inked up the trunk of the tree with Vintage Photo, the leaves with that green ink (can't remember what it's called), and touched the edges of the leaves with broken china. Didn't it turn out awesome? I then went in with my glittery stickles and placed dots here and there....too bad you can't see this IRL...the tree is pretty blingy!
I then took a piece of scrap white cardstock and inked it up with some more distressing ink (fired brick). Next, I inked up my stamp with embossing ink and sprinkled the gold UTEE on it and quickly heat embossed it. Because I used the Ultra Think Embossing Enamel, the effect is different and there was some beading...which is what I wanted. The stamped image becomes distorted, but I love the feel of it after it's done!
I used the current prompt at Scrap That Poetry using the poem "Stopping by Woods on a Snowy Evening" by Robert Frost. The journaling consists of part of this poem:
"The woods are lovely, dark and deep. But I have promises to keep. And miles to go before I sleep, And miles to go before I sleep."
This layout expresses the long journey through life. I know how lucky I am to share it with these three. I am truly blessed. Even though family a joy, it is also a sacrifice. Like many of you, there are other things in life I have to spend less or no time doing/experiencing (scrapbooking, going to movies/hanging out, freedom to make decisions that affect only one person, spending money freely, going on trips...partying...etc). But the sacrifice is well worth it all. I cannot imagine life without these three. We are all on a the journey called life and I am honored to be a part of theirs. I love The Ogre and my Monsters!!!! He he....
Oh! I wanted to mention also that I recently got this idea of hand cutting your own scallop border from one of the JSYS Challenges at Scrap Freak! I've used it lots of times in the last week or so...on cards....on a few layouts and I LOVE how IMPERFECT it looks!!!! Can you see it in the photo above? So fun!
Okay, I've started on a mini book for my Mom for Valentines Day...I don't think she reads my blog...so I'll tell YOU! I'll be sharing some pages as I go but I've got a stretch of 4 more days to work before I have a couple days of scrap time at home! I'll work on the MOTW post for Sunday! See you then...maybe sooner if Mommyhood doesn't tire me out too much over the weekend!
Hugs,
Mo
Thursday, May 14, 2009
Meeting Minnie Mouse
Okay, here's yet ANOTHER project I finished during the Vintage Plum Crop which took place over the weekend of May 2nd and 3rd! For this challenge, proposed by Stace, we were supposed to use up our stash (buttons, ink paper, etc)...for the Stash Challenge. CLICK HERE for details on the challenge and to see Stace's awesome LO!
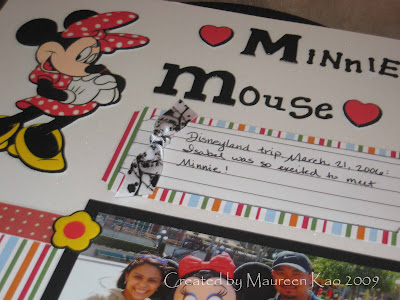
I used this Minnie Mouse poofy sticker I've been saving for scrapbooking our Disneyland Trip in 2006. Isabel was about 3 1/2 and Luke and I thought she would have an awesome time at Disneyland. And, I didn't know it yet, but I had a bun in the oven!!! Yup, no wonder I was eating anything and everything during the trip (I usually eat like a bird). A few months later, my little Gabriel was born!

I cannot believe how many projects I finished! If you spend a lot of time designing, how bout trying these challenges to speed up the process! I completed 6 PROJECTS IN ONE DAY! Let me tell you, it was soooooooooo relaxing and gratifying! Crop alone or gather up some friends! Either way, you'll have a blast! But.....you might get more done alone....he he!


Too bad my little Belly Bel was looking away! She was all decked out in her Minnie Mouse ears!
I have a BUNCH of patterned chipboard letters but NONE OF THEM matched this layout! But it was an easy fix! I just used some embossing powder in black to color my letters!
If you're not quite sure how to do this, here's some directions:
1) Place your letter, front side down into a Versamark pad. (It helps to use some tweezers to handle your letter.) Make sure the whole letter is coated.
2) Sprinkle some black embossing powder over your letter.
3) Heat set with a heating tool.
4) Press your letter into your Versamark pad again.
5) Sprinkle a second coat of black embossing powder and heat set. Let dry.

I cannot believe how many projects I finished! If you spend a lot of time designing, how bout trying these challenges to speed up the process! I completed 6 PROJECTS IN ONE DAY! Let me tell you, it was soooooooooo relaxing and gratifying! Crop alone or gather up some friends! Either way, you'll have a blast! But.....you might get more done alone....he he!

Now let's talk about Stace! She's one of the Vintage Plum Design Team Members and she's got oodles of talent! Check out her blog:
Random ramblings of a wife, mother and scrapper.
Saturday, January 31, 2009
HaraJuku Lovers Perfume......LOVE......and a card!
This bottle is called "Love"....and it comes from a line called HaraJuku Lovers by Gwen Stefani. (Check out the cool website link.....and the super cute video). This specific sent is said to be a "sensuous floral". There are five different scents....(what a great strategy to get you to buy!)! Anyway, the bottles resemble Gwen Stefani and her HaraJuku girls. The website talks about the different fragrances....check it out. It's like collection of little dolls!!!!!! What is HaraJuku? It's the name of the fashion or style.....from Harajuku, Japan. Very cool, VERY different.....and CUTE CUTE CUTE!
So what is the whole point of this?????? I just wanted to say that my adorable bottle of perfume inspired a card creation that I wanted to share!!!!!! Not my usual cardmaking style....which was great! It's hard for me to get out of my crafting comfort zone and doing something different. It was so much fun!
Here is my cute little HaraJuku girl next to my fun card! I think I will be on the prowl for new perfume bottles to inspire my cardmaking! I'm on a mission! I would LOVE to see other creations inspired by this post!!!!! Just email me or leave a comment with a link to your post/photo!!!!!
Wednesday, November 12, 2008
KWerner Design Blog Color Inspiration 30
(all Stampin' Up! unless otherwise noted)
Stamps
Best Yet 111604
Eastern Blooms 111626
Ink
Old Olive Craft Ink
Old Olive Craft Ink
Versamark (watermark ink)
Colorbox Ink in Dune (for Sahara Sand)
Paper
Old Olive
Certainly Celery
Whisper White
Acessories
Hodgepodge Hardware
Certainly Celery Grosgrain Ribbon
White Paper Flowers (I think they are Making Memories)
Heat and Stick Powder
Scallop Edge Punch
Stampin' Dimensionals
I used craft ink so that I could stamp the large flower image and "to you from me" and emboss it using the heat and stick powder. I popped up the lower old olive section of cardstock with Stampin' Dimensionals (with whisper white scallop edge adhered to it).
I also stamped a smaller flower in Versamark ink so I could emboss it again with Heat n' Stick powder. I stacked the three flowers on top of each other and mounted it onto the card with Stampin' Dimensionals.
I wanted to add some old olive flowers, so I again used the craft ink and pressed some small white paper flowers in it to color them!
I wanted a slightly distressed look so I used my Colorbox pigment ink in Dune to ink the edges! You definitely would need pigment ink for this project since I'm using them to emboss and ink on dark cardstock (dye ink does not do this)!
Please leave any comments or questions! I LOVE to hear from other crafters! Now I'm super excited because I can peek at the other submissions (I reward myself in the end by allowing myself to look at the other CI entries.)......he he he.....
Happy Stamping!
Subscribe to:
Posts (Atom)