
Lesson 1: Using Circles to Create a Filmstrip and Dimensional Flower

Alphabet stickers (for title)
Chipboard button and ribbon/twine (or something else to use for a flower center)
Circles punches: 1”, 1.5”, 2.75” (use similar sized punches or use circle templates
Crop-A-Dile which has a 3/16” punch OR standard size hole punch - 0.25”
Filmstrip templates (provided for this class)
Glue stick (recommended) or other adhesive
Hot glue gun (or very strong glue)
Journaling pen
Patterned paper
Pen or pencil
Printer (If you don’t have one, I’ll show you how to create a filmstrip without a printer.)
Ribbon, trim or twine
Scrap paper
Solid card stock in carious colors
If not using filmstrip template (ie: no printer), you will need black cardstock, white
card stock and a standard sized hole punch (see “alternative filmstrip” tutorial)
Doily (optional)
Foam dots/squares (optional)
Journaling sticker (optional)
Heating tool (optional)
Mist (optional)
Vellum (optional)
You can also view this tutorial on YouTube HERE!


Step One: Print out the filmstrip template on 8.5” x 11” white card stock. If NOT using template (you don’t have a printer), refer to the “Alternative Filmstrip” tutorial. Cut out both filmstrips. If needed, cut your photos down to size so that they fit inside the filmstrip. (There will be slight measurement variations depending on your printer so measure the height of the white strip to determine the measurement for your photo’s height to be able to fit inside the filmstrip.) You can leave the filmstrip holes alone or punch them out with either a standard sized hole punch or a Crop-A-Dile. Use the proper filmstrip template that corresponds to the hole punch you are using.
To put together a continuous filmstrip measuring 12” across, you will glue the two pieces so that they overlap in the middle. Add glue to the areas of the two filmstrip pieces that overlap to create a long filmstrip piece. Make sure the holes match up when they overlap. Also, the filmstrip should be slightly longer than 12” (if you’ve punched holes in your filmstrip). You will cut off the excess later. Glue your photos to the strip. Set aside your filmstrip.


Step Three: To create the dimensional flower, use the 2.75” punch to punch a circle from scrap cardstock. Take a 1.5” punch and punch out six circles from patterned or solid cardstock for use as flower petals. Take a 1.5” circle and place the pen/pencil in the middle. Fold the ends upward so that the circle folds into a taco. This will create a dip in the middle of your circle. Next, position your pen so that it runs perpendicular to the middle fold you just made. Curl the edge of the circle over the pen/pencil and curl the edge under. These steps will add texture to your flower petals. Do this for all six 1.5” circles.


Step Four: Add glue to the middle of the 2.75” circle. Take the 1.5” circles and glue them on the outside edges of the large circle. Make sure the curled edges are positioned outward before gluing them down onto the large circle. Glue the 1.5” all around the large 2.75” circle so that it looks like flower petals. Flip the flower over to assist your in repositioning the petals evenly. Use firm pressure with your fingers to slide the petals so that they are evenly spaced around the large circle. Once you’re happy with the placement of the petals. Press down firmly on the middle of the flower. Set aside.


Step Five: Punch a 1.5” circle from scrap paper. Punch out six 1” circles to use as petals. Add glue to the middle of the 1.5” circle. Add texture to the 1” flower petals with a pen/pencil as explained in Step Four. Glue the flower petals to the 1.5” circle. Re-position petals if needed.
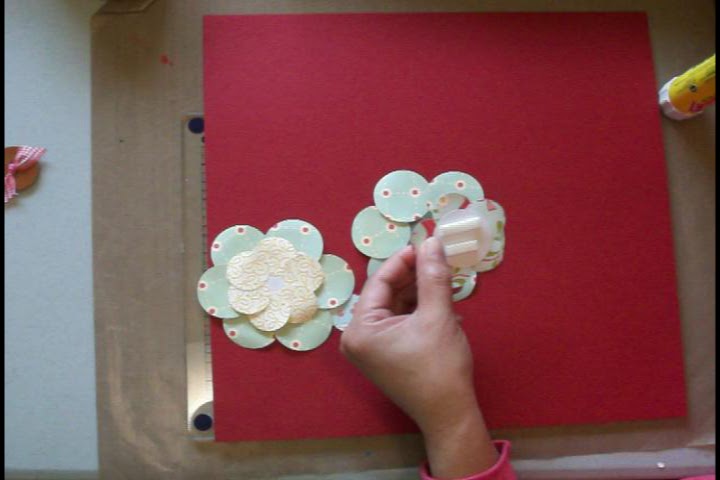


Step Six: Glue the smaller flower to the larger flower you created in Step Four. For added dimension, use adhesive foam. Press firmly around the flower so that all layers are secure. Add a flower center to your dimensional flower. I used a chipboard button and tied a ribbon in the middle of it to create one. If you do not have a pre-made chipboard button, follow instructions below.
To create a faux button/flower center: Punch a 1” circle from some coordinating card stock. Punch two smaller holes in the center with either a standard sized hole punch or a Crop-A-Dile. Tie some twine or ribbon through the holes. Add to the center of the flower you just created.

Step Seven: Position the doily pieces as shown in the sketch. Glue them down. Glue down the filmstrip and your photos and trim the overhanging edge if you have one. Glue on the dimensional flower to the top left hand corner of the layout.
All Aboard by Maureen Esquillo-Kao Supplies Cardstock: Recollections; Patterned Paper: Cosmo Cricket; Alphabet Stickers: American Crafts, Jenni Bowlin; Journaling Sticker: Jenni Bowlin; Mist: Maya Road; Circle Punches: EK Success, Fiskars; Other: Chipboard button, ribbon, doily, bingo piece, vellum; Filmstrip Template created by Maureen Esquillo-KaoStep Eight: Add your title to the top left hand corner, next to the flower. Add journaling to the bottom right hand corner of your layout. You may have a place to journal on in the center of the doily. Add a journaling sticker if more journaling space is needed. Embellish your layout further if you desire. Now it’s complete! To create a filmstrip photo mat, here's a tutorial:
HERE'S A FREE PRINTABLE TEMPLATE TOO
Enjoy, and thanks for watching!   |


